Alcohol Marker Marbling

by Audrie Magno-Gordon

Use alcohol markers to create a marbled background on glossy cardstock.

Supplies

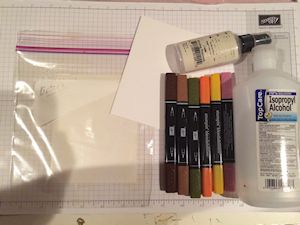
  • Alcohol markers (Blendabilities Markers by Stampin' Up! used here)

  • Rubbing alcohol or colorless blending ink intended for alcohol markers in a spray bottle (safety note: Ranger Blending Solution and alcohol inks contain resins and should not be sprayed)

  • Glossy cardstock cut to 4 1/4" x 5 1/2"

  • Quarter sheet of text weight paper for a template

  • Ziploc-type plastic bag (empty and sealed closed) or other non-porous surface, such as a craft sheet or ceramic tile

Step-by-Step

  1. Step 1

    Using a tiny bit of removable tape, secure a quarter sheet of paper to your work surface. This will serve as a template. Cover the template with a Ziploc bag. Use removable tape to secure the bag so it doesn't move.

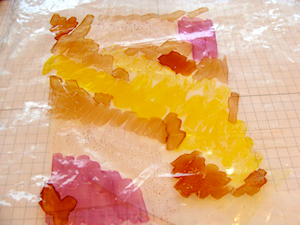
    Begin coloring with alcohol markers directly onto the bag, covering a space equal to the size of the template.

  2. Step 2

    Use a variety of markers randomly on the bag. No need to blend them, just scribble them on side-by-side very randomly.
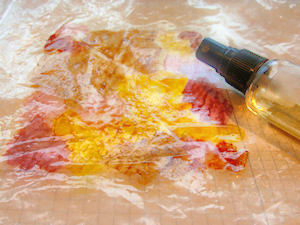
  3. Step 3

    Spritz the bag with rubbing alcohol until the inks appears to be wet, and droplets of the liquid are visible on top. You will notice that the edges of the colors will start to blend.
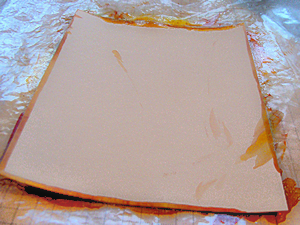
  4. Step 4

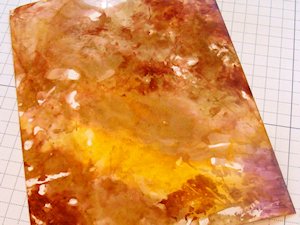
    Place glossy cardstock glossy side down onto the wet ink. Press the cardstock onto the ink for a few seconds then lift it up to reveal your background.

  5. Use the print as is or repeat this step to add layers of color or fill in missed areas. Mist the inked work surface as needed to revive colors with alcohol.

  6. Step 5

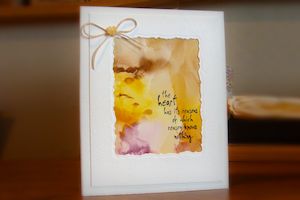
    Use the background to complete a card front or scrapbook page.

Video!

Variations

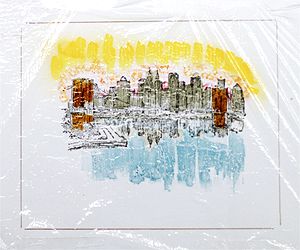
  1. Plan your coloring to complete a scene. For an impressionistic look to any favorite landscape or nature image, stamp the image onto your work surface underneath the plastic, use that image as a guide for color placement.

  2. Spritz a large stamp with rubbing alcohol and lay a completed background panel onto the stamp. An impression of the stamp will appear in your marbled background. Wash the stamp promptly to remove alcohol residue.

    A similar look can be achieved by spritzing alcohol through a stencil over a completed background.
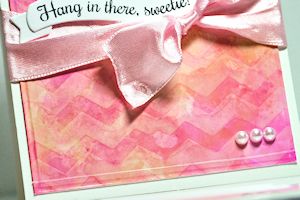
Your Turn

You've seen the tutorial, now you try it! We've got a section of the gallery set aside for Alcohol Marker Marbling. Try this technique, then upload your artwork to the gallery. Show us your creations!

***Please note - Internet Explorer/Edge is not a supported browser, and will not allow you to see the videos. Please use Chrome, Firefox or Safari to view our tutorial videos.

Questions and Comments

We'd love to get your feedback or questions. Leave your comment below.

Fun technique! I use ranger alcohol ink card stock and it works perfectly. The pieces are precut 4 1/4 x 5 1/2. I tried glossy photo paper a long time ago and it doesn't work. It grabs the color too quickly and doesn't allow you to slide or move ink.
muscrat  |  Wed Sep 24, 2014 at 8:52 AM
What good teaching. thank you and yes, I will try this.
Beverly Parkison  |  Wed Sep 24, 2014 at 9:03 AM
Beautiful technique = beautiful cards. Great teaching and I love your confidence.
Karen Erwin  |  Wed Sep 24, 2014 at 9:05 AM
I love your teaching style and your art Audrie. You are awesome!
lydia  |  Wed Sep 24, 2014 at 9:32 AM
I am in awe of this amazing technique. Thank you, Audrie, for showing it so clearly, along with so many different color samples and card ideas. Today is stamping day for me (Lucky me!) and I'm going to give this a try! Thanks so much!
Barbara Joyce  |  Wed Sep 24, 2014 at 9:37 AM
Audrie, this looks like so much fun to do and I love the finished product. What a unique technique. Thank you for finding a new way to use our alcohol markers.
hope  |  Wed Sep 24, 2014 at 10:38 AM
Really enjoyed the video and seeing how you used the technique on your cards....neat!
BevJ.  |  Wed Sep 24, 2014 at 11:20 AM
Please tell me where I can get the die you used to make the frame.
I love the tutorial. Thank You.
Veronica  |  Wed Sep 24, 2014 at 12:02 PM
I am so impressed with the simplicity of this technique. I look forward to making my own backgrounds using the Blendabilities Markers. Thank you so much!
Carol Moncrief  |  Wed Sep 24, 2014 at 3:28 PM
Just watched this fantastic technique on youtube. I can't wait to try it.
Benzi  |  Wed Sep 24, 2014 at 3:57 PM
I just loved the one with the sea birds. Super good job! I was wondering where or what is the square die used to make the ragged edge that framed your work. Very nice!
Hugs, Bev
Bevie Mortimer  |  Wed Sep 24, 2014 at 4:32 PM
This may be the die you are looking for.
http://scrapmaniaonline.com/item_5329/Spellbinders-Nestabilities-A2-Card-Creator-Dies-Distressed-Edges.htm
Lynn Wynn  |  Wed Sep 24, 2014 at 5:35 PM
Or this one looks closer to the size and shape of the image above.
http://www.spellbinderspaperarts.com/products/p-214-deckled-rectangles-lg.aspx
Lynn Wynn  |  Wed Sep 24, 2014 at 5:42 PM
So awesome. I really loved the tutorial and the wonderful examples.
Vicki-Joy  |  Wed Sep 24, 2014 at 6:09 PM
Such an awesome technique. Thanks for sharing your time and talent. Lovely cards.
Randa  |  Wed Sep 24, 2014 at 8:16 PM
Audrie, I'm just popping in again to tell you that I did try your technique, and it worked great! I can't post my work right now, because I'm saving it for the Hope You Can Cling To Challenges in October, but I have a beautiful pink and white marbled background ready to go, with more to come. So Thanks again!
Barbara Joyce  |  Wed Sep 24, 2014 at 8:49 PM
An absolutely fabulous technique, wonderful instruction, and even a terrific mini-grammar lesson to boot: LOVED it!
Sue Speck  |  Wed Sep 24, 2014 at 9:25 PM
Big thanks to Linda Standart for her warning. I suppose in that case you can spindle it on with your hands. And, I agree with Linda - Photo Paper won't be a good substitute. The product should be "glossy cardstock" and many crafting stores carry under multiple brand names. Thanks to everyone for your wonderful comments! Hugs, Audrie
Audrie Magno  |  Thu Sep 25, 2014 at 12:25 AM
Thanks everyone for your delightful comments that made my day-smiles! Also thanks Linda (for both of your comments). I also agree Photo Paper won't work - look for packaging that says "Glossy Card Stock". BIG HUGS, Audrie
Audrie Magno  |  Thu Sep 25, 2014 at 12:29 AM
Oh, what a wonderful technique. I found that just coloring with the Blendabilities is not really for me but I'm definitely going to try this. Such gorgeous results!
Eveline.
Eveline van Heijst  |  Thu Sep 25, 2014 at 1:16 AM

Page 2 of 4 pages  <  1 2 3 4 >

You need to be logged in to comment

GET OUR NEWSLETTER


Splitcoaststampers's privacy policy