Tri-Shutter Card

by Bonnie Szwalkiewicz

Special occasions call for special cards. This one will fit the bill!

Supplies

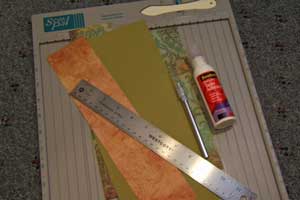
  • One 5 1/2" x 12" piece of Cardstock
  • Scor-Pal™ or other scoring tool
  • Paper Cutter
  • Patterned Paper
  • Bone Folder
  • Craft Knife
  • Ruler
  • Adhesive

Step-by-Step

  1. Step 1

    Place 5 ½” x 12" piece of cardstock horizontally in your Scor-Pal.

    Score at 2”, 4”, 8” and 10”.
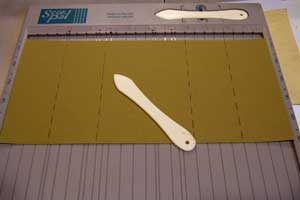
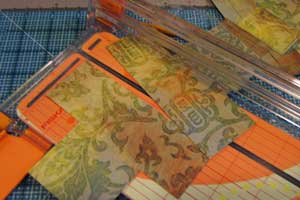
  2. Step 2

    Turn cardstock a ¼ turn.

    Along the long edge, measure in 1 ½” .

    Make a slit with a craft knife between the score marks at 2” and 10”. Repeat on the other long side.
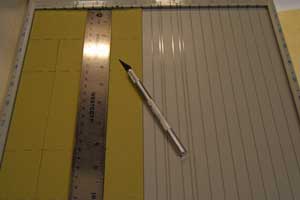
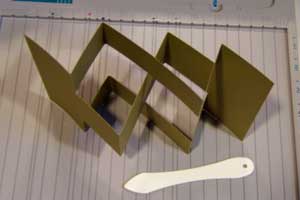
  3. Step 3

    Fold card as pictured.

  4. Step 4

    Using card base as a template, trace the section with the T-shaped fold onto patterned paper.

    Cut two of this shape.
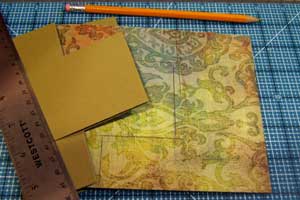
  5. Step 5

    Trim 1/16” from all sides of patterned paper.

  6. Step 6

    Cut 4 pieces of patterned paper 1-3/8" x 1-7/8" .

    Cut 2 pieces of patterned paper 1 3/8” x 3 7/8”.

    Cut 1 piece of patterned paper 2 3/8” x 3 7/8”.

    Dry fit all of the pieces, then adhere to card base.
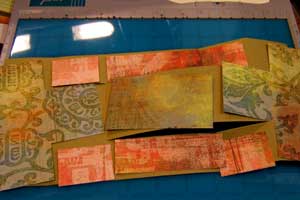
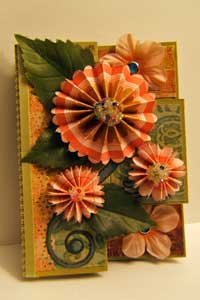
  7. Step 7

    Now that the basic Tri-Shutter card is complete, go forth! Embellish & decorate.

    If you are interested on how the Fan Fold Flowers were created, check this tutorial.

  8. View of the card closed.

Video!

Variations

    To use 8 1/2" x 11" cardstock:
    Trim cardstock to 5" x 10 1/2".
    Score at 1 3/4", 3 1/2", 7" and 8 3/4". Cut your lines horizontally at 1 1/2" and 3 1/2" from the first to the last score line.You will end up with a card that measures 3 1/2″ × 5″.

Your Turn

You've seen the tutorial, now you try it! We've got a section of the gallery set aside for Tri-Shutter Card. Try this technique, then upload your artwork to the gallery. Show us your creations!

***Please note - Internet Explorer/Edge is not a supported browser, and will not allow you to see the videos. Please use Chrome, Firefox or Safari to view our tutorial videos.

Questions and Comments

We'd love to get your feedback or questions. Leave your comment below.

made the card last night...neat!
did notice a mistake on step 6..should be 2 pieces 1 3/8" x 3 7/8" , not 1 7/8" x 3 7/8"
Mary Lou  |  Thu Jul 30, 2009 at 6:26 AM
Thanks for a great tutorial! I cannot wait to try this.
Beth  |  Thu Jul 30, 2009 at 11:56 AM
Thank you for posting the video -- the card seems much easier to do now!

I Love Beate!!!! She is such a great demo!
Sharon Scalzi  |  Thu Jul 30, 2009 at 6:42 PM
I have already made two of these cards and posted them on my gallery (cotdsffs). It was fun to see this card again and the video tutorial. If you go to Bonnie's websire, she shows not only the full front card version, but another version where the folds with cuts begin at the 6" mark (you have to see it to get the idea)!. So there are three versions of this card and all are totally awesome!!!
Joy Moss  |  Thu Jul 30, 2009 at 7:14 PM
Quick update--the last version I tell you about in my first post is sized 5.5" x 11". Bonnie, if you'd post the score marks on that one, I'd be grateful! (I wondered why my test sample was kind of off. I didn't realize it was 11" versus 12" long. lol :D )
Joy Moss  |  Thu Jul 30, 2009 at 7:18 PM
ohhhhhhhhhhh This is SO PRETTY! I love the details and it looks easier to do than I thought- I will have to try this.
lexgabella  |  Fri Jul 31, 2009 at 2:18 PM
Thanks for sharing Will be watching you!!!
Olive  |  Sat Aug 1, 2009 at 1:24 AM
Hi, Bonnie -- I just made the tri-shutter card using your tutorial. I love it! Your instructions for making the card and the adorable flowers were wonderful. Thanks for taking the time to share!
Donna Parshall  |  Sat Aug 1, 2009 at 2:53 PM
Beate, I just found the card to make for my step=mother for her birthday! Something new to try!! Beautiful card to say the least!
Sunshine547580  |  Sat Aug 1, 2009 at 7:47 PM
Thanks so much for the tutorial. I had a lot of fun making one of these as a Thanksgiving card.
Brenda B  |  Sun Aug 2, 2009 at 8:04 AM
Absolutely wonderful! Thanks for taking the time to make this fabulous tutorial and the you tube video. Love it!
Cathy-ScrappinCat!  |  Sun Aug 2, 2009 at 6:21 PM
I love this card, very beautiful and a great job on the tutorial. Very helpful.
Debi  |  Mon Aug 3, 2009 at 6:26 AM
Very clear and concise instructions, Bonnie. I don't have a Scor-pal, but from your measurements, I can use the scoring tool on my paper cutter.
Rebecca  |  Mon Aug 3, 2009 at 8:10 AM
I love making these cards. Discovered these on Fathers Day and my son (13) made one for his dad (with my direction).
Kathy  |  Tue Aug 4, 2009 at 11:13 AM
Your tri-shutter card is beautiful. New at this!
Are these cards for saling after we make our own design on card.
dottie  |  Wed Aug 5, 2009 at 5:10 PM
I am so glad for the videos with the tutorials. Some cards just looked too hard to do but with the video I think I wall be able to make some. Thanks!!
agnes Hewitt  |  Wed Aug 5, 2009 at 6:52 PM
I think there is a measurement error in step 6. I think it should be: "Cut 2 pieces 1&3/8 x 3&7/8", not 1&7/8 x 3&7/8. Just my two cents.
Jackie R.  |  Wed Aug 5, 2009 at 8:13 PM
I just loved the card and thanks so much for sharing the tutorial. I will be attempting to make this card, hope I can do it. I have been looking at cards similar to this one, so now I know how it's done. Many thanks again.
Cheers
Marree
Marree Scott  |  Fri Aug 7, 2009 at 10:32 PM
Precioso trabajo y tutorial. Me encanta que venga acompa�ado de video, es como tener una profesora particular, gracias.
Marimer  |  Mon Aug 10, 2009 at 8:30 AM
This card is gorgeous! Thank you for sharing your tutorial and awesome talent! smile
Sue @ McMahon Five Designs  |  Wed Aug 12, 2009 at 7:23 AM

Page 3 of 7 pages  <  1 2 3 4 5 >  Last »

You need to be logged in to comment

GET OUR NEWSLETTER


Splitcoaststampers's privacy policy