Tri-Shutter Card

by Bonnie Szwalkiewicz

Special occasions call for special cards. This one will fit the bill!

Supplies

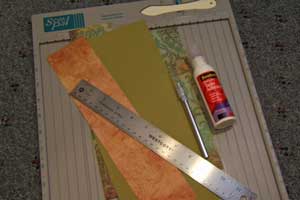
  • One 5 1/2" x 12" piece of Cardstock
  • Scor-Pal™ or other scoring tool
  • Paper Cutter
  • Patterned Paper
  • Bone Folder
  • Craft Knife
  • Ruler
  • Adhesive

Step-by-Step

  1. Step 1

    Place 5 ½” x 12" piece of cardstock horizontally in your Scor-Pal.

    Score at 2”, 4”, 8” and 10”.
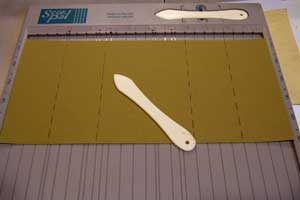
  2. Step 2

    Turn cardstock a ¼ turn.

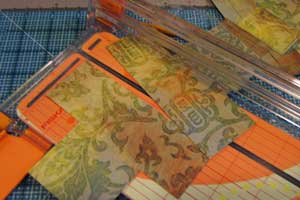
    Along the long edge, measure in 1 ½” .

    Make a slit with a craft knife between the score marks at 2” and 10”. Repeat on the other long side.
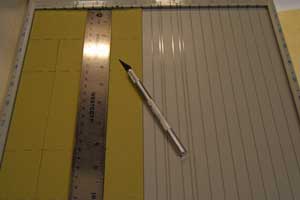
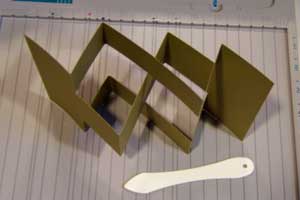
  3. Step 3

    Fold card as pictured.

  4. Step 4

    Using card base as a template, trace the section with the T-shaped fold onto patterned paper.

    Cut two of this shape.
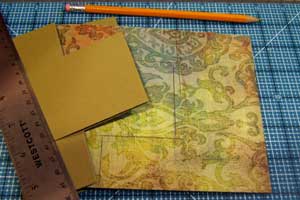
  5. Step 5

    Trim 1/16” from all sides of patterned paper.

  6. Step 6

    Cut 4 pieces of patterned paper 1-3/8" x 1-7/8" .

    Cut 2 pieces of patterned paper 1 3/8” x 3 7/8”.

    Cut 1 piece of patterned paper 2 3/8” x 3 7/8”.

    Dry fit all of the pieces, then adhere to card base.
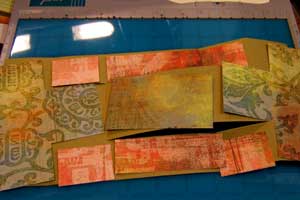
  7. Step 7

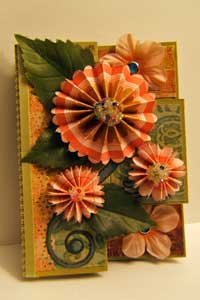
    Now that the basic Tri-Shutter card is complete, go forth! Embellish & decorate.

    If you are interested on how the Fan Fold Flowers were created, check this tutorial.

  8. View of the card closed.

Video!

Variations

    To use 8 1/2" x 11" cardstock:
    Trim cardstock to 5" x 10 1/2".
    Score at 1 3/4", 3 1/2", 7" and 8 3/4". Cut your lines horizontally at 1 1/2" and 3 1/2" from the first to the last score line.You will end up with a card that measures 3 1/2″ × 5″.

Your Turn

You've seen the tutorial, now you try it! We've got a section of the gallery set aside for Tri-Shutter Card. Try this technique, then upload your artwork to the gallery. Show us your creations!

***Please note - Internet Explorer/Edge is not a supported browser, and will not allow you to see the videos. Please use Chrome, Firefox or Safari to view our tutorial videos.

Questions and Comments

We'd love to get your feedback or questions. Leave your comment below.

This card is exceptional, a real eye-catcher.
Thanks for the tutorial,my stamp club members will love this!
Pammyjo  |  Wed Jul 29, 2009 at 7:15 AM
I am printing this tutorial as I type this...plan to try one of these "Tri-Shutter Cards" today and I think I am going to make it my "August Birthday Cards" to 3 brothers (who live in diff parts of the country), a neice and a friend who are all having August birthdays! That should give me some good practice...it's very interesting...Thank you!
Susanne  |  Wed Jul 29, 2009 at 7:23 AM
Thank you so very much for this tutorial! This is one of the most beautiful cards I've seen and you made it look easy to accomplish... it is the very next card I will try. The tutorial alone was easy to understand but the video was amazing and worth it. THANKS!
Elaine Sink  |  Wed Jul 29, 2009 at 7:24 AM
Thank you for doing this tutorial Bonnie and thank you Beate for doing this video. My son's birthday is in August and so is my grandson's so I can use this to make them a surprise card!

Wonderful work smile
Mary Broussard  |  Wed Jul 29, 2009 at 7:31 AM
I loved having the video. I didn't think I could do this card, but the video really helped. Thanks for adding it!
Brandi  |  Wed Jul 29, 2009 at 7:49 AM
Thank you for the wonderful tutorial and video!
It was nice to finally see this card made.
Vada made everything look so ease-peasy.
I especially enjoyed her little mistakes... it made everything more personally and intimate... like I was sitting at her kitchen table, coffee in hand and a great friend teaching me a new technique.
Thank you for sharing, Marilyn (aka mdewulf)
Marilyn DeWulf  |  Wed Jul 29, 2009 at 8:19 AM
Sorry Beate! As I get older, I guess my hearing is the first thing to go... ... Forgive me for not correctly identifying you on the video {puppy dog sad look}
Marilyn (aka mdewulf)
Marilyn DeWulf  |  Wed Jul 29, 2009 at 8:24 AM
Love this card.... I've been wanting to try it and now with the video tutorial, I'm gonna do it... thank you for sharing....
Ms Cookie  |  Wed Jul 29, 2009 at 8:45 AM
This is perfect for my mom's birthday! Thanks!
Juliet A  |  Wed Jul 29, 2009 at 9:11 AM
EXCELLENT!! Thanks!
jen del muro/genie1314`  |  Wed Jul 29, 2009 at 2:06 PM
OOOO, I have wanted to make one of these cards for a while. I always wondered what the dimensions were. This tutorial makes it loo easy enough to try! tfs
Mary  |  Wed Jul 29, 2009 at 3:37 PM
Beate....Bravo!!! love the video...More please!!!
Thank you so much for sharing.
Let us know when you are having a workshop...another neighbor of yours, glad you are here in Ohio!!!
Nancy  |  Wed Jul 29, 2009 at 3:37 PM
LOVE the tutorial thanks so much
momof5boys1girl  |  Wed Jul 29, 2009 at 3:43 PM
Thank you for such an informative tutorial. I hope you do lots and lots of them. You are quick and clear with directions. Yeah!
Sharyn  |  Wed Jul 29, 2009 at 3:44 PM
Thanks so much for the tutorial. I can clearly understand how to do it and am anxious to make some of these. Right now we are having a Heat Wave - 103 deg. - unusual for the Pacific NW and we are breaking records, so I'm not doing much. LOL
Marie Anderbery  |  Wed Jul 29, 2009 at 5:58 PM
Has anyone got the instructions/measurements to do this card from A4 Cardstock instead of having to cut into the 12x12?

Love the finished card here too. Inspired me to have a go at those nice flowers too.
Jennifer Montgomery  |  Wed Jul 29, 2009 at 6:40 PM
Having the video with the tutorial made this so easy to follow. Thanks for such a beautiful card. I just love your weekly newsletter as we do not get anything like it here in Canberra.
Cosie  |  Wed Jul 29, 2009 at 7:51 PM
LOVE this tutorial. Beautiful card and it looks so easy! Thanks for sharing!
Karen  |  Thu Jul 30, 2009 at 3:39 AM
Great tutorial. I love the shape of this card. I already made one and posted it in the gallery.
Thank you for the video. It makes making this card very clear.
Eveline.
Eveline van Heijst  |  Thu Jul 30, 2009 at 4:52 AM
I've been looking for something to make my daughter's wedding invitations special. She is being handfasted on October 31, 2009 (Samhain in our faith). She has not been able to make up her mind about what stamps to use. This design will allow me to incorporate all the elements she wants - a full moon and witch on the cover, pumpkins, etc. throughout. I cannot wait to get started designing. Thank you so very much for sharing you talent!! Brightest Blessings!
Leslie Mars  |  Thu Jul 30, 2009 at 6:10 AM

Page 2 of 7 pages  <  1 2 3 4 >  Last »

You need to be logged in to comment

GET OUR NEWSLETTER


Splitcoaststampers's privacy policy