Scherenschnitte (Scissor Cut) Stamping
by Melanie Schulenberg
Recreate the famous Scherenschnitte silhouette technique using rubberstamping supplies.
Supplies

- Stamps, Stampin' Up!'s Forest Friends used here
- Versamark™, or other embossing ink
- Clear Embossing Powder
- Heat Embossing Tool
- Black and light colored cardstock
- Scissors
- Adhesive
- Border Punch
- Die Cut Templates
Step-by-Step
-
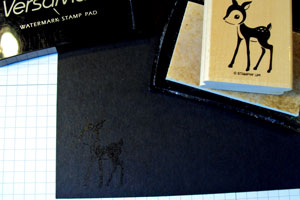
Step 1
Stamp your desired image with Versamark™ ink on to a scrap sheet of black cardstock.
-
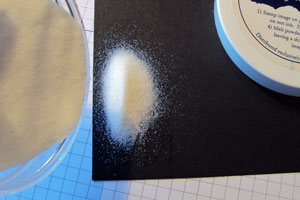
Step 2
Sprinkle clear embossing powder over image.
-
Step 3
Tap off excess embossing powder and heat set with your embossing tool.

-
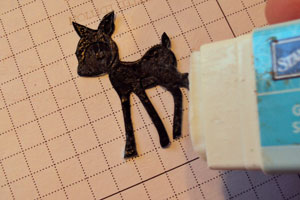
Step 4
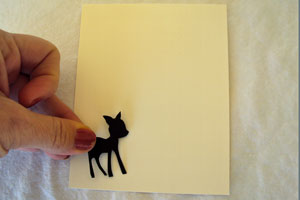
Remove extra cardstock so you have only your embossed image. Cut out your image.
Hint:
For detailed areas (like the legs of this fawn), trim the inner most cardstock first before removing the outer area. This will allow extra support for holding your image while trimming.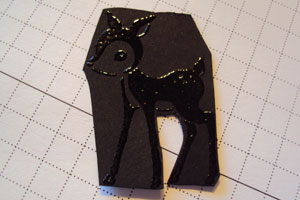
-
Step 5
Apply glue to the ‘glossy’ side of your heat-embossed image (the embossed side will be faced down on your card front).
-
Step 6
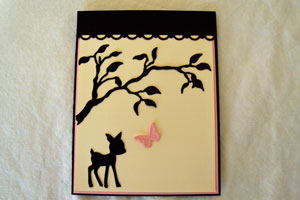
Adhere image to a neutral colored card front.
-
Step 7
Finish your card front by adding more stamped, punched or die cut images if neccessary.
Video!
Variations
-
Scherenschnitte stamping on neutral cardstock
Stamp your image in black ink on neutral cardstock. Color in your image with black marker.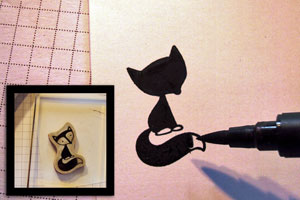
-
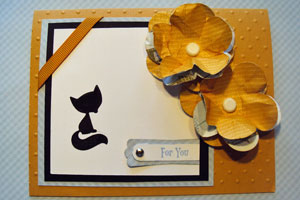
Finish your project.
Your Turn
You've seen the tutorial, now you try it! We've got a section of the gallery set aside for Scherenschnitte (Scissor Cut) Stamping. Try this technique, then upload your artwork to the gallery. Show us your creations!
***Please note - Internet Explorer/Edge is not a supported browser, and will not allow you to see the videos. Please use Chrome, Firefox or Safari to view our tutorial videos.

Questions and Comments
We'd love to get your feedback or questions. Leave your comment below.
Thank you! I have the mini catalogue. I must have forgot that I saw it...lol.
xoxo,
Lori
Thanks for the great tutorial and sharing this technique.
My example that didn't work was the grapes image from the sunripened II set. There is a big leaf that overlaps the top of the grape cluster. Once cut out and flipped over, it just didn't quite make sense...it needed the detail of the stamp. Hope that helps someone!
I am looking forward to trying this technique.
Scherenschnitte has always been one of my favorite paper cutting art forms. I am too chicken to attempt cutting it out the traditional way. Your technique makes me want to try. It also allows me to see the potential of my many stamp sets. Thanks for sharing.
Thanks for sharing. It's a thumbs up for me.
To clarify. It is very difficult to see the image if you stamp with black ink on black cardstock which is one of the reasons I opted to use Versamark.
The Versamark is used b/c it is more visible on the black cardstock. The shine it creates allows you to see the image more clearly, allowing you to find the detialed images.
The image was embossed to help prevent smearing of the VM and it was an additional aid to guide my snips around the image. It does also provide extra stability (esp. for thin cuts like the legs of the fawn).
You can choose to attach the cut out to your card with the embossed side up, but generally, silhouette images are 'dull', as in no shine, no gloss. It's that simplicity makes them so much more beautiful. Having glossy side up just makes it look like an embossed piece of cardstock. You can also still see the detials of the stamped image when you do this, i.e. I could still see the eye and chest detail of the fawn even embossed.
The dye pad and pen method is GREAT for those more detailed stamps, like the green card I've created with the bird sitting on the branch. One thing to remember when doing this method. You'll have to go over your stamped images with the marker as well as fill in the blanks. I found the marker is darker than the ink, going over the entire image makes the color all uniform.
Thanks again for your comments. I hope this clarifies some things for you. Try both methods. They're fun.
Melanie
Yes, craft ink would work the same way. I'd still emboss it to preven smearing.
The large container is something SU! used to sell, 4 years ago or so.
The branches are created from the 'birds and branches' die decorative strips from SU!
Sometimes I find the white ink comes off on my fingers even after it has been heated (not embossed) and causes unexpected white smears elsewhere. Still, it's a great alternative to the VM.
Thanks for the answer on the embossing container.
I figured it was just my luck that SU doesn't make them anymore.
Ruth
Page 2 of 3 pages < 1 2 3 >