Free Standing Pop-Up Card

by Mary Jo Albright

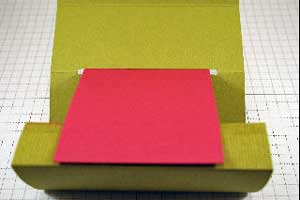
Create a free standing card that folds down flat.

Supplies

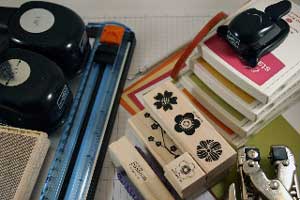
  • Paper cutter with scoring & cutting blade
  • 4-1/4" x 11" piece of cardstock for base
  • 2-1/2" x 5" piece of cardstock for tag
  • 2-3/4" x 5-1/4" piece of cardstock for tag matting
  • Stamps
  • Inks
  • Sticky Strip™
  • Hobby Blade
  • Ruler
  • Mat Pack
  • 1-1/4" & 1-3/8" Circle Punches
  • Crop-a-Dile™ tool
  • 3/16" corner rounder punch
  • Accessories (ribbon, hemp twine, jumbo eyelet, brads, beads, boho blossoms punch, additional cardstock for embellishing)

Step-by-Step

  1. Step 1

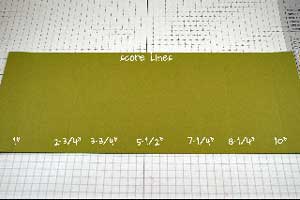
    Score the 4 1/4" x 11" piece of cardstock at at 1", 2-3/4", 3-3/4", 5-1/2", 7-1/4", 8-1/4", and 10".

  2. Step 2

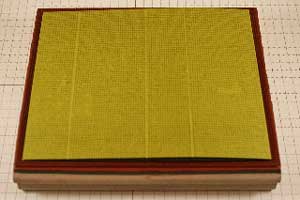
    Stamp as desired. If using a background stamp, fold in half on the 5-1/2" line to achieve full-coverage without having to line up the image.

  3. Step 3

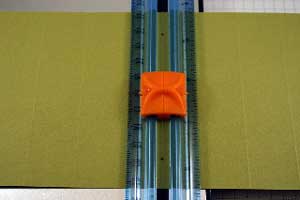
    Turn cardstock base over to the non-stamped side. On the middle 5-1/2" score line, make a mark 5/8" in from both sides.
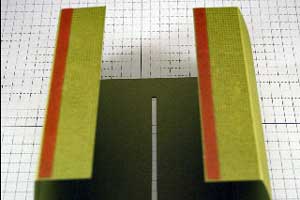
  4. Step 4

    Cut between marked lines to make a slit for your tag.

  5. Step 5

    You can make this slit larger if your tag has dimension and bulky accessories. Use a hobby blade, ruler, and setting mat to create your desired opening.
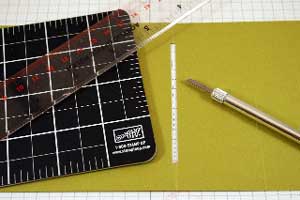
  6. Step 6

    Apply Sticky Strip™ to the stamped side on the end 1" scored sections. You will want to place one strip next to the score line on one, and one strip at the edge on the other side (this becomes important when closing the piece together and for holding the tag in place).

  7. Step 7

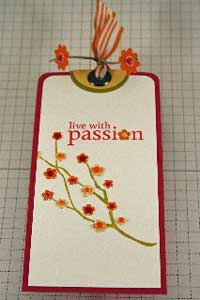
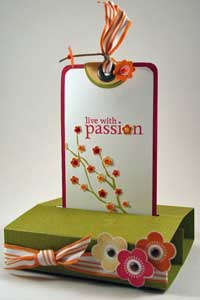
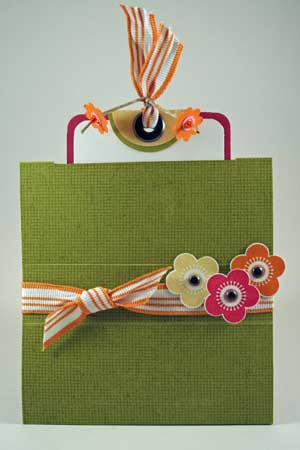
    Create your tag with the 2-1/2" x 5" piece of cardstock and adhere to the mat measuring 2-3/4" x 5-1/4". Adhere punched circles to the top. Attach a Jumbo Eyelet. Add ribbon so tag can be pulled up.

  8. Step 8

    Slide tag into cut slit.

  9. Attach tag to one of your Sticky Strips™. Make sure it is centered in the slit and lines up with the bottom.

  10. Step 9

    Fold up the other side with the Sticky Strip™ and attach to the tag.

  11. Step 10

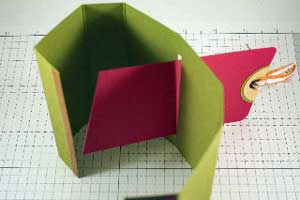
    Embellish the 1" cardstock base section to finish of your card.

  12. Your card will fold flat.

Video!

Your Turn

You've seen the tutorial, now you try it! We've got a section of the gallery set aside for Free Standing Pop-Up Card. Try this technique, then upload your artwork to the gallery. Show us your creations!

***Please note - Internet Explorer/Edge is not a supported browser, and will not allow you to see the videos. Please use Chrome, Firefox or Safari to view our tutorial videos.

Questions and Comments

We'd love to get your feedback or questions. Leave your comment below.

this looks great!! Can;t wait to give it a try!! Thank you!!
Dixie11  |  Wed Aug 27, 2008 at 6:19 PM
Love this project....Can't wait to make a bunch up for Halloween!! Thanks for sharing this this great idea!!
Tina Suzan  |  Wed Aug 27, 2008 at 7:36 PM
Beautiful!! What stamp set is this?
Ali Smith  |  Wed Aug 27, 2008 at 8:14 PM
Stampin' Up! stamp sets:

Eastern Blooms (flowered branch)
Inspired by Nature (sentiment)
Canvas Background (cardstock base)
mary jo albright  |  Wed Aug 27, 2008 at 8:24 PM
This is so gorgeous, Mary Jo!! Thank you for the fabulous tutorial!!
Rose Ann  |  Wed Aug 27, 2008 at 8:56 PM
great project. I am part of a small crafters group, and this will be our project tomorrow!Many thanks,
Anne  |  Wed Aug 27, 2008 at 10:58 PM
Fabulous use of that new set! Great tutorial .. and you've sold me on that set.. May I ask what colours you used for the dye inks?

Thanks!

Debzi333
debzi333  |  Thu Aug 28, 2008 at 2:43 AM
Colors used:

Kiwi Kiss
Rose Red
So Saffron

I do have full instructions on my blog on how to create the tag details
mary jo albright  |  Thu Aug 28, 2008 at 8:50 AM
Hello,

Can one purchase the "DREAM" stamp and where that you used on the "JOY FOLD CARD"? I made the card twice and love it.

Thank you
Christina  |  Thu Aug 28, 2008 at 8:55 AM
I loved this tutorial the card looks like it would take forever to make, but it's so fast and!
TFS :D
Brandy  |  Thu Aug 28, 2008 at 7:40 PM
This is so much fun. I stuck the two taped sides together and whoop! There it was. Your tutorial was so easy to follow.
Nancy Crone  |  Fri Aug 29, 2008 at 10:55 AM
Thank you so much for the easy to follow step by step instructions.
Krissy Jeschke  |  Sun Aug 31, 2008 at 11:58 AM
I love this!!! Can't wait to try it. I love this site. I get to learn so much and then share what I have learned. It helps me to not seem so "new" at all this smile
Darlene  |  Sun Aug 31, 2008 at 12:00 PM
Wow! I had to try one and your instructions were done very well.
I was able to make one and I love it. Not as beautiful as yours but wonderful. Thanks so much!
Lola  |  Mon Sep 1, 2008 at 10:35 PM
I saw this design at a Stampin' Up conference/demonstrator recruiting event in Virginia Beach in 2006 or 2007. I loved it and re-created it but think your measurements look much nicer - thank you!!! I'll have to revisit it and try again.
Valerie  |  Tue Sep 2, 2008 at 12:23 PM
I just did a mock up, and am just clarifying that the tag part isn't what really "pops" up. You have to scrunch the box part down, right? Just want to make sure that I've got this right and that I'm not missing something. But I do think I have a winner for my Christmas cards...yay!
Joan  |  Tue Sep 2, 2008 at 4:24 PM
You are correct! Right after the initial "pull" of the tag part, you kinda have to help the base by lightly pushing down.
I too was first showed this card at the Virginia Beach Regionals in April of 2007 and instantly fell in love with it.
Hope this helps.
Have a great day!
mary jo albright  |  Wed Sep 3, 2008 at 6:13 AM
I really like this card and I think that is going to be my Cnd for some reason Christmas Card this year. I have one problem. I made one the other night and when I pull the tag up the card will not sit flat. It wants to go up rather than sit flat on the bottom. I hope that I made it clear for you to understand. Any help would be greatly appreciated.
Rhandi  |  Sat Sep 6, 2008 at 7:18 PM
For the above question....sometimes, when you pull of the tag and the bottom goes down, you may have to manipulate the bottom standing part by grabbing it with both hands (one on card/tag front side and one on back) and tilt it upward a little to get it in the free-standing position.
I don't know why this happens on some of them. I have made several...some easily go right into position and others need this manipulating.
Hope this helps:)
mary jo albright  |  Sat Sep 6, 2008 at 7:29 PM
Beautiful job on your tutorial! I have one suggestion, that I would make for all tutorials, and that is to put a picture of the finished product at the beginning of the tutorial. It is not a deal breaker but would make them more user friendly. When I go back to my tutorials looking for inspiration I don't always remember what the project looks like (C'mon! I know I'm not the only one!) and I have to flip to the back page to see if it is something that I'm interested in.
Margot  |  Sun Sep 7, 2008 at 5:40 AM

Page 2 of 3 pages  <  1 2 3 >

You need to be logged in to comment

GET OUR NEWSLETTER


Splitcoaststampers's privacy policy