Delft Tile

by Julie Warner

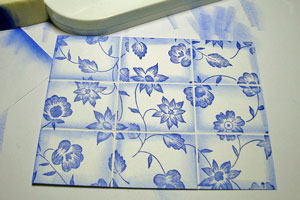
Score lines into your cardstock before stamping patterns over it for a tile look.

Supplies
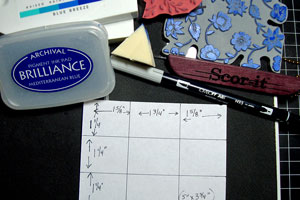
  • Scor-It!™ or other scoring tool
  • Cardstock
  • Ink
  • Stamps (Sparkle N Sprinkle used here)
  • Sponge
  • Light grey marker (Tombow used here)
  • Scrap paper for masking

Step-by-Step

  1. Step 1

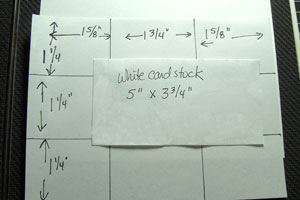
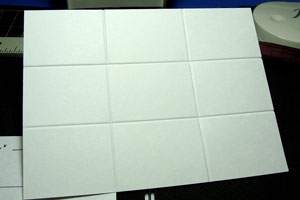
    Cut card stock to 5" x 3 3/4". Using your scoring board, score the 5" side 1 5/8" in from each side (this will leave 1 3/4" for the center column). Turn 90 degrees and score the 3 3/4" side 1 1/4" in from each side.
  2. Step 2

    Turn your scored card stock so that the backside, or side with indented score lines, is face up.
  3. Step 3

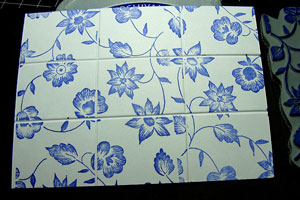
    Stamp your image. Large background images work best. Smaller images will also work, but care must be taken not to press too hard into the scored indentations.
  4. Step 4

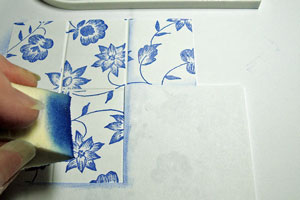
    Cut an inside corner out of the scrap paper. Place the mask over the scored lines. Ink the sponge with the same or slightly lighter ink. Lightly sponge just inside the scored line covered by the mask. Move the mask as you go, sponging all sides of the “tiles”. The out side edges may be sponged, if desired.
  5. Step 5

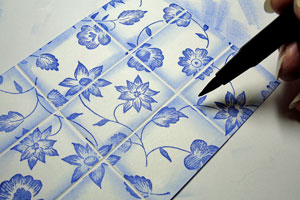
    To further enhance the tiles, use the light grey marker to outline the scored indentations or faux grout lines.
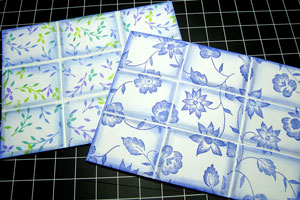
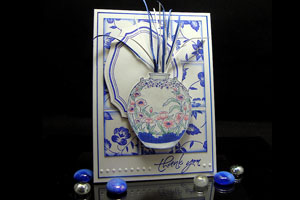
  6. Two different background shown here.

  7. Step 6

    Use the tiles as a focal image.
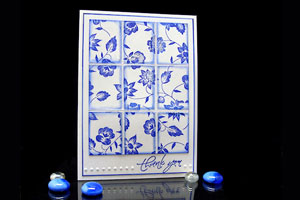
  8. Alternately, use the tiles as a background on a card.
Video!

Variations

    Other Sizes
    Try making the tiles smaller for a different look.

Your Turn

You've seen the tutorial, now you try it! We've got a section of the gallery set aside for Delft Tile. Try this technique, then upload your artwork to the gallery. Show us your creations!

***Please note - Internet Explorer/Edge is not a supported browser, and will not allow you to see the videos. Please use Chrome, Firefox or Safari to view our tutorial videos.

Questions and Comments

We'd love to get your feedback or questions. Leave your comment below.

The vase is from Sparkle N Sprinkle as noted above. The stamp is called Poppy Urn (1452-304K). It is also available in a set called Asian-Leaf Robe Stamp set 304. (I searched the website and found them since I like them too). Thanks for the tutorial. Can't wait to try this out. (And the background image is called Brocade Background) Happy stamping everyone1
Bound4London  |  Fri Apr 22, 2011 at 3:11 AM
To those who asked, the vase stamp is called "Poppy Urn" and it is made by Sparkle N Sprinkle.

The blue lines on the white Spellbinders nestie shape behind it are a stamp made to fit inside the nestie. It is called "Elegant Ovals" and is from Our Daily Bread designs.

Thanks for asking!
Julie - justwritedesigns  |  Fri May 20, 2011 at 11:05 PM
Thanks for this 'easy to follow' tutorial, Julie. I certainly enjoyed making my delft tile card.
Benzi  |  Tue Aug 30, 2011 at 7:47 AM
Thanks Julie for sharing with us this lovely tecnic I had a great time making this card!!!!!

have a great day

Mary
MARIA DEL ROCIO DE CEBALLOS OLMEDO  |  Tue Jan 3, 2012 at 10:23 AM
While making some samples with this fabulous tutorial for the project at our stamp club, we discovered that doing it with glossy CS is totally awesome. Makes it shiny just like a tile. I'll post pics to gallery after the meeting.
kathynruss  |  Wed Mar 14, 2012 at 7:23 AM
I loved the video tutorial, it helped so much. I also tried this on glossy cardstock. It turned out sooooo
good!
Thanks
Pam in FL  |  Wed Mar 14, 2012 at 7:25 AM
Thanks so much for this idea. I'll have to go get some blue ink! Thanks again
Jessica
Jessica  |  Wed Mar 28, 2012 at 3:55 AM
Thank you for your precise and clear instructions and I especially appreciate that you spoke loudly! smile
Mary Ann Huntington  |  Wed Mar 28, 2012 at 12:47 PM
One hint I discovered trying this - before scoring, run a white crayon down the score line. This will act as a resist and help keep the 'grout' line cleaner.
Glenda Cairns  |  Thu Jul 19, 2012 at 4:10 PM
wow - how beautiful is this - cannot wait to try it. thanks for sharing.
ronnie lorentz  |  Wed Oct 23, 2013 at 8:00 AM
So pretty...thanks for the inspiration!
Susanne Gleason  |  Wed Oct 23, 2013 at 8:45 AM
In order to stop the ink from rubbing off, I spray rhe finished tiles with a clear acrilyc sealer. You can get this at any home improvement store. My friends love the tiles I have made and use them in the kitchen to set hot pans on.
Shirley  |  Wed Oct 23, 2013 at 9:07 AM
I love this really a neat way to change up some of my large stamps!! Thanks for the cool idea.
LaDonna Park  |  Sat Nov 30, 2013 at 4:42 PM
Thanks for the delft tutorial, very helpful and beautifully presented.
Regards.
Pumpy Knowles  |  Fri Feb 21, 2014 at 2:55 AM
I'm going to try this!!!! I LOOOOVE THIS! As I told you Julie, I have a weakness for Asian Design & for Blue & White China! wink JUST GORGEOUS!!!!!!!!!!!!!!!! wink
Becky Green  |  Fri Mar 24, 2017 at 9:34 AM
I've never seen this technique & I love the result! Thank you for the tutorial!
gg nurse  |  Wed Jul 21, 2021 at 9:21 AM
What a beautiful idea for stamping! You explained it very clearly, and went through exactly how to do it all in a simple to follow way. Thank you
kgirl1966!  |  Sat Jan 7, 2023 at 4:32 PM

Page 4 of 4 pages « First  <  2 3 4

You need to be logged in to comment

GET OUR NEWSLETTER


Splitcoaststampers's privacy policy