Clear Envelope Brag Book

by Corinne Somerville

Make your own photo brag book with clear envelopes.

Supplies

  • 4 3/4" x 9 1/4" piece of cardstock for back and spine of book

  • 4 3/4" x 6 1/4" piece of cardstock for front of book

  • Additonal cardstock and patterned paper to decorate

  • Paper cutter with scoring tool

  • 1/16" handheld circle punch

  • Clear Envelopes

  • Brads

  • Sticky Strip™

Step-by-Step

  1. Step 1

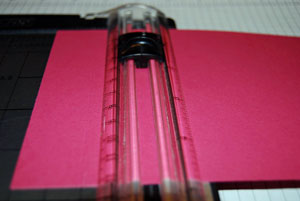
    Score your 4 3/4" x 9 1/4" piece of cardstock at 1" and 2" on the 9 1/4" side.

  2. Step 2

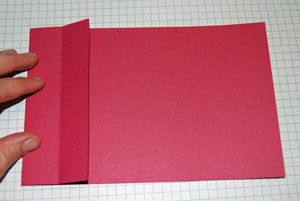
    Fold your cardstock over at the 2" score mark. This will form the spine of your book.

  3. Step 3

    Apply Sticky Strip™ to the end of the front panel.

  4. Step 4

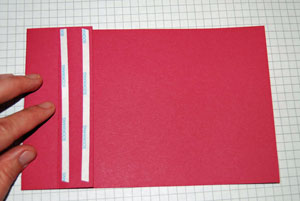
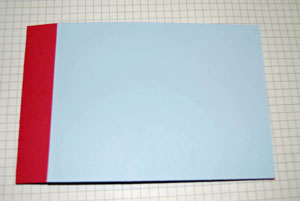
    Adhere the 6 1/4" x 4 3/4" piece of cardstock (your front cover) to the exposed Sticky Strip™.

  5. Step 5

    Peel the plastic lining of your clear envelope seal, line the envelope up with the back of your book and tape down. Layer all envelopes on top of each other.

    Five envelopes were used here. The envelopes will serve as page protectors for your photos.
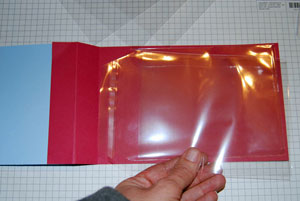
  6. Step 6

    Use your hole punch to make holes for your brads. You can use your thumb as a ruler on both ends.

    The punch will go through both all the cardstock and envelopes with no problem
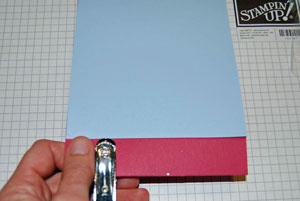
  7. Step 7

    Attach your brads.


    Variation:
    Eyelets and ribbon can be used here instead of brads.
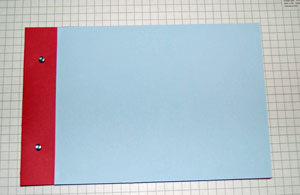
  8. Step 8

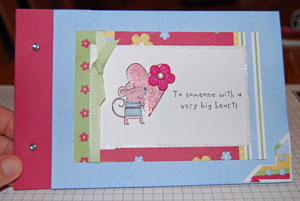
    Decorate brag book to whatever theme that will hold your photos.

Your Turn

You've seen the tutorial, now you try it! We've got a section of the gallery set aside for Clear Envelope Brag Book. Try this technique, then upload your artwork to the gallery. Show us your creations!

***Please note - Internet Explorer/Edge is not a supported browser, and will not allow you to see the videos. Please use Chrome, Firefox or Safari to view our tutorial videos.

Questions and Comments

We'd love to get your feedback or questions. Leave your comment below.

Hi Ruth....if you go to www.stampinup.com and click on "find a demonstrator" along the top of the website it will hook you up the demonstrator that is closest to you smile If you need any other help...just let me know.
Corinne  |  Fri Feb 8, 2008 at 4:11 AM
thank you
Ruth  |  Fri Feb 8, 2008 at 8:10 AM
Thanks for the help. I will definitely be making some of these.
Kandi  |  Fri Feb 8, 2008 at 9:38 AM
This tutorial ROCKS my socks!! I have a 3-d club running right now, and have been looking for *new* ideas. have I told you lately how much I love you? wink
kris  |  Fri Feb 8, 2008 at 12:55 PM
I'm really glad you enjoyed the tutorial !!! I'm sure your 3D club will enjoy this !!!
Corinne  |  Fri Feb 8, 2008 at 2:08 PM
No WAY!!! I have a fettish with these clear envelopes and just love them..okay too much detail about me *tee hee* What an incredible idea -- THANKS!!!
Pattie  |  Sat Feb 9, 2008 at 8:28 AM
I think there are worst things in life than having a fettish for clear envelopes....just not sure what though smile I'm so glad you liked the project....enjoy smile
Corinne  |  Sat Feb 9, 2008 at 8:50 AM
This tutorial is awesome, even kids can do this. Perfect for Junior Girl Scouts.
Steph  |  Sat Feb 9, 2008 at 8:33 PM
I just started getting the newsletter and I'm really enjoying it. Thanks so much. Marilyn
Marilyn  |  Sun Feb 10, 2008 at 1:57 PM
Excellent tutorial! I'm loving this... I used it as a hostess gift last night and the hostess was so excited! Thank you!
Selene  |  Sat Feb 16, 2008 at 7:05 AM
I'm so glad this worked out for you !!! Congrats and thanks for your kind words !!! smile
Corinne  |  Sat Feb 16, 2008 at 9:40 AM
I just love all the ideas. I do have one question and that is where would one get the clear envelopes from? Thanks!
glue2go  |  Wed Feb 20, 2008 at 1:58 PM
You can get them from Stampin' Up! There are 50 envelopes in each package. Here's the item #102619. Hope that helps. smile
Corinne  |  Wed Feb 20, 2008 at 2:02 PM
Thanks so much, Corinne.
glue2go  |  Wed Feb 20, 2008 at 4:00 PM
Corinne, Thanks for the great idea. I am making projects for a Silent Auction at our church for a summer mission trip and made a very cute one using your tutorial. TFS!
Cecilia  |  Wed Feb 20, 2008 at 11:50 PM
That's great, Cecilia....glad to help smile
Corinne  |  Thu Feb 21, 2008 at 11:39 AM
I can't wait to make this!
My one concern though is the SU envies open on the top, like the regular med envies. Yours appear to be side opening. Maybe we can figure out how to adjust the template/instructions to work for a top opening book instead of side?
Tina  |  Wed Feb 27, 2008 at 11:17 AM
Tina,
Are you using the clear envelopes? The SU ones do open on the side and work perfectly for this project. I just made one with envelopes I received from SU last week and it worked perfectly.
Cecilia  |  Wed Feb 27, 2008 at 12:18 PM
Hi Tina...Cecilia right smile..even though the envelopes open at a different point that regular envelopes the pictures still just slip in..they just slip in at the short end of the envelope instead of the top. I hope that makes sense. If not, please feel free to ask again...no problem
Corinne  |  Wed Feb 27, 2008 at 12:23 PM
Cecilia, thanks! I just assumed since they were with the other regular envies they would be that way too. SOOOO glad to hear the SU ones are side opening...now I can demo this at my workshop Sat! I have envies from clearbags i'm still trying to use up before ordering from SU....so good to know.
THANKS!
Tina  |  Wed Feb 27, 2008 at 4:33 PM

Page 4 of 5 pages « First  <  2 3 4 5 >

You need to be logged in to comment

GET OUR NEWSLETTER


Splitcoaststampers's privacy policy