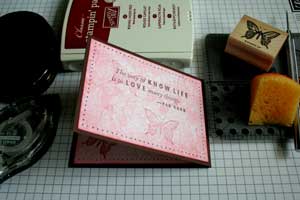
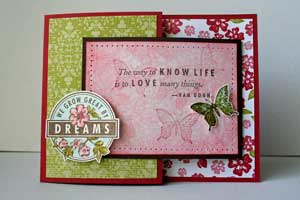
Joy Fold Card

by Beate Johns

Create this unique opening card with two pieces of cardstock.

Supplies

  • One 4 1/4" x 8 1/2" piece of cardstock
  • One 3" x 8" piece of cardstock
  • Two 2 3/4" x 4" pieces of cardstock or designer paper (optional)
  • One 4" x 5 1/4" piece of of cardstock or designer paper (optional)
  • One 2 3/4" x 4" piece of cardstock or designer paper (optional)
  • Additional cardstock
  • Scoring tool
  • Adhesive
  • Stamps
  • Ink

Step-by-Step

  1. Step 1

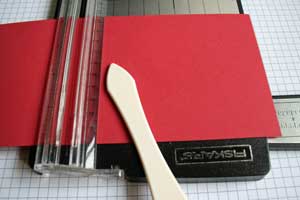
    Score your 4 1/4" x 8 1/2" piece of cardstock at 5 1/2".

  2. Step 2

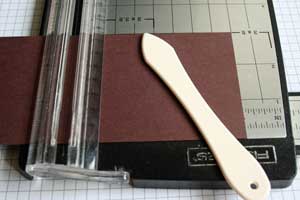
    Score your 3" x 8" piece of cardstock at 4".

  3. Step 3

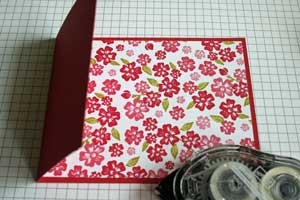
    Adhere your 4" x 5 1/4" piece of designer paper on the inside of the card.

  4. Step 4

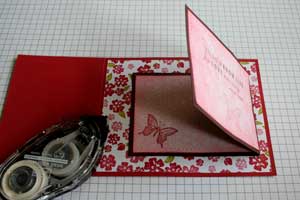
    Adhere your 2 3/4" x 4" piece of designer paper to the card front.

  5. Step 5

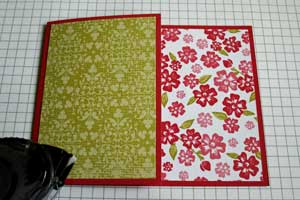
    Stamp your 2 3/4" x 3 3/4" pieces of designer paper if needed and adhere them to the inside and outside of your smaller folded cardstock piece.

  6. Step 6

    Add adhesive to the back of your smaller flap and tape it to the inside of the card. Make sure the fold of the smaller flap is pointing to the right.

  7. Step 7 (Optional)

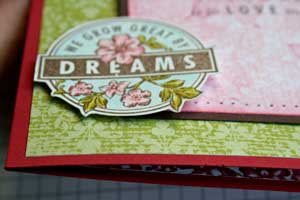
    If you want to secure the flap from opening, stamp a complimentary image and adhere it with dimensionals to slightly over the edge of the smaller flap to keep it closed.

  8. Step 8

    Finish your card.

Video!

Variations

  1. Try a flap on top instead.
    Make the card base a 5 1/2" x 7 1/4" piece of cardstock scored at 4 1/4".

    Create a flap from a 4 1/4" x 5 1/2" piece of cardstock scored at 2 3/4".

  2. Make it a square.
    Create your square card base by scoring a 4 1/4" x 6 1/4" piece of cardstock at 4 1/4". Score a 3" x 6" piece of cardstock at 3" to create your insert.


    Make a mini-slimline card.
    Make the card base 3 1/2" x 9" and score at 2 3/4". Cut a second piece at 2 3/4" x 11" for the insert, scoring at 5 1/2". The finished card is 3 1/2" x 6 1/4" and will fit in a #6-3/4 envelope (small business size).

    Inside layering panel: 3 1/4" x 6"
    Left layering panel: 2 1/2" x 3 1/4"
    Insert layering panel: 2 1/2" x 5 1/4", focal panel 2 1/4" x 5"

Your Turn

You've seen the tutorial, now you try it! We've got a section of the gallery set aside for Joy Fold Card. Try this technique, then upload your artwork to the gallery. Show us your creations!

***Please note - Internet Explorer/Edge is not a supported browser, and will not allow you to see the videos. Please use Chrome, Firefox or Safari to view our tutorial videos.

Questions and Comments

We'd love to get your feedback or questions. Leave your comment below.

Great tutorial - I am anxious to try it!!!
Sharon T  |  Wed Jul 23, 2008 at 3:11 PM
TFS! This is a great tutorial. I love how you used this particular stamp set. Hope your summer is going well.
Trudy  |  Wed Jul 23, 2008 at 4:14 PM
This is so cool. I will make mine tomorrow. I bet recipients of these joy fold cards are ooing and ahing.
Vanessa Yu  |  Wed Jul 23, 2008 at 7:40 PM
what a wonderful card - as i have come to expect from you (no pressure, of course) can't wait to try this. you are so very talented.
paula  |  Thu Jul 24, 2008 at 5:57 AM
Ohhh I love this card! I got one in a swap a couple years ago and just had to make one as well! Thanks for bringing it back to light! I haven't made one in a while!
Silvia Mabie  |  Thu Jul 24, 2008 at 7:10 AM
I love how the fold of the smaller card is pointing to the right. Thanks for the cool idea.
reyne  |  Thu Jul 24, 2008 at 10:54 AM
I mean pointing to the left.
reyne  |  Thu Jul 24, 2008 at 10:56 AM
Love this! What stamps did you use?
Sandra Correale  |  Thu Jul 24, 2008 at 11:18 AM
Another great one Beate! Thank you.
Niki  |  Thu Jul 24, 2008 at 3:39 PM
just trying the Joy Fold Card, and I'm not
sure what to do with the 3" X 8" piece of cardstock. I don't seem to see it on the instructions. Think this card is just great.
Elvina Gordon  |  Thu Jul 24, 2008 at 4:13 PM
Most unique card I have seen in some time!!
Off to make one for my dear auntie's birthday!!!
Congrats!!!!
Lori  |  Thu Jul 24, 2008 at 5:24 PM
Thank you so much for this wonderfully easy to follow tutorial. Your card is lovely and by following your instructions I created a card that is really special.

So thrilled that I found this site!
Thanks!
sticklelover  |  Thu Jul 24, 2008 at 5:44 PM
The creative portion of your brain must be SO BIG!!! (You should be left handed : O) This is fabulous and we all thank you for sharing your ideas with us.
Jana  |  Thu Jul 24, 2008 at 9:45 PM
Elvina,

The 3" x 8" piece of cardstock is shown being scored in step 2. It's the inner, smaller flap that is taped to the card base.
beate  |  Fri Jul 25, 2008 at 7:01 AM
How lovely! New to this, help..what are "dimensionals"?
Vaitiare  |  Fri Jul 25, 2008 at 7:10 AM
Get to the point where I think I've seen all the folds possible ~ ~ ~ then you come up with one I've not seen before! You make it all so easy to follow. Thank you for another lovely card idea.
Avril  |  Fri Jul 25, 2008 at 10:47 AM
Isn't this called a Joy Fold because Joy (joyofstamping) did it for a small swap! Think that is the origin!!
Beth Silaika  |  Fri Jul 25, 2008 at 6:07 PM
OMG Beate!! This is gorgeous and was so easy to make! I ABSOLUTELY love your tutorials and your WORK even more!! Thanks so much for doing what you do and sharing it with all of us!
Donna  |  Sat Jul 26, 2008 at 5:49 AM
What a phenomenal tutorial! You took excellent photographs, and I can't wait to do one myself ..... or two or three! This would make a great Christmas card for all those wonderful family members that have enjoyed my cards all year long.
Celia Cawthon  |  Sat Jul 26, 2008 at 8:24 AM
what is the best paper to use when stamping
Sarah  |  Sat Jul 26, 2008 at 7:44 PM

Page 2 of 4 pages  <  1 2 3 4 >

You need to be logged in to comment

GET OUR NEWSLETTER


Splitcoaststampers's privacy policy