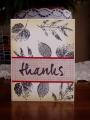
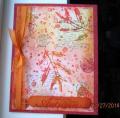
I had started this piece of paper a while back when I was using a brayer with blue paints and used a scratch sheet of paper to clean it off. I had already stamped the leaves in silver over this. I added the script in Navy and spatter in Indigo. I added some caulk through dry wall mesh and chalk paints also through mesh and over the caulk. I tore my piece then wiped silver ink along the edges. My button is four layers of Pacific Point glued together then embossed in the Elegant Bouquet then rubbed Versamark over the raised areas and brushed on the PearlX. I wanted it a bit shiny, so I layered CE over this. I punched my holes with a Cropadile then wished I'd used something smaller as the holes were pretty large for my more delicate looking "button" so I used ribbon along with cord to thread through the button. I have a Whisper White base with a frame of Turquoise embossed in the lattice ef with Indigo sponged over it. I popped my panel angled over this. I think I'll go back and use a couple of dimensionals behind the button as it is floating more than I'd like. I didn't want to cover up my panel so I used a rubon sentiment.
Date: Thursday, March 20, 2014 GMT Views: 1444
Favorited:3
Splitcoast Dirty Dozen Alumni SCS Gallery Moderator Splitcoast Challenge Hostess Teapot Tuesday TEAm
Registered: July 27, 2007 Location: Dublin, Ireland Posts: 131652
Thu, Mar 20, 2014 @ 11:57 PM
Gail - I took a peep at this on my phone when I was awake in the night, but decided to wait till the morning and the laptop to comment. Both your panel and the button are so beautiful!! I love the dimension you got on your button with the embossing. Even though I embossed mine twice, I couldn't get as strong an impression as I was hoping for. I think with the texture in yours the bigger holes were probably fine! (I still have my old spring-loaded Fiskars eyelet setters, which are great when I need smaller holes). I so hear you on not wanting to cover up technique background panels, I'm glad you left this one to shine.