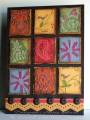
I use that gorgeous metal artwork as my inspiration, I knew the second I saw it what I wanted to try creating and I like how it turned out. I think this will hang in my studio for a while. StudioÂ…sounds so cool doesnÂ’t it!
-The negative embossing technique was used for the Cuttlebug squares; you can find the directions in the Technique Lovers Challenge list.
-I used Prismacolor pencils to color the embossed areas.
-CHF Burlap Backgrounder was stamped on the under layer which is tool distressed. I also used it on the punched border and Weave is stamped on the reddish border.
-All the squares were ink distressed on the edges.
Ink: Ranger distress ink – fired brick, weathered wood, scattered straw, walnut stain, Stampin Up classic- Old Olive, Really Rust, More Mustard
Accessories: Tonic paper perforator for tool distressing, sponge, brads from Buttons Galore, Martha Stewart border punch, tape, glue, Prismacolor pencils, paper stumps, baby oil for blending
Registered: June 10, 2007 Location: BC Posts: 44872
Sat, Jun 14, 2008 @ 12:03 PM
Ohhh that is gorgeous Roxie!! I love all of the colour and the beautiful texture!! Wonderful work on the IC.. and just a beautiful unique card! Love it!
Registered: August 29, 2007 Location: Cambridge, Ontario Canada Posts: 20999
Sat, Jun 14, 2008 @ 12:06 PM
Love you fabulous card. It looks like you have a wonderful mix of fantastic Mexican tiles on your card. Love the treatment at the bottom of your card too.
------------------------------ Nicole
DT member for Mark's Finest Papers
I am a pround member of SCS. My blog