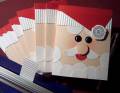
Our wonderful StampinÂ’ Up! demonstrator featured this punchy Santa at a December card class. She said she got the idea from Convention. We all loved him. I now have a stack of 10 ready to use next Christmas. My thanks to whomever dreamed him up.
The 1-inch band on the hat is put through the crimper. The ball on the hat is stamped, then torn out rather than punched.
This is an addition to answer a question about how the hat is rendered: The top strip of Real Red CS is 1/2 inch by 4.25 inches. I cut long white CS strips 1 inch wide and then crimped them. Trim to proper width (4.25 inches) after adhering to card front just under red strip. Cut 3.5-inch by 2-inch rectangles of Real Red then cut them diagonally. This gives you hat pieces for two card (turning one over so the hypotenuse (long side) of triangle can stretch from the top right side of the crimped white piece up to the top almost-left (won't go all the way) side of the red strip. Stamp the North Pole stamp; tear around it and adhere to the lowest point of the red triangle with a pop dot.
Hope this helped! With inky goodness, Peg
Date: Thursday, January 24, 2008 GMT Views: 5463
Favorited:220
Paper: Blush Blossom, Real Red, Whisper White, Basic Black
Ink: Ruby Red Classic ink sponged on cheeks and nose. Left edge of nose edged in Ruby Red with the sponge,
Accessories: uni-ball Signo white gel pen for eyes and nose catch lights, Fiskars paper-crimping tool, dimensional foam tape for nose and hat ball, ½-inch round punch, ¾-inch round punch, 1 1/4-inch round punch.


 ))
))