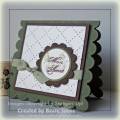
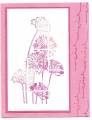
This card was CASE'd from the January 2008 issue of Stampin' Success (p. 22). I love this technique! You can use your paper cutter with a scoring blade or a Scor-pal for this type of card. I changed the stamp set from Kind Thoughts to A Beautiful Thing, and switched the Sahara Sand to River Rock. All supplies are from Stampin' Up! except the brad (unknown).
Date: Wednesday, January 16, 2008 GMT Views: 1905
Favorited:14
Additional Info
Stamps: A Beautiful Thing, swirl from Priceless
Paper: River Rock, Whisper White, Purely Pomegranate
Registered: January 11, 2008 Location: Valparaiso, IN Posts: 51
Thu, Jan 17, 2008 @ 7:59 AM
Wow, thank you all so much! These two cards were my first posts, and I was a little nervous about doing it. You made me feel wonderful, and I appreciate your time and kindness.
Registered: January 18, 2008 Location: Victoria, MN Posts: 12
Sat, Jan 26, 2008 @ 7:00 PM
I love this card! Beautiful! Is there a tutorial for this technique? I haven't seen it before. How did you do it?? You mentioned scoring the lines but then how do you apply the ink? I would appreciate any help. Thanks!
Registered: January 11, 2008 Location: Valparaiso, IN Posts: 51
Sat, Jan 26, 2008 @ 8:41 PM
I asked SCS about it, and they said they are working on it. But if you need one in the meantime, here is my version:
1. Take your cardstock (cs) and turn it so it is on a slant to your paper trimmer.
2. Use your scoring blade to score lines diagonally on the cs. I made mine about 1/4 inch apart.
3. When you have finished scoring in one direction, your cs looks like this: / / / / /
4. Turn your cs th opposite way, and score again, so the score lines are in a criss-cross pattern (you should have scored a diamond pattern).
5. Sponge a light-colored ink onto your "tiled" cs. Cover the entire piece of cs. Now you should see it starting to come together--you will see what look like grout lines between the "tiles."
6. Choose a fancy type of stamp--I used a nice swirly one--and ink up the image with a darker shade of the same colored ink you used for the sponging. This emphasizes the tile look. (You can also use a contrasting color of ink for a more dramatic look.)
To finish the card:
7. I then added a ribbon, sentiment, and cut-out flower with a brad center. I also matted the tiled cs on a contrasting color, and then adhered that to the actual card.
I hope this helps!!! Good luck, and please let us know when you've made similar creations so we can all check them out


 and Lauren (11)