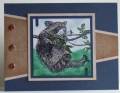
The image panel is a 2 ¾” square. The darkest under panel is 3” on one end and 1” on the other. I cut a rectangle 3” wide made my marks in from the edge and lined up the corner and the mark on the cutter to get the correct shape. For a border just start with a 3 ¼” rectangle and repeat the steps.
Pad ink and H2o brush or markers were used for coloring the image. Sponging was done to create the sky and landscape using templates. Slot punch for the notches on the image panel and I cut the rounded end off each and glued them in place. I did ink distressing on the edges of the beige and tan.
Date: Tuesday, April 3, 2007 GMT Views: 2914
Favorited:20
Registered: January 11, 2006 Location: Western Kentucky Posts: 5988
Wed, Apr 04, 2007 @ 11:43 AM
This is another great card. Love the raccoon. I have some prints I bought years ago, with just about this same raccoon. I don't know if I'll get a chance to play or not. This is a great layout. Thanks, Rox
------------------------------ Janet - aka Ridge Stalker
Wife of 52 yrs, 2D, 2GD, 1GS, 3GGS
Check out MY GALLERYhttps://www.splitcoaststampers.com/g...0&ppuser=67069 Glitter Mafia member. Proud to be a fan club member. #67069
Registered: June 29, 2004 Location: Sugar Land. Texas Posts: 79894
Thu, Apr 05, 2007 @ 3:35 AM
Love how that little fellow is hanging on!! Love this sketch!!!
------------------------------ LizThe joy of the LORD is my strength.Right Brain Madness --My blogProud member of the redDivasKSS certified multi-step stamperFan Club member since 2004