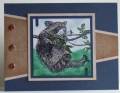
The image panel is a 2 ¾” square. The darkest under panel is 3” on one end and 1” on the other. I cut a rectangle 3” wide made my marks in from the edge and lined up the corner and the mark on the cutter to get the correct shape. For a border just start with a 3 ¼” rectangle and repeat the steps.
Pad ink and H2o brush or markers were used for coloring the image. Sponging was done to create the sky and landscape using templates. Slot punch for the notches on the image panel and I cut the rounded end off each and glued them in place. I did ink distressing on the edges of the beige and tan.
Date: Tuesday, April 3, 2007 GMT Views: 2892
Favorited:20