Retro Rubber Stamp Challenge Blog #123 which gave followers the opportunity to do "anything goes" as long as you used a stamp that was at least a year old. (https://www.retrorubberchallengeblog...hing-goes.html)
My Stampin' Up! (SU) "Bright & Beautiful" set is from their 2014 holiday catalog... so that makes it 5 years old!
Jennifer McGuire has a great video tutorial on a technique she calls a "Window Gatefold Card". Her instructions are fantastic, so rather than repeat them here, please visit her blog at https://www.jennifermcguireink.com/2...old-cards.html . Note that the details on measurements and cutting start at about 11 minutes into the video.
Please see the list of supplies I used for my card below.
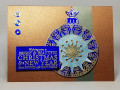
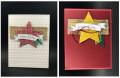
The star was created by first inking the middle-sized star in the stamp set with Versamark, then inking again with SU Elegant Eggplant before stamping onto white cardstock, then I covered with clear embossing powder and heat set with a heat tool/gun. I did the same with the smallest star stamp, then die-cut them out with their matching dies.
The smallest star was backed with adhesive foam tape and centered on the larger star. I then used SU rhinestone jewels in 3 sizes to accent the star center and tips.
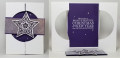
To create the embossed pattern on the front folds of the card, I used the SU embossing folder called "Scattered Sequins". You do this AFTER you cut out the two circles on the card panels (be sure to watch the video for Jennifer's clever way of making sure the two circles line up!).
The inside purple panel was stamped with Versamark using the same stamp set, then dusted with white detail embossing powder and heat set. I put some rhinestones around the sentiment so they would show through the circle when the card is closed.
The final step was to create the "belly band". The main part of the band is a strip of the same purple that's inside the card cut 1-3/4" wide and 8" long. Following Jennifer's instructions, I scored at 2" and 6-1/4", then trimmed off any excess from the long piece so that I had about an inch overlap before I glued it closed. I created the sparkly panel by cutting a strip of purple cardstock that was a bit narrower than the belly-band, and a bit longer than the front of the card is wide. I put double-sided Scor-Tape on this strip, then dusted with transparent micro fine glitter crystals. I attached this glittery panel to the front of the belly-band, then attached the assembled star element using foam tape to the center of the band.
The card really looks pretty when you hold it in your hand, and will be a great card to send to someone special!
I am rating the difficulty of this card as a "3" or "4" out of a possible "5". It's easy to create, but requires several steps that include precise measurements... however, I definitely plan to make more of this type card in the future!!!
Date: Monday, November 11, 2019 GMT Views: 431
Favorited:2