|
Thinking of You at Christmas
|
|
 Photo Details
|
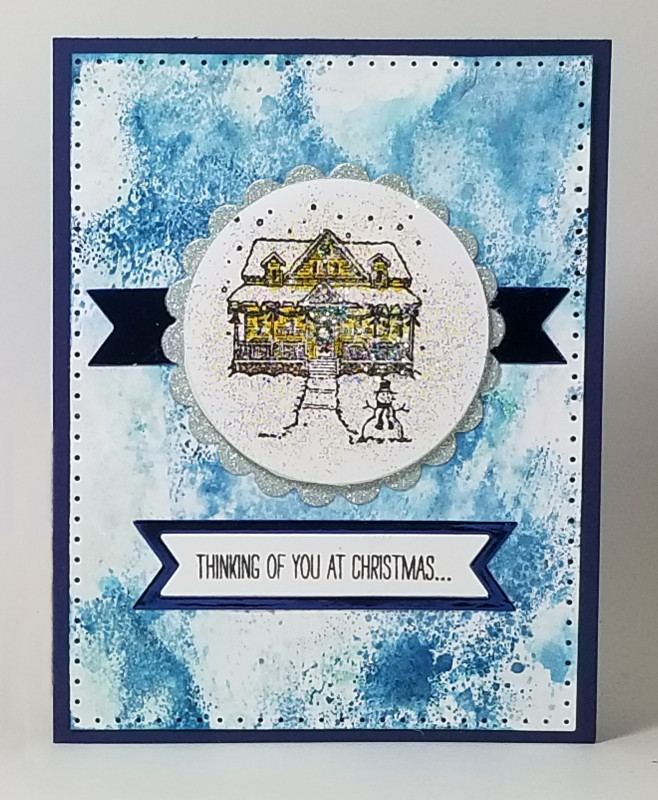
 | | This holiday card was inspired by two card challenges:
Retro Rubber Challenge Blog #122 (https://www.retrorubberchallengeblog...etch-time.html) which had a sketch as well as the requirement to use a stamp that was at least one year old (the holiday home stamp is 17 years old, and the sentiment is 5 years old).
- and -
52 Christmas Card Throwdown #40-19 (https://52cct.blogspot.com/2019/10/o...e-dt-call.html) which had the requirement to use of the "smooshing" technique on your card.
Having the sketch in hand, and the requirement to use the smooshing technique, I created the wintery background using four different blue inks. I swiped the three lightest colors on a silicon craft mat, then misted with water. Then I squished the Stampin' Up! (SU) Whisper White cardstock into the beaded inks. I kept doing this, and drying with my heat tool in between each until it had color all over. Then I cleaned the mat, and swiped the darkest blue ink on the mat and misted it so I could add darker shades to the areas which didn't have much color.
After I had dried the smooshed panel, I die cut it using a dotted rectangle die, and glued it firmly to the SU Not Quite Navy card base. I put it under some books to flatten it while I went on to the next step.
Using Memento black ink, I stamped the holiday home stamp from the 2002 SU "Winter Wonderland" set onto a scrap of white cardstock. Then after it dried thoroughly, I used SU Stampin' Write Markers to color the house and its holiday decorations. I then die cut a circle around the house scene, and used a craft sponge to sponge glue all over the circle. I poured a prismatic glitter on top of the wet glue, and pressing it in, I tapped off all the loose glitter.
The scalloped matting is cut from a bluish silver glitter cardstock from DCWV. I wanted the glittery circle to set a little bit above the scalloped matting, so I used the same circle die to cut a fun foam backing for the stamped image. I glued this to the back, then glued the sandwich to the scalloped mat.
The blue banners extending from both sides of the scalloped mat are two small banners I die cut using the smallest SU "Banners" die. I used a tee-square to align them on the card, then glued the matted circle on top of them.
The sentiment was stamped using Versafine Onyx Black ink onto a scrap of white cardstock, then die cut using the die in the SU "Bunch of Banners" die set that cuts both the inside and the outside at the same time. I kept the white sentiment piece, the die cut using the same die on a piece of the SU blue foil I had used for the banners behind the scallop matted piece. They were glued down directly on the card front piecing the white inside the outside blue rim.
This card had a lot of steps, but none were very hard. I am rating the difficulty as a "2" out of a possible "5", but noting that it takes a while to make the card because of all the dies and stamp sets I used. |
|
Date: Tuesday, October 29, 2019 GMT
Views: 1047
Favorited: 3
|
|
Additional Info
|
|
Keywords: RRCB122 52CCT40-19 Christmas
|
|
Stamps: SU Winter Wonderland, White Christmas
|
|
Paper: SU Not Quite Navy, Whisper White, Noble Peacock Blue Foil Sheet, DCWV Holiday Glitzy Glitter Stack Bluish Silver.
|
|
Paper Size: A2
|
|
Ink: SU Not Quite Navy, Pacific Point, Coastal Cabana, Pool Party, Memento Tuxedo Black, Versafine Onyx Black, SU Stampin' Write Markers
|
|
Accessories: Spellbinders Circle Die, Spellbinders Scalloped Circles Die, Sizzix Dotted Rectangles Die, SU Bunch of Banners Dies, Tombow Multi Liquid Glue, JudiKins Prisma Glitter, SU Banners Framelits Die, Craft Sponge, Water Mister, Silicon Craft Mat, Heat Tool
|
|
Techniques: Die Cutting, Hand Coloring, Smooshing
|
|
|
|
Difficulty (1-Easy 5-Advanced): 2
|
|