Since more open outline stamps work best with this technique, I opened up my 2004 Stampin' Up! (SU) "In Full Bloom" set which has several stamps to choose from.
I wanted to stamp two blossoms over the top of another, I first stamped the image using Stazon black ink onto Contact paper to create a mask. I cut this out with paper snips, being careful to trim close to the outside line of the image so it would match your final stamped image EXACTYY. Save this mask for using later.
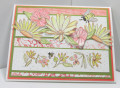
I stamped the first image of the flower with Versamark onto my 3-3/4"x 5" SU Very Vanilla panel, then dusted with clear embossing powder, and heat set it. I carefully covered this image with the clear mask, and followed the same steps to stamp the second flower slightly overlapping the first. I left the mask in place, and stamped the stem and a few leaves with Versamark so they slightly overlapped the flower as well. Then, after removing the mask, I dusted with clear embossing powder and heat set the leaves.
I repeated this process for the second flower, being sure to use the mask as I stamped. (Don't forget to remove the mask before pouring the embossing powder on the stamped image,,, you end up getting dust on the back sticky part of the mask, so it's not sticky anymore, and therefore not re-usable for future projects.)
After all my stamped images were heat embossed, I warmed up my desktop laminator, and ran my embossed image through with a rose gold foil sheet inside a folded piece of copy paper. I ended up running it through twice to ensure all the heat embossed parts melted enough to make the foil stick to them.
After the foil embossed image had cooled, I used Copic markers to color the flowers and leaves.
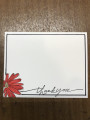
The birthday sentiment was from the SU "Beautiful Bouquet" stamp set. I first inked my stamp with Versamark, then inked it with SU Flirty Flamingo ink before stamping it on the card. I then dusted with clear embossing powder and heat set the words. This is a nice way to make your sentiments glossy in any shade of color you have in your supplies. By inking first with Versamark, that ensures the top coat of your stamped sentiment will hold the embossing powder for heat setting.
Finally, I matted the SU Very Vanilla panel with Rose Red, and then glued it to the SU Flirty Flamingo card base.
I am rating the difficulty of this card as a "2" out of a possible "5" because of the need to do the foiling. The card could easily be stamped with regular ink, or even heat embossed with colored embossing powder instead of foiled,,, you just wouldn't get the brilliant foil effect which looks so great in person.
Date: Friday, May 17, 2019 GMT Views: 1268
Favorited:5
Registered: October 13, 2005 Location: near the DE beaches Posts: 2874
Wed, Apr 07, 2021 @ 1:31 PM
This looks complicated but the results are gorgeous. I may use the idea for a card for my friends birthday minus all the foiling steps since I don't have any and have never done that process.