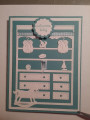
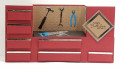
Once again, I wanted to try a card technique that was new to me, so I went with the "Bench Fold" to create a workbench with tools for a masculine birthday card. A great tutorial for a kitchen version can be found at: Bench Fold Card Tutorials at Splitcoaststampers I used the basic fold, and created a Craftsman-like toolbox card complete with drawers and tools!
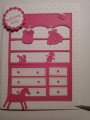
To make the drawers look 3D, after cutting them out, I ran a black Sharpie pen all along the drawers' edges. I also glued thin Fun Foam on the back of each drawer before attaching them to the card base. Their handles are 1/8" strips cut from the silver cardstock.
The back of the workbench area was created to look like peg board by inking a Cuttlebug "Swiss Dots" embossing folder lightly on the side WITHOUT the lettering (i.e. the bumps sticking up on the inside of the folder), before embossing. This created peg board "holes" with black interiors.
The tools were created by die cutting them from both silver cardstock, SU Dapper Denim and Basic Black. The colored tool handles were cut off, then glued on top of the silver tools so that the "metal" parts of the tools were silver.
The sentiment was created by stamping the birthday greeting from SU "Petite Pairs" stamp set onto SU Kraft cardstock, then die cutting it in a "diamond" configuration using the square dies from SU's "Stitched Shapes Framelits Dies". The silver matting was created by die cutting the next size larger stitched square. The two were glued with Tombow, then adhered to the card base using adhesive foam strips.
While the card looks really complicated, the card base is really only 4 pieces of rectangular panels. The finished size will fit into a standard business envelope for mailing. I am rating the difficulty level as "3" out of a possible "5" only because of the extra care it takes to cut out all the drawers and handles. With the tool dies, creating them is REALLY easy!
Date: Friday, November 2, 2018 GMT Views: 490
Favorited:3