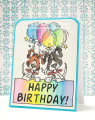
This is a card I created for my SIL's birthday. She & my brother have 2 dogs, and he had asked me to make a card for her from them. I don't have many dog images, but in going through my Bugaboo images, I found one that I thought would work--with a little modification.
I opened the "Sign It Sorry It's Rough" image in Photoshop on a 4x5.25" blank "canvas," & sized it to fit. I used the marquee tool to erase the greeting from the image sign. I copied the image layer, flipped the copy horizontally, and moved it over so I had 2 dogs. I resized the second layer slightly, just to make it a bit smaller so it didn't look exactly like the same dog as the first. I adjusted the outline of the sign on the flipped layer, so the lines matched up with the first image layer. I also erased the spots on the left dog, since their one dog doesn't have any spots on her body. I then used the "Action Man" font on my computer to type "Happy Birthday!" in the sign area.
I decided there was too much white space above the dogs' heads, so I went back to my Bugaboo images. I found the "Balloon Bunch," & figured it would be perfect. I copied that image onto the same canvas in Photoshop, & flipped it horizontally so the balloon highlights were on the right side. (I prefer to color as if my light source is in the top right.) I also moved the balloon layer down in the Layers panel in Photoshop so the balloons look like they are behind the dogs. Finally, I printed it out onto a piece of watercolor paper.
I colored the image with my Inktense pencils, using a damp paintbrush to pick up the color from the pencils & apply it to the paper. I colored the dogs to look like theirs. I lightly penciled in their facial markings, and then colored. I erased the pencil lines on the left dog, before I colored right over them. For the black & white dog, I didn't worry about my pencil lines, since I knew the black color would cover them. I finished the dogs with a little clear Wink of Stella on the tags on their collars, & went over their eyes with a black glaze pen.
For the balloons, I used a trick I picked up from Kelly Latevola. I made sure, when I colored each balloon, to continue the "outline" with my color. I didn't add any black outlines; just overlapped the colors so the balloons look transparent. I did make sure to place my colors so the green didn't overlap with the pink, which would have made brown.
After I'd finished coloring, I rounded the top corners with the 1/2" side of my Corner Chomper. I adhered it to a teal panel that I'd mounted to a card base, and rounded the top corners of that as well. My SIL LOVED this card!
Date: Sunday, September 23, 2018 GMT Views: 284
Favorited:2