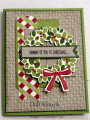
This was made as a Design Team card for Try Stampin' on Tuesday Tic-Tac-Tues #6 Challenge: https://trystampinontuesday.blogspot.com I used two of the rows; top horizontal (green-circle-foil), and diagonal start from the lower left (stamping-trees-foil).
My card base is Stampin' Up! (SU) Whisper White Thick cardstock. This thicker cardstock gives the card with so many folds more sturdiness.
To meet the top row (green-circle-foil), my mind right away went to the SU Wondrous Wreath stamp and matching dies. I first diecut the wreath shape from a piece of cardstock that I had printed a solid black at Kinko's. Toner ink (NOT ink jet!!!) attracts foil transfers when run through a laminator. So After pre-heating my laminator for 20 minutes, I ran the wreath cutout with the foil laying on top (color side up) through three times (inside a thin paper folder). After this cooled, I used the leaves stamp from the SU Wondrous Wreath set and stamped on top of the foil using SU Old Olive ink. The bow was stamped using the same stamp set by first inking the stamp with Versamark, the inking it with SU Wisteria Wonder ink before stamping on the white cardstock. I then covered the bow with clear embossing powder, and heat set it. When it was cool, I cut it out using the matching bow die.
The diagonal row (stamping-trees-foil) was met by die cutting SU Old Olive cardstock using the row of trees die from the SU Outdoor Adventure Framelits Dies. I then pressed the trees into a Versamark pad to thoroughly cover the trees, then dusted the trees with SU Heat & Stick powder. I heated the powder up with my heat tool and IMMEDIATELY lay a piece of foil (color side up) over the top and pressed with my fingers in a rotating motion until the foil was completely adhered. NOTE: I ended up blistering my finger tip from the heat of the melted powder, even though I was rubbing on top of the foil. I suggest you used a piece of cloth over your fingertip to avoid this. As I rubbed, the foil backer sheet lifted leaving the trees covered with beautiful green foil.
The next step was to glue the plaid pattern paper onto the cut and folded center step card. Since I was using a plaid pattern paper (brand unknown), it was especially important that the paper be measured and centered so it matched. You could make your card a lot simpler by not using pattern paper, or use a pattern that doesn't need careful alignment.
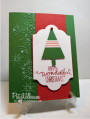
The sentiment is from the retired 2006 "Perfect Ending" SU set that was inked first with Versamark, then SU Wisteria Wonder ink before stamping onto a scrap piece of white cardstock. It was then dusted with SU Clear Embossing Powder, and heat set. I used an Old Olive Stampin' Write marker to color in the tree at the end of "merry". It was then punched out with an SU Word Window punch. A mat was created for the sentiment using the retired SU "Modern Label" punch to punch out of a scrap piece of SU Old Olive cardstock.
The last step was to assembled everything. The wreath was mounted on the center panel using adhesive foam strips. The bow was attached with adhesive foam strips as well.
The foiled trees were attached with Tombow glue. The sentiment was glued to the SU Olive Green mat, and the whole assembly mounted on the card front with adhesive foam strips.
Because of the need to do careful measurements and cutting for the card base, careful alignment of the pattern paper, and foiling; I am rating this card as a difficulty level of "4" out of "5".
Date: Sunday, September 9, 2018 GMT Views: 667
Favorited:2
Paper: SU Whisper White Thick Cardstock, Old Olive, Unknown Brand Plaid
Paper Size: A2
Ink: Versamark, SU Old Olive, Wisteria Wonder
Accessories: SU Wonderful Wreath Framelits Dies, SU Outdoor Adventure Framelits Dies, SU Heat & Stick Powder, SU Clear Embossing Powder, iCraft Deco Foil, SU Modern Label Punch, SU Word Window Punch, Heat Tool, Tombow Multi Liquid Glue, Adhesive Foam Strips
Techniques: Center Step Card, Foiling, Heat Embossing