Photo Details
|
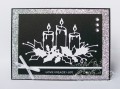
 | | I made this card to give to my daughter for Halloween and it is also for the SCS Ways to Use It WT555 Challenge of 'Brush it Up' where you need to use a brush on your card eg: brushstroke painting, tole painting, use a brush for adding chalk, dry brushing etc. etc. I used DRY BRUSHING on my card to add white pigment ink on the tops of the black diecuts to add a bit of reflection from the moon & to add a bit of mistiness/spookiness to my card. Please see this link for details on the challenge---> WT555 ~ 10/29/2015 ~ Brush It Up! by Cook22 at Splitcoaststampers
I LOVED making this card so much - it was great fun and I just enjoyed every minute of it. I made a quick prototype with white cardstock first so I knew exactly where I needed to put the various layers - so that saved me a lot of time & I didn't waste my scant supply of black cardstock by making boo-boos.
I made the sky using Ranger watercolour cardstock and Distress Inks. I diecut a circle from Inkadinkado stamping mask paper and placed it on the cardstock so I could mask where I wanted the moon to be. I then coloured the cardstock using my Ranger round ink blending tool with the following Distress Inks: Dried Marigold, Scattered Straw, Spiced Marmalade, Stormy Sky and Hickory Smoke. I removed the mask and coloured the moon a little with Dried Marigold and shaded it a little with Hickory Smoke. I added two layers with my Wink of Stella clear glitter brush over the moon to give it some subtle sparkle.
The house, pumpkin and gravestones and bats are a die by Impression Obsession - Halloween Hill - but I cut off the tree next to the pumpkin and didn't use the far RHS of the diecut (as it didn't fit into the scene but saved it for later on). The front hill was diecut using another Impression Obsession die - Hill Landscape Layers. The gravestones and cat are leftovers from the far RHS of the back hill plus I diecut another scene and cut off a couple of gravestones and tucked them all in behind the diecut hill.
I used a small flat brush dipped very lightly into some white pigment ink to add a bit of whiteness to the tops of all the black diecuts (except for the Orchard Tree frame) so it would look like the moon is reflecting off them and to add a bit more spookiness. The ghosts were diecut using a Memory Box - Ghastly Ghosts die set - and I added some clear Wink of Stella to them for some sparkle. The black tree frame is also by Memory Box - Orchard Tree Frame - which I diecut 3 times and glued together using Tombow Mono Multi glue. I used some cobweb to add some mistiness/fog on the moon plus on the bottom hill & used tiny dots of Ranger Multi Matte medium glue to attach it. The designer paper is old - from 2008. I used the Orchard Tree Frame to diecut the paper but used the negative of the diecut. I used a Lifestyle Nesting Card Template die (rectangle) to cut the paper negative to the size I wanted then just glued that in around the black Orchard Tree diecut frame. It was great because it just slotted in around the black diecut tree on my black cardstock base.
The sentiment was stamped in Versamark Watermark ink and heat-embossed using SU white embossing powder. I trimmed the sentiment panel down then cut a flag end on the RHS. I added a Kaisercraft black rhinestone then popped the panel up on 1mm dimensionals. Lastly, I tied on some Divine Twin Halloween twine.
Thanks for having a peek at my card! Please come and peek at my blog - this link will take you directly to my blog post where I have a close-up photo of the scene & a more detailed supplies list---> http://instead-of-ironing.blogspot.c...ings-card.html
ETA: Also added this to the SCS Free for All F4A297 Challenge of Fall Colors + the Mixability Challenge MIX144 of Fall Colors - which susieaustralia suggested my card fits. Thanks Susie ♥ |
|
Date: Friday, October 30, 2015 GMT
Views: 3735
Favorited: 11
|
|
Additional Info
|
|
Keywords: WT555 F4A297 MIX144 Halloween ImpressionObsession MemoryBox Lifestyle HeroArts DistressInks ghosts diecutting BigShot
|
|
Stamps: Hero Arts Happy Halloween clear set CL353
|
|
Paper: Making Memories Spellbound 12" x 12" (2008) - ret
|
|
Ink: Versamark Watermark, Versacolor White pigment, Distress Inks: Dried Marigold, Spiced Marmalade, Scattered Straw, Stormy Sky, Seedless Preserves, Hickory Smoke
|
|
Accessories: Dies: MB Orchard Frame + Ghastly Ghosts, Lifestyle Nesting Card Templates + Nesting Circles, IO Halloween Hill + Hill Landscape Layers, paintbrush, Wink of Stella clear glitter brush, Big Shot, SU white ep, heatgun, dimensionals, cs: black, white, w/c
|
|
Techniques: Distress Inks background, diecutting, heat embossing
|
|
|
|
Difficulty (1-Easy 5-Advanced): 4
|
|