• login
  • join
  • about
  • help
 
  • Home
  • Gallery
  • Forum
  • Tutorials
  • Store Directory
  • Blogs
Splitcoast Gallery
 
Home     Company Galleries     Stampin Up! Galleries     Occasions Galleries     Upload a Card    


In the Gallery

Register

Today's Uploads

Search the gallery

Advanced Search

Around the Site

Join the Fan Club

Join a Group

Member List

Contact Us

Store Directory

Get the Weekly
Inkling
newsletter


Previous Issues

Get Social

Splitcoaststampers on InstagramLike Splitcoaststampers on FacebookFollow Splitcoaststampers on TwitterPit Splitcoaststampers on Pinterest

Sponsored Ads

Home » Member Galleries » Em1941
« Previous Image ·> Slide Show ·Next Image »

Rectangle Card in a Box-Large
Added to Favorite

Photo Details
Poster: Em1941

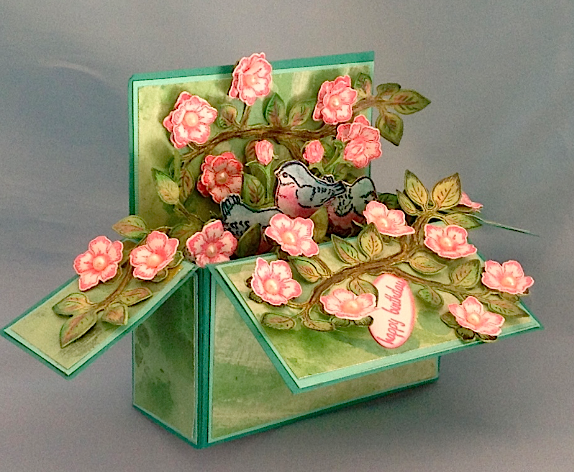
 There are a lot of templates and directions available for the Rectangle card in a box on the Internet. I wanted a larger box so I changed the sizing of my box to fit on a 4 ½” x 12” piece of cardstock. Make a template using these measurements: Starting on the 12 “ side, make a mark at: 1 5/8”, 5 5/8”, 7 ¼”, 11 ¼”, 12”. On the short side make a mark at 2 3/8”. When the template is complete paper clip it to your cardstock, place it on your scoreboard and score on all of the lines. I left the center back standing up rather than folding it back. Cut on all of the lines above the centerline and fold both small flaps and the front flap. Leave the back standing up. Add Contrast paper and DSP to the base of the box. Cut 2 strips for the shelves ¾” x 5”, score ends at ½” and fold the tabs forward.

Stamp the birds on white cardstock using black, and stamp the flowers in pink. The branches were stamped in black and sponged in 2 shades of green before some adding for accent color to match the flowers. The leaves were also sponged in 2 shades of green and I added a little pink accent to them to tie them in with the flower. The birds were colored using blue and pink chalk. I used my flower forming toolkit to shape the birds and flowers and them layered them on the branch using Dimensionals. I added pearls to the center of the flowers.
Adhere the shelf strips on one side of the box ONLY, and leave the other end loose. I adhered the front shelf about ¼” lower than the back shelf. Form the box by adhering the tab edge to the inside of the opposite end to form a box. Now attach the loose ends of the shelves to the other side of the box. Tape box shut and then adhere the shelves to the to opposite edge of the box.

Add the branches, birds and flowers to the shelves and the flaps using Hot Glue. I have my verse on the back of the center panel.

Date: Friday, August 28, 2015 GMT
Views: 16364
Favorited: 10
Additional Info
Keywords: Card In A Box Rectangle Card In A Box
Stamps: Heartfelt Creations Birds and Blooms Collection: HCPC-3644, HCPC-3645, HCPC-3646
Paper: 12” sq. for card base; contrast shade for layer 1 and white
Paper Size: 4 �� x 12�
Ink: Yellow; 3 shades of green; Pink
Accessories: Heartfelt Creations Birds and Blooms Dies HCD1-755, HCD1-756, HCD1-757; Flower Forming Toolkit; Pearls for flowers; Glue; Hot Glue; colored pencils; colored chalk and small stiff brushes
Techniques: Card in a Box

IMG_0004_b
«
VG_ChalkyF
«
Rectangle_
124_by_Mar
»
Hankie_Pri
»

Author
Thread Post A Reply 
Benzi


Splitcoast Dirty Dozen Alumni


Registered: July 9, 2008
Location: Stars Fell on Alabama
Posts: 83770
Fri, Aug 28, 2015 @ 12:11 PM

A beautiful box and I love the birds among those pretty flowers.

------------------------------
My Blog---My Gallery---My PinterestI'm a Punchkateer! (Prez) FOREVERDirty Dozen Alumni2014 CAS Spring DT--- Inspiration Challenge Co- Hostess 12/02/17-12/28/19 Watercolor Wednesday Design Team Hebrews 13:2 Brenda Team member for Dirty Dozen Christmas Fan Club Challenge
This user is online
Click here to see this users profile Click here to Send this user a Private Message Find more posts by this user Visit this user's gallery Report Post
wavejumper


Proud Fan Club Member


Registered: November 24, 2013
Location: NYC
Posts: 18583
Fri, Aug 28, 2015 @ 6:49 PM

What a great job! This is beautiful!

------------------------------
Margot
I am a proud fan club member
This user is online
Click here to see this users profile Click here to Send this user a Private Message Find more posts by this user Visit this user's gallery Report Post
tessaduck


Splitcoast Dirty Dozen
Splitcoast Gallery Moderator


Registered: October 5, 2010
Location: Oregon
Posts: 52695
Sun, Aug 30, 2015 @ 4:02 PM

Congratulations! In the General Stamping forum, you're in the FAVORITES for the week ending August 30, 2015. See post #57.

------------------------------
Have fun! with Love,
Brenda
Fan Club member
This user is online
Click here to see this users profile Click here to Send this user a Private Message Find more posts by this user Visit this user's gallery Report Post


Switch to full site

home |  gallery |  forums |  resources |  news |  store directory  |   about
contact us  |   calendar   |  advertise

Visit our platinum partners:
My Sweet Petunia   |  Verve  |   The Cat‘s Pajamas

© 2013-2026 MH Sub I, LLC dba Internet Brands.

Use of this Web site constitutes acceptance of the Splitcoaststampers.com

Terms of Use, Rules, Privacy Policy, and Cookie Policy.

Manage Preferences Your Privacy Choices


Em1941
View Public Profile
Send a private message to Em1941
Send email to Em1941
Visit Em1941's Gallery
Find More Posts by Em1941
Add Em1941 to Your Buddy List
Benzi
View Public Profile
Send a private message to Benzi
Send email to Benzi
Visit Benzi's homepage!
Visit Benzi's Gallery
Find More Posts by Benzi
Add Benzi to Your Buddy List
wavejumper
View Public Profile
Send a private message to wavejumper
Send email to wavejumper
Visit wavejumper's Gallery
Find More Posts by wavejumper
Add wavejumper to Your Buddy List
tessaduck
View Public Profile
Send a private message to tessaduck
Send email to tessaduck
Visit tessaduck's Gallery
Find More Posts by tessaduck
Add tessaduck to Your Buddy List