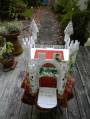
Took an ordinary cardboard box, painted it with white acrylic paint, sponged it with gray for surface contrast. Added paper towel and toilet paper tubes for turrents. Punched and cut out pieces of shirt cardboard for accents and vegetation. Voila! Lily's Enchanted Castle! Had a blast making it and I hope she enjoys it for Christmas!
Date: Wednesday, September 12, 2012 GMT Views: 1016
Favorited:2
Additional Info
Paper: Cardstock for inside medieval shields, leaves, shingles
Registered: July 14, 2007 Location: North Carolina Posts: 1
Mon, Oct 01, 2012 @ 6:14 AM
I do have a blog, spindleanddistaffcreations.blogspot.com but only photos of my work. I used a common cardboard box, papertowel and toilet paper tubes, glued them onto the box, cut out windows and crenellation at the top. I used egg carton cups for "window boxes" under each window. I added "floors". There are three on the inside, cut out the drawbridge. Then I added the details...cut "stones" to mimick the walls of a real castle and glued them to the outside and inside, used matchsticks for window grating, painted everything white. I then sponged very light gray paint in a light smearing fashion on the outside to accentuate the castle's surface. After that dried, I added sponged trailing "vines" on the outside in various spots, added ribbon roses on one vine to look like a climbing rose. Punched out leaves to add to window boxes to resemble shrubs and punched out ovals, cut in half, to make shingles on snow cones on the back spires. I glued a "rug" on the inside on each floor, added a cardboard fireplace on bottom floor. I made contoured cardstock shields to decorate the walls, printed out "tapestries" , "suit of armour" and mounted them on cardstock and glued them to the walls for decor.