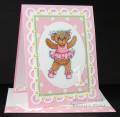
Spellbinder: Frameabilities – Scalloped Edge and I avoided cutting the center out by rolling in and back out again before it reaches the center cutting edge.
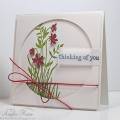
Nestabilities – Largest of the Large Ovals was used to cut the image panel.
Metal ball stylus: to emboss the snot area and I used a folded paper towel for cushion. I hold the image up to a light source and draw the snot outline and the nose so itÂ’s easy to emboss the correct area without guessing.
Fiskars: border punch for tiny flowers. I cut a strip of cardstock a little wider than the actual flower and place it under the flower portion of the punch rather than punch a complete border.
Cuttlebug: Tiny Tags die for flower center. I punch ¼” circles of cardstock and place those over the holes on the die and run it through the machine.
Placing the flowers and centers on the card is very easy by using a stick pin dipped in glue then touch the back of the cardstock shape and it picks it up. Flip it over and place on the card, press down with the fingers and youÂ’ll have time to slide into place if needed before it dries. I used AleeneÂ’s tacky glue and I repurpose the paper that stickers, labels and foam mounted rubber images come on so the paper doesn't absorb the glue.
Cuttlebug Numbers embossing folder was used for the #1. I place as piece of cardstock a little larger than the number in the folder and emboss then cut out. To keep it level on the card I punched three 1/8” circles of cardstock the same thickness as the what the upper portion rest on, glue those to the area that rest on the pink panel and then glue the number in place.
Paper: Bazzill – pink textured, smooth green, Making Memories polka dots, Beckett Expressions for image, Die Cuts with a View glitter paper, unknown smooth white for scalloped panel
Ink: computer
I used just a portion of the frame die to cut a piece for the insert. The envelope is two stripes of cardstock glued to the envelope and the hearts are punched from a Stampin Up punch. Click here for a direct to blog post link if youÂ’d like to see a photo of the insert and envelope.
Date: Wednesday, August 8, 2012 GMT Views: 1960
Favorited:7