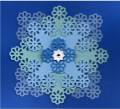
The smallest square is 1 1/2". Start with a strip of dp cut to 1 1/2' by about 3'. WITH THE WINGS IN THE IN POSITION, NOT FLARED OUT, turn the punch over always working from the back side, punch the two corners. When punching the 2nd corner, check where the the other was punched so you will know where to position the next two punches as you will be doing them with the punch working at an angle. Once you have learned how to punch the small medallion, the rest will be easy. The next size square needs to be at least 3' in order to get the punch in the correct position for the 3 punches in each corner. The 3rd punched medallion is 3 1/2". Do the 3 punchings on each corner. On this size and the last size you will have to hand clip out the center piece that wasn't punched. The 4th medallion is 4". You will do the same punching on this one as the 3rd one. But notice that the pieces between punched corners are larger and these also need to be hand clipped out. On #3 I have show two clipped out pieces and on #4, I have shown only one clipped out pieces. All sections need to be hand clipped out. The punch used on these samples was the hardest one to use. The punches used on medallions 1 and 2 were quite easy to position.
Date: Monday, April 9, 2012 GMT Views: 419
Favorited:8