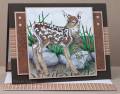
I was busy making a scene with Biblical ImpressionsÂ’s landscape images. To begin I stamped the Moose and masked off the image using a sticky note which I have stored to use multiple times. Next the Rock Grouping was stamped, a few if the Grass images (look for orange flowers) and the Field Grass right and last the Forest images right and left were stamped, cleaned and ink up only on the bottom portion and stamped again to bring the grass area down to the moose. Remove the mask and itÂ’s time to color.
I did not worry if the solid forest images donÂ’t stamp solid because I color those with a dark green Copic and it just adds to scene. The scene doesnÂ’t take much of an artist touch, just scribble on a variety of greens and blend together but do remember to add the flowers first and if you have a few white areas when you finish your scribbles fill them with flower colors.
A handmade cloud template and sponge was used to add the sky.
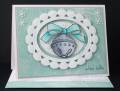
The brad tab was created with a Marvy ½” punch and Cuttlebug circle die which were glued together and cut in half. The brad by the way is a full round brad, the light made it appear flat on the bottom in the photo.
The brown panels were stamped with the Woven Fibers background image. I like using these images for adding texture and they are much easier than pulling out the large images. I stamp the image, cover the straight edge with a sticky note and repeat until I complete the border. There is no lining up the image for repeated stampings.
Copic markers used for the scene: C1,3,5,7, YR09, W0,3,5, G05,7,9,27,28,29,33,49,94,99,E00,21,97,99