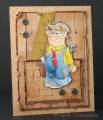
With a plastic stencil I sponged on the checked background for the base to add texture.
Ink distressing with Ranger tea dye ink was done on the base and vintage photo on all other panels.
For the brick embossing I inked up the embossing folder on the section that is sunk in which is raised once you emboss. I made sure lots of ink pooled on the mortar areas, it works best to rake the ink pad over that area and the ink is very noticeable on the folder when you have enough. After embossing I distressed with the vintage photo ink.
A Tonic paper perforator was used to tool distress the edges and the curling on the corners was done by rolling the paper with fingers.
The measuring tape is a paper embellishment (unknown company) glued to the card with AleeneÂ’s tacky glue.
The screws are brads from the company Forever in Time.
Copic colors used for the image: Pencil – YR15, Y19, E21, C7, Face – E02, E00, E21, Hair – C1,3,5,7, Jeans B91,93,95,97,99, Shirt – Y13,15,17, Tie R24,27,29, Hat – 40,42,44,47
Registered: January 11, 2010 Location: Miamisburg, OH Posts: 7227
Sat, Jul 09, 2011 @ 9:36 AM
Roxie, I LOVE those brads you used!! They are AWESOME!! It's just awesome to see where the IC takes people!! Love your card1!~
------------------------------ "Art is the most intense mode of individualism that the world has known." ďż˝ Oscar Wilde
My Blog: http://jennabeecrafts.blogspot.com/
Registered: November 3, 2005 Location: Fairport Harbor, OH-IO, Lake Erie shoreline Posts: 60202
Sat, Jul 09, 2011 @ 9:53 AM
What a fun card Roxie, just perfect for the Mr. Fix It guy and I love all the details. You always explain things so well. The bricks are fab. Great card.
I hope you are enjoying your time being Queen.
------------------------------ Karen ~ Thanks for stopping by my gallery. Proud Fan Club Member - FS525, QFTD49 Life is better in a beach town!