I am fairly new as a member of Split Coast Stampers. Every once in a while I see a card that I just have to make, and today this is the one. How can I make this. Can you please send me [email protected]. Thank you so much...Norma of Sandusky, Michigan
Registered: February 18, 2004 Location: pontiac, Michigan Posts: 1250
Mon, Dec 12, 2005 @ 8:26 PM
Oh my thank you girls .. I have been out pretty much of the day so sorry I havent had to chance to get back to you .. But here are the directions I got from Sandy ...
I really hope this is clear enough because this is all I have ...
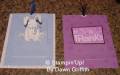
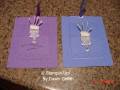
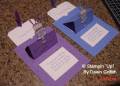
Pop-Up Sliding Card
Materials:
Stamps
Inkpads
Colored Card Stock: 4 �� x 5 �� card-front
White or other neutral Card Stock
1 3 �� x 4 �� pullout piece
1 4 �� and 5 �� card backing
Paper Cutter or Craft Knife
Adhesive
Bone Folder
Optional: Ribbon, corner rounder, hole punch
Directions:
Stamp and color image for card-front. Cut out and put aside.
Stamp colored card front with background stamp or a small image repeated randomly across the front. Punch a small half-circle in the center � this is so that the recipient can pull the pull-out more easily.
Using a paper cutter or craft knife, cut a 3-sided flap on the colored card-front approximately �� from the bottom and each of the sides. Score �� from the bottom of the flap. This �� portion will adhere to the pull-out piece. Score across the top of the flap. Then score one more time � the distance between the top and bottom scores.
Use corner rounder punch to trim top of white pullout piece. Punch a hole in the center at the top for pull ribbon. Alternatively, write �PULL� in small letters that will show through the half-circle punched on the card-front. Stamp a message on the pull-out near the top so it will show when the piece is pulled.
Adhere the bottom �� of the window to the bottom of the pull-out piece. This will be sliding mechanism for the pull-out.
Adhere the colored card-front to the white card-backing. Stamp or write a message in the window revealed by the pull-out.
Attach the stamped cut-out image to the front, making sure to only put adhesive on the part that will stick to the section of the flap that is above the �� bottom of the pull-out.
Thank you all again
xoxo
Dawn
Registered: February 18, 2004 Location: pontiac, Michigan Posts: 1250
Tue, Dec 13, 2005 @ 7:49 PM
I would like to clarify that these directions were copied word for word from the orginal author CalBear1969 ..I did not know this was done until it was brought to my attention and I just want to give credit where Credit is due..
Thanks girlie ...
xo
Dawn