IÂ’m not counting my envelope or the inside of sheet in the 45 minutes but they were only about three minutes of random stamping. It took pretty close to the time limit to get this card front done but I forgot to get any dispenser tape so IÂ’m using tape with a backing and some days that stuff sure can slow me down. I also had some uneven cuts that drive me crazy so they had to be fixed!
This card works up easily and directions go like this and no I didnÂ’t type all this out, I just cut and pasted it from another card and made some adjustments:
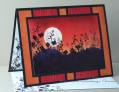
I used 80% glossy white cardstock for my panel.
-Tear a large piece of paper in two pieces – one piece much smaller than the other.
-Masked off the ground portion of the panel with the smaller section of torn paper. I use repositional tape to secure the paper and I actually find the blue painters tape from the hardware store to be sufficient and a great price; I keep some pieces on the table, paper cutter and Cuttlebug at all times so they are handy when I need them and it takes away some of the sticky which is good.
-Punch a circle from a sticky note and place it on the panel for your sun.
-Ink up the brayer with orange and brayer onto the panel starting off the cardstock at the top and rolling back and forth and side to side to avoid lines. Now add the red in the same manner but avoid going down as far on the panel. Ink up a second time and repeat as often as you need to get the depth of color you like for both color applications.
-Remove the sun mask and without inking up the brayer go over the entire sky area to tone down the white. This does two things, one: it uses some of the brayer ink and two: it pulls the color from the ink already on the panel.
-Now cover the sky portion of the panel with the other piece of torn paper. Also place a second piece of torn paper at an angle which will be covering the bottom of the panel. This will add depth when finished. Ink up the brayer and apply it to the panel but keeping it on the light side so not a full coverage. Remove the angled mask; cover the already colored area and brayer the ink on until itÂ’s a darker shade than the first.
-Now to get the darkness in the sky panel I replaced the sun mask and positioned my panel to the black which is on the paper you just used for the ground area. Start off the cardstock and work onto the top area and itÂ’ll pick up some the black without even inking up the brayer. Pretty cool! This step could also be done before you take the sun mask off to brayer over the entire panel but I donÂ’t do things the easy way.
-Now itÂ’s time to add the images using a stamp positioner.
-The orange and red panel is stamped with red ink using the Weave backgrounder and these panels were also ink distressed.
-My texture for the challenge was done with the Cuttlebug and embossing folder on the red strips.
I think that covers it!


 )) Thanks!