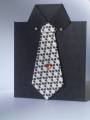
I struggle for masculine cards! here is one we'll be doing for July's camp.
I've been PM'd for directions so here goes: Standard card base 4 1/4 X 5 1/2 Fold in half. On card back measure down 1 inch and cut off. On card front measure down 1 inch and cut 1 inch strip (do not remove) fold inward towards front to match other side. This makes the collar. The oragami Tie tutorial is really simple. http://www.activityvillage.co.uk/Origami%20Tie.pdf
Date: Tuesday, June 30, 2009 GMT Views: 1738
Favorited:26
Registered: May 5, 2006 Location: Hillsboro OR Posts: 11498
Tue, Jun 30, 2009 @ 3:45 PM
this is downright....HIL-ARIOUS!! HOW did you do this!??? Do you have directions on a blog?? VERY cute!! I'm gunna hafta dig into my Game night paper and actualy use it.....I've been hoarding it!! heehehhhehe
------------------------------ We cannot do great things, only small things with great love.
Registered: May 5, 2006 Location: Hillsboro OR Posts: 11498
Tue, Jun 30, 2009 @ 3:46 PM
this is downright....HIL-ARIOUS!! HOW did you do this!??? Do you have directions on a blog?? VERY cute!! I'm gunna hafta dig into my Game night paper and actualy use it.....I've been hoarding it!! heehehhhehe
------------------------------ We cannot do great things, only small things with great love.
Registered: June 2, 2007 Location: Washington State Posts: 3953
Tue, Jun 30, 2009 @ 4:10 PM
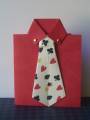
let me know if you need more specific instructions on the shirt. I will probably use Jackpot DSP for the shirt front in my final project but this is much more cost effective when I'm low on dsp
Registered: January 31, 2006 Location: BC, Canada Posts: 4288
Mon, Jul 06, 2009 @ 7:40 PM
This is awesome - Love how you made the collar for the shirt!!
Thanks for sharing the how to with us!! ... and for the tie tutorial :-)
Saved to my favs so I can give it a try