-I use 80% glossy (not a high shine finish) cardstock for my scene. You can pick this up in the office supply stores. Mine came from a print shop so I donÂ’t know the brand name. -These instructions are long so you can follow with ease but the procedure is really very easy and quick once you learn the technique. Typing took longer than the procedure!
-The first step is to secure the 80% cardstock to scrap paper - 8.5 x 11” regular paper and placed the cardstock in the middle. I secured with blue painters tape on the ground area. I use the same piece of tape multiple times and store it right on my work space and for this project I used a couple pieces that are pretty much ready for the garbage can because the sticky is almost gone; this will avoid it taking off the top layer from the cardstock and also avoid leaving sticky that will not allow the ink to cover the paper.
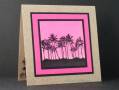
-Now mask off the ground area, I used torn paper; secure it with the painters tape to the paper the cardstock is secured to.
-Load the brayer with the lightest color pink and apply then the darker and I brayered off first onto the paper the cardstock is secured to so it wouldn’t go on real dark. Work the brayer back and forth and moving it slightly side to side but keeping completely away from the last ½” towards the ground area until the brayer is nearly empty then go over that last ½” for blending. You will repeat these steps until you like your color.
Note: that where I brayered off the ink onto the scrap is right next to the cardstock so when you brayer it is picking up a little and adding it to the sky; not a complete waste.
-Add the image, mask off in the same manner as you did for the sky using the opposite torn piece and rub directly onto the paper with a black ink pad. I also added some marker since my ground image is not solid and I didnÂ’t want the pink to show.
-I did a ten second stipple with a plastic stipple brush on the Kraft and pink background layers - black on Kraft and pink on pink.
ThatÂ’s it, now youÂ’re ready to assemble.
Registered: July 21, 2004 Location: in the warm Southwest Posts: 30313
Mon, Jun 08, 2009 @ 10:22 AM
this TOTALLY pops in the gallery! love the stippling and the detailed instructions on brayering (though I am brayer-challenged and hardly ever use the thing!), TFS this CAS card!
------------------------------ Melissa (Muh LEE sa) aka straight s/talker loves stamping the CAS way my GALLERY
Registered: February 7, 2009 Location: Midwest Posts: 720
Mon, Jun 08, 2009 @ 11:33 AM
How gorgeous!
------------------------------ Jo Meyer, CopicClassroom.blogspot.com
DT for ScrapItPlus -- http://ScrapItPlus.com/
It's never too late to live happily ever after.