In the Forums

Register

Today's Posts

Search

Get the Weekly
Inkling
newsletter


Previous Issues

Splitcoaststampers's privacy policy

Get Social

Splitcoaststampers on InstagramLike Splitcoaststampers on FacebookFollow Splitcoaststampers on TwitterPit Splitcoaststampers on Pinterest

Sponsored Ads


Splitcoaststampers.com - the world's #1 papercrafting community
You're currently viewing Splitcoaststampers as a GUEST. We pride ourselves on being great hosts, but guests have limited access to some of our incredible artwork, our lively forums and other super cool features of the site! You can join our incredible papercrafting community at NO COST. So what are you waiting for?

Join the party at Splitcoaststampers today!

Thread Tools Search this Thread
Old 01-20-2012, 11:26 AM   #1  
Splitcoast Dirty Dozen Alumni
Splitcoast Challenge Hostess
 
bfinlay's Avatar
 
Join Date: Aug 2008
Location: Belfast, Northern Ireland, UK
Posts: 31,972
Likes: 0
Received 1 Like on 1 Post
Default Tuesday Tutorial #3 {1-24-12} Basic Reverse Masking

Today I'm going to share with you the basics of a technique called reverse masking. There are many variations on this technique but we'll start with a quick, simple one today. Reverse masking involves cutting out a shape with a die-cutting machine, punches or scissors and then using the negative of the cut shape as a mask to cover up parts of the cardstock you don't want inked, leaving the shape revealed to stamp and sponge.

You can use any shape such as a square, oval, rectangle, heart or star. You can also stamp an image and cut that out for your shape. I've even googled an object in images and then used the outline to cut out my shape for masking - I've tried it with a guitar, flower, and an irregular shaped heart.
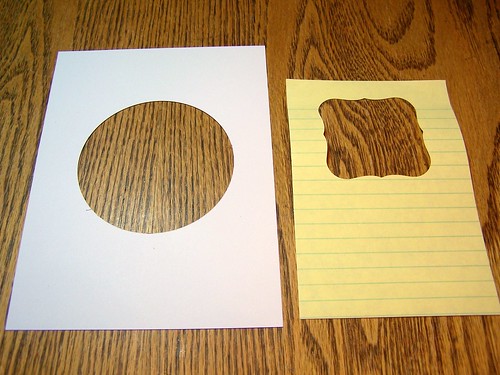
Today I'm going to use a circle cut with Spellbinders Nestabilities Circles in my Cuttlebug, but I've also cut a Nestabilities Labels One from a post-it-note just as an example.


You can cut your mask from regular paper or from post-it-notes. Thick card isn't ideal because when you come to stamp over the masking sheet, the stamp will not connect with the the card you're stamping onto right up to the edges of your shape, and it leaves gaps in your stamping.
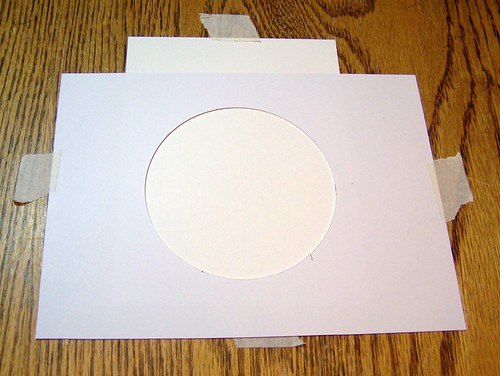
The advantage of a post-it-note is that one end is sticky and when you put the masking sheet over your card base the stickiness will hold it in place so it won't slip around while you're sponging and stamping. If you use a post-it-note, it's helpful to cut near the sticky end as shown in the photo above, so that it holds the shape in place more securely.
You can also use removable adhesive, or some people like to use a repositional adhesive spray product. When neither one of these is available I've used little bits of masking tape to attach my cardbase to the table and also the masking sheet over it. Just check first to make sure your masking tape is low tack enough so that it doesn't ruin the edges of your cardstock when you remove it!
Here's what it looks like when I've got it all in place.


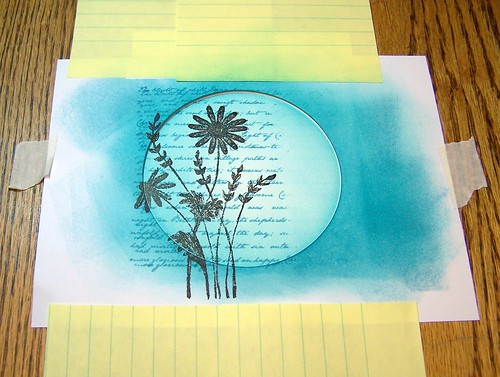
The next step is sponging color inside the circle. Before this step I used some post-it-notes at the edges to cover up the cardbase and protect it from ink while I'm sponging inside the circle. There are several things I like to remember so that the ink goes on smoothly. You can use a sponge or an ink applicator. Tap your applicator onto the ink pad to pick up ink and bring it down first on the outside of the masking sheet once or twice before moving inside the shape in a circular motion. If you come straight down inside the circle there will be sharp ink lines and uneven, splodgy ink instead of even coverage. When I first started I practiced on scrap paper until I got the feel of how much pressure to apply. I've used Stampin Up's Cool Caribbean first as my lighter color and then added a layer of Ranger Distress Broken China on the outside edge so the color is heavier there and gets lighter towards the center of the circle.
Here's what it looks like at this stage.


Then take a background stamp and ink it up in a slightly darker shade - I've used Ranger Distress Broken China again here with Sweet n' Sassy Stamps Light of Christmas background stamp. This is a beautiful background, the words are so small that they aren't limited to simply Christmas cards! Because I want the script background to be uneven to make it more interesting, I've taken a clean sponge and rubbed off a bit of ink on one side. I then stamped over the circle and here's the result.


At this point you can take any other stamps you'd like to use for a background and add them such as partial flourishes or flowers. Postal images work well too. If you want a lighter stamped image, stamp off your image once a peice of scrap paper before stamping inside your shape.
If you leave the masking sheet in place before stamping your main image, it will look like this.


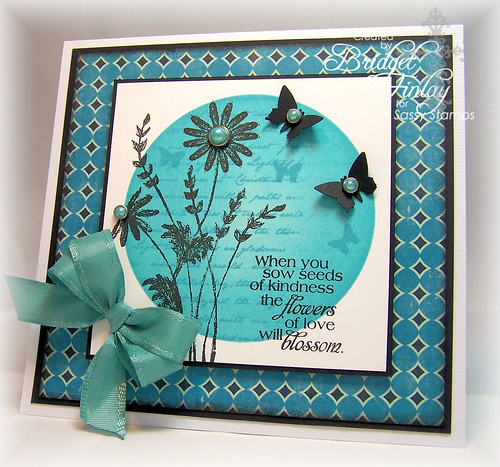
Here's an example of the result when you remove the masking sheet and then stamp your sentiment.


You can also remove the mask before stamping your main image and your sentiment and it will look like this.


For both of these examples I've stamped the sentiment after removing the masking sheet so that the words are partially outside the circle.
Whether you keep the masking sheet in place or remove it before stamping your main image, it's entirely up to you. It just depends on the look you're going for and what you prefer, both work well.
This flower silhouette and sentiment are from Sweet n' Sassy Stamps Wildflowers set.
Other Sweet n' Sassy Stamps which I thought would work well are the flowers from Poppies and Greetings, Spring Tulips, Rose Blossom, and Flowers in Bloom. What about trying the images from Together Silhouettes, Snowflake Flourish, or any of the beautiful bird sets!
I stamped a few tiny butterflies from Sweet n' Sassy Stamps Serene Silhouettes and then put my card together with dp, punched butterflies, pearl brads and ribbon and here's the end result.


There are so many creative ways to use reverse masking and make it your own, so I hope you'll have fun with it!
__________________
Bridget
My blog:Bridgets Paper Blessings

Last edited by SweetnSassyStamps; 01-21-2012 at 02:01 PM..
bfinlay is offline  
Tweet this Post! Share on Facebook Reddit!! Pin on Pinterest! Share on Google+!
Likes
Old 01-21-2012, 12:05 PM   #2  
Gabfest Goddess
 
SweetnSassyStamps's Avatar
 
Join Date: Jan 2008
Location: my happy place
Posts: 7,171
Likes: 0
Received 0 Likes on 0 Posts
Default

Bridget, this is a fabulous tutorial and your card is just gorgeous!!
__________________

Korin Sutherland
This is the day which the Lord hath made; we will rejoice and be glad in it. Psalm 118:24
My Website
SweetnSassyStamps is offline  
Tweet this Post! Share on Facebook Reddit!! Pin on Pinterest! Share on Google+!
Likes
Old 01-24-2012, 11:17 AM   #3  
Splitcoast Dirty Dozen Alumni
 
hskelly's Avatar
 
Join Date: Oct 2004
Location: Castro Valley, Ca
Posts: 49,248
Likes: 0
Received 0 Likes on 0 Posts
Default

Great tutorial and gorgeous card Bridget!
__________________
Harriet aka hskelly
My blog: Allycatcards
hskelly is offline  
Tweet this Post! Share on Facebook Reddit!! Pin on Pinterest! Share on Google+!
Likes
Old 01-24-2012, 11:21 AM   #4  
Splitcoast Challenge Hostess
Just Me
 
stagccva's Avatar
 
Join Date: Sep 2006
Location: over here :)
Posts: 32,898
Likes: 0
Received 0 Likes on 0 Posts
Default

Wow, Bridget - this is SO amazingly gorgeous!! I cannot wait to try this technique - thanks SO much for the tutorial!

And your card is really gorgeous
__________________
Taylor
(blog) ~ (gallery) ~ (facebook)
Social Media Manager, Crafter's Companion
UK ~ US ~ Spectrum Noir
stagccva is offline  
Tweet this Post! Share on Facebook Reddit!! Pin on Pinterest! Share on Google+!
Likes
Old 01-24-2012, 02:07 PM   #5  
Polyshrink Goddess
 
Mathilda's Avatar
 
Join Date: Mar 2011
Location: Mississauga, ON
Posts: 605
Likes: 0
Received 0 Likes on 0 Posts
Default Mathilda M

Bridget ... your card is gorgeous ... can't wait to try this technique ...thanks for sharing.
Mathilda is offline  
Tweet this Post! Share on Facebook Reddit!! Pin on Pinterest! Share on Google+!
Likes
Old 01-24-2012, 04:46 PM   #6  
Gabfest Goddess
 
SweetnSassyStamps's Avatar
 
Join Date: Jan 2008
Location: my happy place
Posts: 7,171
Likes: 0
Received 0 Likes on 0 Posts
Default

Quote:

Originally Posted by MathildaView Post
Bridget ... your card is gorgeous ... can't wait to try this technique ...thanks for sharing.
Oh, Mathilda, I do hope you will share with us what you make !!
__________________

Korin Sutherland
This is the day which the Lord hath made; we will rejoice and be glad in it. Psalm 118:24
My Website
SweetnSassyStamps is offline  
Tweet this Post! Share on Facebook Reddit!! Pin on Pinterest! Share on Google+!
Likes
Old 01-25-2012, 03:51 AM   #7  
Stampin' Fool
 
atsamom's Avatar
 
Join Date: Apr 2007
Location: Parker, CO
Posts: 1,392
Likes: 0
Received 0 Likes on 0 Posts
Default

Bridget - it's fantastic! So many great details and options!
__________________
Kim in Colorado
My blog: Joyful Creations with Kim
atsamom is offline  
Tweet this Post! Share on Facebook Reddit!! Pin on Pinterest! Share on Google+!
Likes
Old 01-25-2012, 05:43 AM   #8  
Gabfest Goddess
 
SweetnSassyStamps's Avatar
 
Join Date: Jan 2008
Location: my happy place
Posts: 7,171
Likes: 0
Received 0 Likes on 0 Posts
Default

I just had to tell you, Bridget, earlier this week I was at a local office supply store that I frequent...they are sort of a close-out type store.....and they had generic post-it notes in packs of 12 for $1!! I grabbed a pack just for this technique .
__________________

Korin Sutherland
This is the day which the Lord hath made; we will rejoice and be glad in it. Psalm 118:24
My Website
SweetnSassyStamps is offline  
Tweet this Post! Share on Facebook Reddit!! Pin on Pinterest! Share on Google+!
Likes
Old 01-25-2012, 07:15 AM   #9  
Splitcoast Dirty Dozen Alumni
Splitcoast Challenge Hostess
 
bfinlay's Avatar
 
Join Date: Aug 2008
Location: Belfast, Northern Ireland, UK
Posts: 31,972
Likes: 0
Received 1 Like on 1 Post
Default

Korin, you got a great deal all right!! It's hard to find the larger size post-it-notes here, so I had good ole' Mom send me some from the U.S.!
__________________
Bridget
My blog:Bridgets Paper Blessings
bfinlay is offline  
Tweet this Post! Share on Facebook Reddit!! Pin on Pinterest! Share on Google+!
Likes
Old 01-25-2012, 07:17 AM   #10  
Splitcoast Dirty Dozen Alumni
Splitcoast Challenge Hostess
 
bfinlay's Avatar
 
Join Date: Aug 2008
Location: Belfast, Northern Ireland, UK
Posts: 31,972
Likes: 0
Received 1 Like on 1 Post
Default

Mathilda, Harriet, Taylor, Kim and Korin, thanks for your sweet comments and like Korin said, if and when you give this a try, we'd LOVE to see your creation!
__________________
Bridget
My blog:Bridgets Paper Blessings
bfinlay is offline  
Tweet this Post! Share on Facebook Reddit!! Pin on Pinterest! Share on Google+!
Likes
Old 01-25-2012, 12:26 PM   #11  
Gabfest Goddess
 
merrymstamper's Avatar
 
Join Date: Feb 2005
Location: pennsylvania
Posts: 7,318
Likes: 0
Received 0 Likes on 0 Posts
Default

WOW!!! this is fantastic Bridget!
__________________
merrymstamper is offline  
Tweet this Post! Share on Facebook Reddit!! Pin on Pinterest! Share on Google+!
Likes
Old 01-25-2012, 12:36 PM   #12  
Matboard Maniac
 
Nana2sean's Avatar
 
Join Date: Mar 2005
Location: CT
Posts: 202
Likes: 0
Received 0 Likes on 0 Posts
Thumbs up

Awesome tutorial and beautiful card TFS...
Nana2sean is offline  
Tweet this Post! Share on Facebook Reddit!! Pin on Pinterest! Share on Google+!
Likes
Old 01-25-2012, 01:05 PM   #13  
Pearl-ExPert
 
Lola G.'s Avatar
 
Join Date: Jul 2008
Location: South Glastonbury, CT
Posts: 2,217
Likes: 0
Received 0 Likes on 0 Posts
Default

What a beautiful technique – your card is really special! This seems like something I'd be very comfortable trying, so thank you for the inspiration.
Lola G. is offline  
Tweet this Post! Share on Facebook Reddit!! Pin on Pinterest! Share on Google+!
Likes
Old 01-26-2012, 10:08 AM   #14  
Glitter Queen
 
noreenkilby's Avatar
 
Join Date: Jun 2010
Location: Boyds MD
Posts: 22
Likes: 0
Received 0 Likes on 0 Posts
Default

Your "card" is much too pretty to be just a card .... it should be framed. Thanks for the inspiration!
noreenkilby is offline  
Tweet this Post! Share on Facebook Reddit!! Pin on Pinterest! Share on Google+!
Likes
Old 01-26-2012, 12:10 PM   #15  
Glitter Queen
 
noreenkilby's Avatar
 
Join Date: Jun 2010
Location: Boyds MD
Posts: 22
Likes: 0
Received 0 Likes on 0 Posts
Default

So I had some time this afternoon to give masking a try. It took me a few false starts, but within an hour, I had this "first" effort. Mask Card by noreenkilby - Cards and Paper Crafts at Splitcoaststampers
noreenkilby is offline  
Tweet this Post! Share on Facebook Reddit!! Pin on Pinterest! Share on Google+!
Likes
Old 01-26-2012, 01:14 PM   #16  
Gabfest Goddess
 
SweetnSassyStamps's Avatar
 
Join Date: Jan 2008
Location: my happy place
Posts: 7,171
Likes: 0
Received 0 Likes on 0 Posts
Default

Quote:

Originally Posted by noreenkilbyView Post
So I had some time this afternoon to give masking a try. It took me a few false starts, but within an hour, I had this "first" effort. Mask Card by noreenkilby - Cards and Paper Crafts at Splitcoaststampers
Your card is wonderful!!! I'm so glad you gave it a try!
__________________

Korin Sutherland
This is the day which the Lord hath made; we will rejoice and be glad in it. Psalm 118:24
My Website
SweetnSassyStamps is offline  
Tweet this Post! Share on Facebook Reddit!! Pin on Pinterest! Share on Google+!
Likes
Old 01-26-2012, 01:17 PM   #17  
Splitcoast Dirty Dozen Alumni
Splitcoast Challenge Hostess
 
bfinlay's Avatar
 
Join Date: Aug 2008
Location: Belfast, Northern Ireland, UK
Posts: 31,972
Likes: 0
Received 1 Like on 1 Post
Default

Noreen, I'm so glad you gave this a try, and look at the result - beautiful!!! I hope you had fun too!
Thanks for your kind comments, Noreen, Lola, Nana2Sean, and Mary - you're all very sweet and encouraging!
__________________
Bridget
My blog:Bridgets Paper Blessings
bfinlay is offline  
Tweet this Post! Share on Facebook Reddit!! Pin on Pinterest! Share on Google+!
Likes
Old 01-26-2012, 02:46 PM   #18  
Gabfest Goddess
 
SweetnSassyStamps's Avatar
 
Join Date: Jan 2008
Location: my happy place
Posts: 7,171
Likes: 0
Received 0 Likes on 0 Posts
Default

I finally got around to giving this a try ....

Let Go WT359 by sweetnsassystamps - Cards and Paper Crafts at Splitcoaststampers
__________________

Korin Sutherland
This is the day which the Lord hath made; we will rejoice and be glad in it. Psalm 118:24
My Website
SweetnSassyStamps is offline  
Tweet this Post! Share on Facebook Reddit!! Pin on Pinterest! Share on Google+!
Likes
Old 01-26-2012, 03:13 PM   #19  
Dirty Dozen Alumni
 
eggette's Avatar
 
Join Date: Sep 2007
Location: Shetland, Ontario, Canada
Posts: 3,865
Likes: 0
Received 1 Like on 1 Post
Default

Oh my word! I am so glad I popped in! This is gorgeous!!
__________________
~Bonnie~
My Blog - The Lucky Clucker

My Gallery
Proud Dirty Dozen Alumni!
Proud DT Member for CAS-ual Fridays Stamps
eggette is offline  
Tweet this Post! Share on Facebook Reddit!! Pin on Pinterest! Share on Google+!
Likes
Old 01-26-2012, 04:54 PM   #20  
Stazon Splitcoast
 
mamaxsix's Avatar
 
Join Date: Jul 2007
Location: Syracuse, Indiana
Posts: 25,177
Likes: 0
Received 2 Likes on 2 Posts
Default

Great explanation and very helpful pictures...oh, and of course, your card is AWESOME! Thanks for sharing Bridget
__________________
Gail
mamaxsix is offline  
Tweet this Post! Share on Facebook Reddit!! Pin on Pinterest! Share on Google+!
Likes
Old 01-26-2012, 05:05 PM   #21  
Glitter Queen
 
noreenkilby's Avatar
 
Join Date: Jun 2010
Location: Boyds MD
Posts: 22
Likes: 0
Received 0 Likes on 0 Posts
Default

Bridget, I'm curious. What kind of lighting do you use to take the photo of your card? Mine always turn out yellowish and I"m sure it's the type of bulbs in the lamp I use.
noreenkilby is offline  
Tweet this Post! Share on Facebook Reddit!! Pin on Pinterest! Share on Google+!
Likes
Old 01-27-2012, 05:53 AM   #22  
Gabfest Goddess
 
SweetnSassyStamps's Avatar
 
Join Date: Jan 2008
Location: my happy place
Posts: 7,171
Likes: 0
Received 0 Likes on 0 Posts
Default

Quote:

Originally Posted by noreenkilbyView Post
Bridget, I'm curious. What kind of lighting do you use to take the photo of your card? Mine always turn out yellowish and I"m sure it's the type of bulbs in the lamp I use.
I'm not Bridget, but I may be able to help with the yellow lighting.....it's best to use natural light if you can....I often shoot my photos in front of a window during the day, but if I have to take them one the sun goes down, I use my Ott-lite....because it uses white light....many household light bulbs give off yellow light so that will make your pictures look yellow.
__________________

Korin Sutherland
This is the day which the Lord hath made; we will rejoice and be glad in it. Psalm 118:24
My Website
SweetnSassyStamps is offline  
Tweet this Post! Share on Facebook Reddit!! Pin on Pinterest! Share on Google+!
Likes
Old 01-27-2012, 07:18 AM   #23  
Splitcoast Dirty Dozen Alumni
Splitcoast Challenge Hostess
 
bfinlay's Avatar
 
Join Date: Aug 2008
Location: Belfast, Northern Ireland, UK
Posts: 31,972
Likes: 0
Received 1 Like on 1 Post
Default

Thanks so much, Bonnie and Gail!
__________________
Bridget
My blog:Bridgets Paper Blessings
bfinlay is offline  
Tweet this Post! Share on Facebook Reddit!! Pin on Pinterest! Share on Google+!
Likes
Old 01-27-2012, 07:25 AM   #24  
Splitcoast Dirty Dozen Alumni
Splitcoast Challenge Hostess
 
bfinlay's Avatar
 
Join Date: Aug 2008
Location: Belfast, Northern Ireland, UK
Posts: 31,972
Likes: 0
Received 1 Like on 1 Post
Default

Yes, I second everything Korin has said, Noreen. I got something called a "natural light" light bulb which I put in a regular desk lamp and that helps...it was only slightly more expensive than a regular light bulb, and I know they'd be available in the U.S. too. Most household bulbs have a yellowish hue.
I find shining the light from the top is helpful too, so that huge shadows aren't cast.
There are probably tutorials on taking photo's and if I can hunt one up I'll put a link here...hey, Korin, maybe we could do one of those here! : )
__________________
Bridget
My blog:Bridgets Paper Blessings
bfinlay is offline  
Tweet this Post! Share on Facebook Reddit!! Pin on Pinterest! Share on Google+!
Likes
Old 01-27-2012, 07:36 AM   #25  
Mad Swapper
 
missyterry's Avatar
 
Join Date: Nov 2004
Posts: 1,581
Likes: 0
Received 0 Likes on 0 Posts
Default

What a wonderful 'tut' Bridget.
No matter how many times I've done the 'reverse masking', I have to stop and think....senior moments. Now I have printed this and it's on my desk.
Thank you.
missyterry is offline  
Tweet this Post! Share on Facebook Reddit!! Pin on Pinterest! Share on Google+!
Likes
Old 01-27-2012, 07:50 AM   #26  
Splitcoast Dirty Dozen Alumni
Splitcoast Challenge Hostess
 
bfinlay's Avatar
 
Join Date: Aug 2008
Location: Belfast, Northern Ireland, UK
Posts: 31,972
Likes: 0
Received 1 Like on 1 Post
Default

Thankyou! And I know exactly what you mean about those "senior moments" and having to stop and think....and stop and think again...then stop and try to remember what I was thinking about.....

Quote:

Originally Posted by missyterryView Post
What a wonderful 'tut' Bridget.
No matter how many times I've done the 'reverse masking', I have to stop and think....senior moments. Now I have printed this and it's on my desk.
Thank you.
__________________
Bridget
My blog:Bridgets Paper Blessings
bfinlay is offline  
Tweet this Post! Share on Facebook Reddit!! Pin on Pinterest! Share on Google+!
Likes
Old 01-27-2012, 11:49 AM   #27  
Glitter Queen
 
noreenkilby's Avatar
 
Join Date: Jun 2010
Location: Boyds MD
Posts: 22
Likes: 0
Received 0 Likes on 0 Posts
Default

Another card ... I'm getting a little OCD with this technique. This one was challenging because I didn't like how the cup aligned in the circle -- maybe because the cup is curvy? Anyway, I finally got this one after about the 5th try. All supplies are CTMH (Wonderland Workshop).
noreenkilby is offline  
Tweet this Post! Share on Facebook Reddit!! Pin on Pinterest! Share on Google+!
Likes
Old 01-27-2012, 11:50 AM   #28  
Glitter Queen
 
noreenkilby's Avatar
 
Join Date: Jun 2010
Location: Boyds MD
Posts: 22
Likes: 0
Received 0 Likes on 0 Posts
Default

Oops, I forgot to put the link to my card: Gallery at Splitcoaststampers
noreenkilby is offline  
Tweet this Post! Share on Facebook Reddit!! Pin on Pinterest! Share on Google+!
Likes
Old 01-27-2012, 12:23 PM   #29  
Splitcoast Dirty Dozen Alumni
Splitcoast Challenge Hostess
 
bfinlay's Avatar
 
Join Date: Aug 2008
Location: Belfast, Northern Ireland, UK
Posts: 31,972
Likes: 0
Received 1 Like on 1 Post
Default

Oh, Noreen, I smiled with delight when I saw your card! You really made this your own and were so creative with the bg, image and sentiment...all are fabulous, by the way, and ones I'd not seen before! Glad you're having fun with this technique!
__________________
Bridget
My blog:Bridgets Paper Blessings
bfinlay is offline  
Tweet this Post! Share on Facebook Reddit!! Pin on Pinterest! Share on Google+!
Likes
Old 02-02-2012, 04:47 PM   #30  
Cardstock Collector
 
jan stamps's Avatar
 
Join Date: Jul 2011
Posts: 2
Likes: 0
Received 0 Likes on 0 Posts
Default

I use shrink art sheets or stencil sheets and make permanent stencils
of my nestie dies... I cut heart ones for all of gals in one of my
card clubs last year and we were able to use them over and over.
jan stamps is offline  
Tweet this Post! Share on Facebook Reddit!! Pin on Pinterest! Share on Google+!
Likes
Old 02-02-2012, 04:59 PM   #31  
Polyshrink Goddess
 
Mathilda's Avatar
 
Join Date: Mar 2011
Location: Mississauga, ON
Posts: 605
Likes: 0
Received 0 Likes on 0 Posts
Default Mathilda M

Finally tried this wonderful technique ... here is my card ...

Mother Teresa by Mathilda - Cards and Paper Crafts at Splitcoaststampers
Mathilda is offline  
Tweet this Post! Share on Facebook Reddit!! Pin on Pinterest! Share on Google+!
Likes
Old 04-09-2012, 08:21 AM   #32  
Splitcoast Dirty Dozen Alumni
Splitcoast Gallery Moderator
Creative Crew SU Design Team Alumni
 
simplybeautiful's Avatar
 
Join Date: Apr 2008
Location: Wandering in the Mountains
Posts: 9,521
Received 55 Likes on 53 Posts
Default

I have fell in love with this technique! Thanks for sharing!
here are some cards I have made using it

Happy Birthday Korin
April Showers
Worthy Is The Lamb
__________________
Ceal Humbled FS287 Spring 2013 CAS Design Team I design for My Sweet Petunia, Sweet 'n Sassy Stamps m{My BLOG} My Gallery
simplybeautiful is online now  
Tweet this Post! Share on Facebook Reddit!! Pin on Pinterest! Share on Google+!
Likes
Old 06-14-2012, 05:58 AM   #33  
Polyshrink Goddess
 
wanderer's Avatar
 
Join Date: Nov 2005
Location: Sylvan Lake, Alberta
Posts: 531
Likes: 0
Received 0 Likes on 0 Posts
Default

Great tutorial! I love your card.
wanderer is offline  
Tweet this Post! Share on Facebook Reddit!! Pin on Pinterest! Share on Google+!
Likes
Old 06-14-2012, 10:32 AM   #34  
Rubber Obsessor
 
kathibc's Avatar
 
Join Date: Jul 2009
Location: Murfreesboro, TN
Posts: 115
Likes: 0
Received 0 Likes on 0 Posts
Default Love this tutorial

You make it all look so easy. Newbie here so any help on what are good stamp pads would be appreciated... beginner level ;)

Kathi
kathibc is offline  
Tweet this Post! Share on Facebook Reddit!! Pin on Pinterest! Share on Google+!
Likes
Old 06-16-2012, 08:28 AM   #35  
Gabfest Goddess
 
SweetnSassyStamps's Avatar
 
Join Date: Jan 2008
Location: my happy place
Posts: 7,171
Likes: 0
Received 0 Likes on 0 Posts
Default

Hi Kathi!

Tim Holtz Distress Inks are great for this technique but most any decent dye ink would work. Welcome to the wonderful hobby of stamping !!
__________________

Korin Sutherland
This is the day which the Lord hath made; we will rejoice and be glad in it. Psalm 118:24
My Website
SweetnSassyStamps is offline  
Tweet this Post! Share on Facebook Reddit!! Pin on Pinterest! Share on Google+!
Likes
Old 06-16-2012, 08:37 AM   #36  
Rubber Obsessor
 
kathibc's Avatar
 
Join Date: Jul 2009
Location: Murfreesboro, TN
Posts: 115
Likes: 0
Received 0 Likes on 0 Posts
Default

Quote:

Originally Posted by sweetnsassystampsView Post
Hi Kathi!

Tim Holtz Distress Inks are great for this technique but most any decent dye ink would work. Welcome to the wonderful hobby of stamping !!
Thanks! I am very excited to get into this part of crafting! I appreciate the welcome ;)
__________________
Kathibc
My blog:http://www.designoriginalsbykc.blogspot.com
kathibc is offline  
Tweet this Post! Share on Facebook Reddit!! Pin on Pinterest! Share on Google+!
Likes
Old 06-16-2012, 09:46 AM   #37  
Splitcoast Dirty Dozen Alumni
Splitcoast Challenge Hostess
 
bfinlay's Avatar
 
Join Date: Aug 2008
Location: Belfast, Northern Ireland, UK
Posts: 31,972
Likes: 0
Received 1 Like on 1 Post
Default

Hi Kathi! We'd love to see what you come up with! Have fun! :p
__________________
Bridget
My blog:Bridgets Paper Blessings
bfinlay is offline  
Tweet this Post! Share on Facebook Reddit!! Pin on Pinterest! Share on Google+!
Likes
Old 08-13-2013, 10:04 AM   #38  
Proud Fan Club Member
 
FayeMakesCards's Avatar
 
Join Date: Feb 2005
Posts: 49,140
Received 1,896 Likes on 1,279 Posts
Default

This is a technique I see in the gallery and wonder how it is completed...now I know...thanks for the pictures...some of us are visual learners!

In order to attempt it I need colors other than black and brown! Have a few very old SU colors I can try...


And seriously...I thought that sponge/handle tool was only used with Tim Holtz distress inks! I have lots to learn...:rolleyes:
__________________
On a positive note, I'm too old to have a mid-life crisis! ~~anonymous

FayeMakesCards is offline  
Tweet this Post! Share on Facebook Reddit!! Pin on Pinterest! Share on Google+!
Likes


Thread Tools Search this Thread
Search this Thread:

Advanced Search

Posting Rules
You may not post new threads
You may not post replies
You may not post attachments
You may edit your posts

BB code is On
Smilies are On
[IMG] code is On
HTML code is On
Trackbacks are Off
Pingbacks are Off
Refbacks are Off