I created this tutorial and posted it on my
blog.
 Card Base
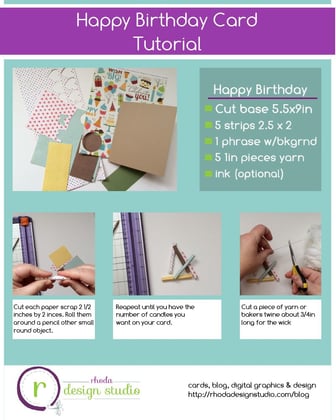
First you will need to pick your paper colors. I sometimes cut into brand new papers, but most of the time I just grab some scraps from the bin that go together well.
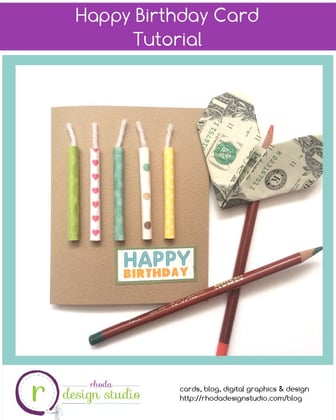
Pick your base color. If you have pre-cut and folded cards, that�s great. You can also make your own using cardstock. Cut a piece that is 9 inches tall by 5 1/2 inches wide. Fold in half at the 4 1/2 inch mark.
Candles
Cut scrap pieces to make a 2.5in by 2in rectangle. These will be your candles. I have five on my card, you can cut as many as you want to add.
Roll these pieces of paper lengthwise (so the candle is 2.5 inches tall) around a pencil or paintbrush. Once you have them at the diameter you want, glue the edge.
Cut a 3/4 inch section of yarn to make a wick for each candle.
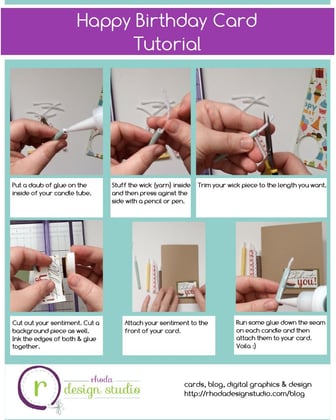
Add a daub of glue to the end of each candle piece and then insert the wick. Use a pencil or something long and skinny to press the wick down into the candle and along the side to make sure it sticks in the glue.
Attach your candles to your card.
Sentiment
If you have stickers or a rub-on that you want to use, attach that to a piece of light colored paper. A piece about 2.25 inches long by 1.25 inches tall works best.
Cut a border color piece that measures 2.5 inches by 1.5 inches. Glue your sentiment to the background.
Add your sentiment to your card.
This is a simple yet fun card to make. The candles make it unique and 3 dimensional which is something different.
Hope you enjoy it. This is just one card out of 5 that I created a video tutorial of. I'm hoping to create more. Let me know if there is something specific you would like to see


