Splitcoaststampers.com - the world's #1 papercrafting community
You're currently viewing Splitcoaststampers as a GUEST. We pride ourselves on being great hosts, but guests have limited access to some of our incredible artwork, our lively forums and other super cool features of the site! You can join our incredible papercrafting community at NO COST. So what are you waiting for?
I have a massive amount of 12x12 paper that needs to get used up quickly. My daughter is starting a long term service project to make cards for low income nursing home residents and will be hosting card making parties with other students to make and write out the cards.
I need ideas on how to precut this paper so the teens can use it easily. I seem to rememmber ages ago there was some kind of diagram on how to cut the 12x12 paper to be used on cards.
Also, ideas on how to organize it so the girls can easily find what they want to use.
Lastly, any super simple card layouts would be great. I won't be teaching them any stamping, but will put out some ideas for their inspiration. They don�t really know what they are doing and the last time we put stuff out they were overwhelmed and some of the cards had to be thrown away because, well, shall we say they were crazy busy (basically, they don�t know when to stop.) Since they�re teens they don�t want me hovering, things will need to be fairly simple and self explanatory, though I will available in the next room to assist as needed.
I am going to let them use up my stash of papers, ribbons, brads/eyelets, and stickers. If anyone has done something like this before, I�d love to hear what you did to make it go smoothly.
Links to images for the cutting, storage, and card ideas are also helpful & greatly appreciated.
Also, if you go to the Forums page here, scroll down past General Stamping Talk ( where this thread is) and find Splitcoast Challenges.
Under that you will see a bunch of “sub-forums”. Click on Card Sketches and you will find a bunch of posts, each with their own sketch. You can check them out and find a few you think the teens can handle.
Organizing can be as simple as a bunch of baskets from the Dollar Store.
After you cut the paper down you can sort it by color...whatever the “major” color is, or by florals, stripes, geometric. Or very simply by masculine and feminine. Although if you are like most of us 98% of your stash is probably “feminine”.
The "Best things in life are Pink" blog at The best things in life are Pink. shows many examples of simple card designs that use patterned paper efficiently. Maybe her videos would be useful too.
Try searching for one sheet wonders or triple time stamping techniques. Many might be for 8.5x11 but there are some for 12x12 too. Here are some links to get you started:
One sheet wonders, right! I could not remember that name. Thanks everyone!
I�m thinking it might be easier to make up some kits or something like that, putting the coordinating papers in a basket. Some of the kids seem to get overwhelmed when there are too many options.
Try searching for one sheet wonders or triple time stamping techniques. Many might be for 8.5x11 but there are some for 12x12 too. Here are some links to get you started:
I went to your last link, clicked on one template that I liked; what I got was a porn site. I know it's not your fault because some of the links are legit; just wanted to make everyone aware, and ask the mods to delete that link.
__________________ Linda E
Caution: You are entering an artistic zone. This is not clutter - this is creating. These are not pajamas - it's my work uniform.
Last edited by TexasGrammy; 06-30-2018 at 07:19 AM..
Reason: removed spam link
I went to your last link, clicked on one template that I liked; what I got was a porn site. I know it's not your fault because some of the links are legit; just wanted to make everyone aware, and ask the mods to delete that link.
Thanks for letting me know. I seem to recall a similar thing happened to someone else recently. Lydia removed but explained how it could have happened. Hope I can find that thread.
I would suggest organizing the supplies into kits and having a pre-make design to follow. Then the girls could quickly assemble and you don't have to worry about the quality of the design.
well, if you do make "kits" maybe make one sample finished card so they get an idea of what can be done with that kit?
and or maybe if you have a bunch of scraps you could always stamp some generic sentiments ( happy birthday, I miss you , (what ever) and then diecut those into simple banners or circles or tags or something so that when they finish their cards they can just tie on the words they want instead of waiting for a turn to use the stamps? ( just a thought)
I like the sample card idea. They can follow that and not get over busy. Make a few of those.
Maybe they can cut your 12 x 12 down to 6 x 6 to make it easier to use? More people can get to use the same pattern
Do you have punches? If you have a large flower and a circle that go in it...or whatever...then they can do a simple single layer with DP, and then the punch with a sentiment and a ribbon or solid paper band...
org: I would say the easiest is by color vs subject with maybe the exception of Xmas.
One can have 50 subjects vs a red pile or the blue pile...Might be helpful if they want to do monochromatic.
Oh-I would also try to have a color wheel around to help them match colors. And tell them to try to stick to 3 colors.
Another great way to use a 12X12 sheet is to cut it into 9 4X4 squares then cut those on the diagonal and line up the square ends to the ends of the cards and stamp the sentiment in the gap that's created.
If you have an envelope punch board or simple template, you can use up 12x12 paper making envelopes. There’s usually enough of the paper left to be incorporated into simple designs on cards, leaving them with a matching set.
I’m remembering the David Tutera Celebrate line of card supplies Joann’s had a few years ago. The idea was based on 1-2-3 steps: Step 1) You start by picking your card base(Step 2) Add layers of paper that are pre-embossed and die-cut. (Step 3) Embellish. Tons of stickers and shapes to suit any occasion.
If you set up your table with this system, it could be like a free-form kit. (Controlled choice) Each step could be in a separate station or basket; once a step is finished they could move on to the next step. If you provide a poster with samples, that would help them grasp, what they’re aiming for (and what a tasteful card might look like). You can also control the content of each station, so you know the things go together, improving the kids’ chance at success.
Club Scrap has "idea decks" which have a set of cards with formulas for either greeting cards or scrapbooking. For the greeting cards, they have you cut card bases, and the rest of the paper makes layers for stacking on the bases. For example, I recently made 4 cards using 3 sheets of 12x12 paper. The digitial versions are only $3.95 which I think is a bargain to have all those measurements figured out for me! Diamonds Hearts
__________________ Jo AnnMy SCS gallery / my blogThe cure for everything is salt water - sweat, tears or the sea~Isak Dinesen FS 776
Perhaps set it up like a shoebox swap. Everything needed to make the card is in the box with the sample clipped onto the box or standing on the end. Writing simple step-by-step directions for each box would help. You could buy cheap zipbags to store the pieces to each card. Then they could use the same design but use different colors or embellishments. Remind them that each bag is for that one card only so that the colors coordinate. After making a card (or however many they wanted) from one box, they could put it away and choose another. This would be easy to replenish without having to re-think every time you wanted to have the girls over and would give them an opportunity to try different styles. Even experienced stampers love doing this for new samples or adding to their stash of ready-to-go cards. You will need one more box than the number of girls you have attending so that they will always have one to work on. Plastic shoe boxes work great and are easy to store for the next session.
It would also be easier to use one color for the base and envelope, as well as the sentiment piece. I think the poster that mentioned having sentiments stamped already was right on target. Just add a few punches with samples as mentioned and let them have "controlled freedom" in design.
Also, don't forget to remind them that "less is more." when I have novice stampers and let them freewheel it they always seem to go overboard with images and elements and end up with a mess.
We had the first card making party last week, with 3 girls attending, plus my daughter. The 4 of them were just about silent the entire 2 hours, it was so odd. Some of the cards were a mess as they didn�t want me to tell them what to do. During the week my daughter & I had a �card hospital� so we could fix all the messed up cards. For some reason, they think it is ok to use regular weight paper as the card base, even though I told them to use cardstock, plus they think if they use patterned paper for the outside of the card, they don�t have to add any decoration or sentiment, but they go crazy with stickers on the inside. So odd. I�m glad I decided not to let them use any stamps/ink, just stickers. (We have a giant box of stickers.) Butterflies were the popular choice of stickers.
I accidentally left a few of my wedding thank you cards (with our first names printed on the front) in the box of card bases and one of the girls used that to make a card. She didn�t put anything on the front, just left our names, instead she decorated the inside. My daughter and I just kept shaking our heads in wonder at the thought process of various people. It's kind of facinating when you think about how different people do things.
What we are most happy about is that the girls all wrote nice things inside the cards.
This week we will have the same number, but different girls, and I am going to do the shoebox swap style with samples. Hopefully we�ll have better luck and won�t have to do as much repair.
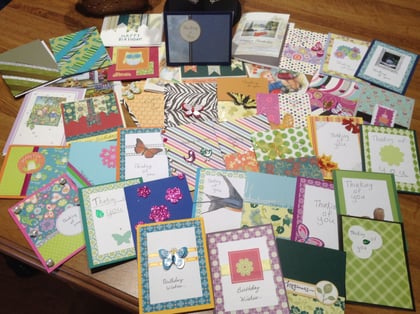
Here are the cards made by my daughter and 3 friends today. I think they did a pretty good job. I forgot to take a photo last week, but they only made a few cards then, because we didn�t really precut much. This week we had the card samples and precut papers for each, shoebox swap style, and it went very well. One girl who had never made cards before said she really liked how easy it was.
Teen girls LOVE rhinestone and sparkly stickers. Some of the cards have over a dozen rhinestones on them, even INSIDE some of the cards. I�m going to have to limit them to just 4 per card, as we are quickly running out of those. It�s cute, though.
Teen girls LOVE rhinestone and sparkly stickers. Some of the cards have over a dozen rhinestones on them, even INSIDE some of the cards. I�m going to have to limit them to just 4 per card, as we are quickly running out of those. It�s cute, though.
Thanks for your help!
If you don't mind some slightly used packages, I'd be happy to send you some more rhinestones for the girls to use. I have plenty, and I'd rather they get used than just hoarded in my box. LOL. Just send a PM with an address I can send them to.