Splitcoaststampers.com - the world's #1 papercrafting community
You're currently viewing Splitcoaststampers as a GUEST. We pride ourselves on being great hosts, but guests have limited access to some of our incredible artwork, our lively forums and other super cool features of the site! You can join our incredible papercrafting community at NO COST. So what are you waiting for?
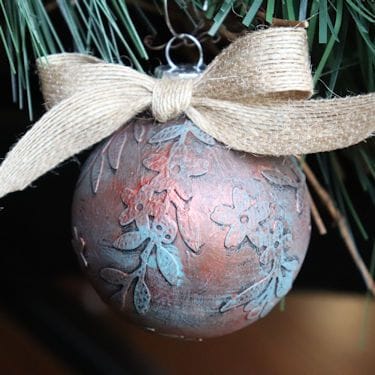
Scale up a simple ball ornament with a die cut relief pattern (this technique can be used on other surfaces too!).
FIND THE INSTRUCTIONS HERE
VIEW OTHER TUTORIAL ENTRIES HERE
Find more holiday tutorials HERE
UPLOADING INSTRUCTIONS:
Add your tutorial sample to the Die Cut Relief gallery.
On the upload screen select Technique Spotlight> Holiday Blitz Gallery > Antiqued Ornament
Thank you for playing along with us! Happy Holidays!
I am more than thrilled with this tutorial and the results. Attaching a pic of the "before" process. And here's the finished project 2019BLITZ5 Vintage Lace Orna...
I'd love to try this in deep navy with gold for the relief - have to check my box of acrylics and maybe go shopping. I really enjoyed trying it out. Thanks, Dina.
Anyone else struggling with the process? I couldn't find black gesso, so I added black acrylic paint to get a darkish grey. That was a messy project and cleanup is awful because I don't like to put gesso down my drains. I tried various ways to support the ball while putting the die cuts on and was not happy. I left it all to dry. This morning I looked at what you all have done and am inspired to keep at it, so today I'll brush on the Colours. If I can get down to it, I think these would make lovely gifts.
Vannie, I just mixed black Brusho powder with the tail end of a tub of gesso so mine was grey too. But very little of the base coat shows at the end, I don't think that matters.
I had a large spool of thread on my desk, and the ornament cap just sat down into the centre of that while everything dried - though I think if I'd got as far as adding the silver cord (which I want to switch out for my own gold to match the ribbon, but silver is what came with the baubles) I could have hung it from something. For adding the die-cuts, I just held it carefully in my hand!
Oh Dina--the things you ask me to do. This actually turned out to be fun and easier than I thought so maybe I did it wrong. Dry Brushing is definately something I had never experienced and so mine final coat is a bit heavier that I think it needed to be. But my ornament is ready for any black tie affair of the season. Elegant Ornament with bow tie..... by c-mouse - at Splitcoaststampers
__________________ c-mouse-If you can't say nuttin nice--don't say nuttin at all. Thumper. Pansy
Card Sketch Challenge 1-227 done only 396+ to go to be caught up!!!!!
Ok, it was worth it to stick to it and learn this technique. In fact I am now experimenting with the other five ornaments in the box... And I posted separately about my mini variation.
Please forgive: I couldn't find an ornament that would work! I like the finish on the small sketch book, and I figured it'd get more use that an ornament, anyway. Here 'tis: sketch book
__________________ Have fun! with Love, Brenda
Fan Club member
Hi everyone! While I was creating my ornament for this challenge, I chose to use some rich Art Anthology paints to produce a rusty patina effect. I sent a question to Art Anthology accompanied by a picture of what I was making. They liked it so much, they will be posting it on their blog onSaturday! Their paints are so wonderful for creating special effects and their products are really special. Hope you go check it out! http://artanthologyinc.com/blog
__________________ Kelly - Sunstamper - Paper Artist