Splitcoaststampers.com - the world's #1 papercrafting community
You're currently viewing Splitcoaststampers as a GUEST. We pride ourselves on being great hosts, but guests have limited access to some of our incredible artwork, our lively forums and other super cool features of the site! You can join our incredible papercrafting community at NO COST. So what are you waiting for?
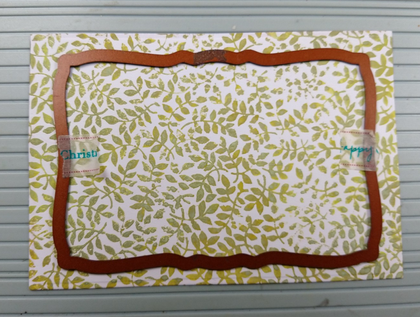
Happy Monday to you all. It's my turn to host this week, and I have a simple self-framing challenge with two options for you - you can either pop up the centre OR the frame. My samples show both ways.
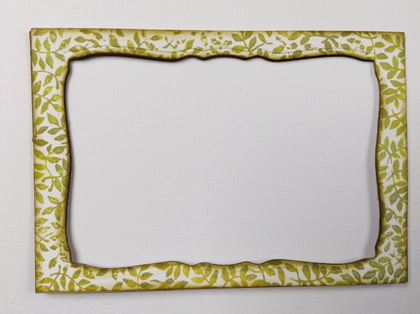
Either way, you start with a stamped panel and die-cut a frame, keeping both pieces. I've used rectangular dies, but you could equally well use circles or ovals or....
Die-cut a frame (or layer to match the centre piece) from thin chipboard or foam and stick it to the stamped piece.
Reassemble the panel on your card base. Essentially it's the Eclipse method on a large scale.
I like to sponge the edges for a little extra definition.
Don't do what I did, and after repeatedly telling myself to make sure the inside of the leafy panel was matching the frame, I went ahead and did it the wrong way round . At least it doesn't really show - it would have mattered far more with the roses card!
Have fun and then please come and share your creations here.
:arrow: Remember to use the keyword TLC713 when you are uploading. It's helpful (to the hostesses for sure!) if you come back and leave a link on this thread .
If you're not sure how to link your card on the thread here, here's how:
1. Open 2 windows or tabs: one window for your card and one for this thread.
2. In this thread, click on reply and type anything you want to show before the link.
3. Go to your card window. Highlight the address for your card. (It says www. splitcoaststampers.com/gallery/showphoto..... and so on)
4. Click EDIT. Click COPY
5. Go back to this thread. Click PASTE.
Thank you Sabrina for this challenge so I could use the last piece of shaving cream...I'll need to make some more!!
I made 2 one where the frame is lifted and the other where the center is lifted. TLC713 Have Fun by snietje - at Splitcoaststampers
__________________ Jan 'Being confident of this very thing, that he which hath begun a good work in you will perform it until the day of Jesus Christ'. Philippians 1:6
Mine did not have as much depth as I wanted so, I ended up pulling it off and adding some foam dots. ( probably should have inked the edges but, forgot)
Sabrina, this is a GREAT technique. I don't know why i never ever thought of doing this but it looks fabulous. Thank you so much for bringing this forward to us. Love this. Petal Garden Sympathy
__________________ a little bit of this and that there is no thrill quite like doing something you didn't know you could.
I just need to embellish mine yet, although I'm wondering if I did it backward? I popped up the outside frame and left the die cut on the bottom layer.
I just need to embellish mine yet, although I'm wondering if I did it backward? I popped up the outside frame and left the die cut on the bottom layer.
Kathy, I gave both options so that people could do whichever they preferred/looked better with their chosen design. So my samples showed both ways. I reckon the roses would have looked good either way but the owl one definitely needed the outer frame popped up. I'll keep a look out for yours later!
I made a double frame, using a shaped die, though they are two-tone in color. I stamped them with a smaller flower around the edges, distressed them with charcoal ink, and layered them one on top the other. Here is my card: Thinking You Much Better Real Soon!
__________________ Carlene aka Chatterbox-1--My BLOG; My Pinterest;My SCS Gallery; FAVORITES Team Member; 2022 Christmas Card Challenge 75/105. My SCS Goal: Challenge Catch-up; Sketch Challenge Sample Card Team (August 2022--January 2023).