Tri-Shutter Card

by Bonnie Szwalkiewicz

Special occasions call for special cards. This one will fit the bill!

Supplies

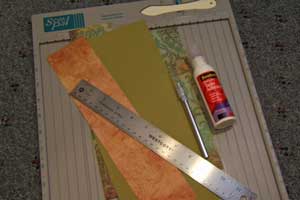
  • One 5 1/2" x 12" piece of Cardstock
  • Scor-Pal™ or other scoring tool
  • Paper Cutter
  • Patterned Paper
  • Bone Folder
  • Craft Knife
  • Ruler
  • Adhesive

Step-by-Step

  1. Step 1

    Place 5 ½” x 12" piece of cardstock horizontally in your Scor-Pal.

    Score at 2”, 4”, 8” and 10”.
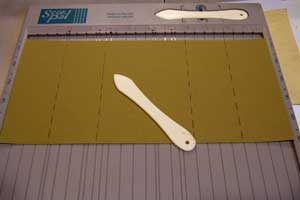
  2. Step 2

    Turn cardstock a ¼ turn.

    Along the long edge, measure in 1 ½” .

    Make a slit with a craft knife between the score marks at 2” and 10”. Repeat on the other long side.
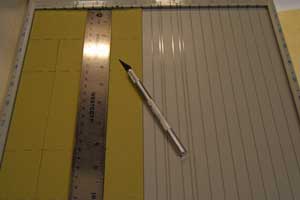
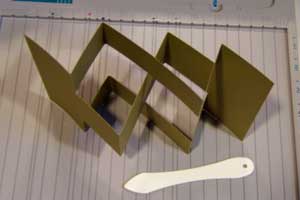
  3. Step 3

    Fold card as pictured.

  4. Step 4

    Using card base as a template, trace the section with the T-shaped fold onto patterned paper.

    Cut two of this shape.
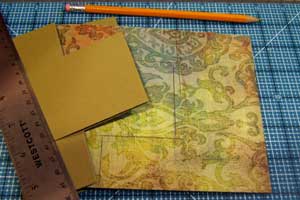
  5. Step 5

    Trim 1/16” from all sides of patterned paper.

  6. Step 6

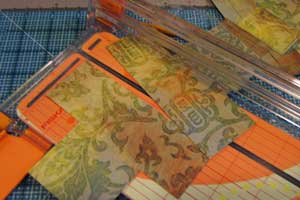
    Cut 4 pieces of patterned paper 1-3/8" x 1-7/8" .

    Cut 2 pieces of patterned paper 1 3/8” x 3 7/8”.

    Cut 1 piece of patterned paper 2 3/8” x 3 7/8”.

    Dry fit all of the pieces, then adhere to card base.
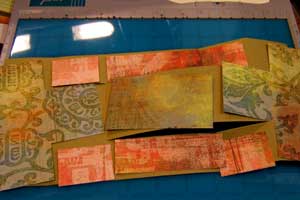
  7. Step 7

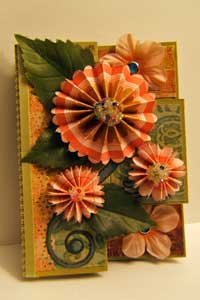
    Now that the basic Tri-Shutter card is complete, go forth! Embellish & decorate.

    If you are interested on how the Fan Fold Flowers were created, check this tutorial.

  8. View of the card closed.

Video!

Variations

    To use 8 1/2" x 11" cardstock:
    Trim cardstock to 5" x 10 1/2".
    Score at 1 3/4", 3 1/2", 7" and 8 3/4". Cut your lines horizontally at 1 1/2" and 3 1/2" from the first to the last score line.You will end up with a card that measures 3 1/2″ × 5″.

Your Turn

You've seen the tutorial, now you try it! We've got a section of the gallery set aside for Tri-Shutter Card. Try this technique, then upload your artwork to the gallery. Show us your creations!

***Please note - Internet Explorer/Edge is not a supported browser, and will not allow you to see the videos. Please use Chrome, Firefox or Safari to view our tutorial videos.

Questions and Comments

We'd love to get your feedback or questions. Leave your comment below.

I love this design it works so well and the tutorial was so clear and easy to follow. Thank you.
Ann  |  Wed Aug 12, 2009 at 10:23 PM
Oh wow! Great concept, thanks so much for sharing!
Rosemarie  |  Sat Aug 22, 2009 at 3:30 AM
I like the tri-shutter card enough that I knew I'd make it several times. However, cutting out the little pieces several times over was going to be tedious, so I created a cutting file. This one calls for 8.5 x 12 paper, but you can move pieces to a second sheet if you are using 8.5 x 11. Hope it helps you out. http://www.ronandkay.com/cards/TriShutter.GSD
(I hope the link works. Haven't tried loading a gsd to my personal web site before ...)
Kay  |  Sat Aug 22, 2009 at 3:30 PM
Correction to previously posted URL. The directory was case sensitive, so you'll need the capital C on "Cards/"

http://www.ronandkay.com/Cards/TriShutter.GSD
Kay  |  Sat Aug 22, 2009 at 3:32 PM
Oh, that was great!!! I'm going to have to try to do one of these cards.. Thank you
Nellie Rose  |  Sat Aug 22, 2009 at 5:46 PM
I love this tutorial! This is what I made with it!
<a >Thri-shutter card</a>
Renata  |  Mon Aug 24, 2009 at 9:06 AM
Thank you for this tutorial. I couldn't believe how easy this card was to make (with your help!) It looked so complicated! I will use this pattern a lot.
Lori Pena  |  Sat Aug 29, 2009 at 5:36 PM
Holy cow! What an awesome tutorial! Thank you so much for sharing! I learned so many tips along with learning to make an awesome new card style. Thank you again!
Amy  |  Fri Sep 4, 2009 at 7:28 PM
What a wonderful tutorial..and you make it look so easy and professional. Thank you so much..I will be trying this one for sure.
Deanna  |  Mon Sep 7, 2009 at 11:09 AM
I would love to know where that beautiful paper is from. I want some of it! Thanks.
Rhonda Proseus  |  Mon Sep 7, 2009 at 4:17 PM
An amazing tutorial !!! I learn so much watching the videos. It makes things so much easier to understand. But again, I would love some of the paper used in the video. Thanks so much.
Rhonda Proseus  |  Mon Sep 7, 2009 at 4:20 PM
Rhonda,
I am glad you like the videos! The Designer paper used in the video is from Stampin' Up! It is called "Thorougly Modern Designer Paper".
Hugs and smiles
beate  |  Mon Sep 7, 2009 at 5:21 PM
Thank you so much for sharing. You've done a fine job at explaining. I can hardly wait to try it out for myself!
Gretel  |  Wed Sep 9, 2009 at 2:53 AM
that's very beautiful thank's for the tutorial
coraline  |  Sun Sep 13, 2009 at 7:31 AM
Oh my!! This card is so so amazing. The tutorial is great and the video is even better. Thank you so much for inspiring me today smile
Thai Zebra  |  Fri Sep 18, 2009 at 11:19 PM
Thankyou for sharing.
Linda  |  Mon Sep 21, 2009 at 5:07 AM
You made it easier for me to understand. I really love this card
JoAnn Butler  |  Sun Sep 27, 2009 at 4:32 PM
Bonnie, your tutorial made this so easy. What a lovely card. Made one yesterday for my sister-in-law's birthday. Thanks so much. Now I just have to find out how to post it.
Angelus  |  Sat Oct 17, 2009 at 8:53 AM
Bonnie,

What is the brand name of your black/silver paper trimmer? Where can I get one?

Thanks, Chris
Chris  |  Sat Oct 17, 2009 at 5:36 PM
Chris,
Are you talking about the trimmer in the video? That's a Fiskars trimmer. You can buy it through a Stampin' Up! demonstrator and get the silver/black version or you can buy it at stores in purple/silver.
Hugs and smiles
beate  |  Sat Oct 17, 2009 at 5:42 PM

Page 4 of 7 pages « First  <  2 3 4 5 6 >  Last »

You need to be logged in to comment

GET OUR NEWSLETTER


Splitcoaststampers's privacy policy