Pull-Out Scrapbook

by Corinne Somerville

Make this cute little book to show off your photos.

Supplies

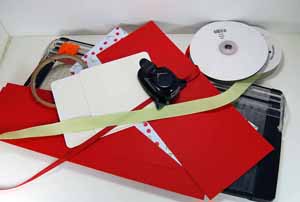
  • Two 4” x 4” chipboard coasters

  • One 4” x 10” piece of card stock for the front book cover

  • One 4” x 10” piece of coordinating patterned paper for the inside of the book cover

  • Two 3” x 12” pieces of cardstock

  • Three pieces of ribbon – 18” each piece

  • Extra sticky adhesive

  • Paper cutter

  • Scoring tool

  • Grid paper (optional but helpful)

  • 3/16” corner rounder

Step-by-Step

  1. Step 1

    Use the 3/16” corner rounder to round all four corners of two pieces of 4” x 10” pieces of paper.

    Run a strip of tape lengthwise through the center of the plain 4” x 10” piece of card stock and adhere one of the lengths of ribbon to the tape.
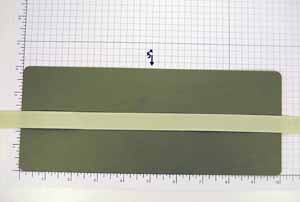
  2. Step 2

    Adhere two chipboard coasters onto the outer edges of the prepared piece from Step 1.
    Apply adhesive between the two coasters so that the patterned paper will be adhered along the spine of the book.
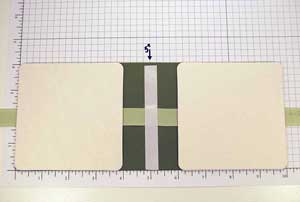
  3. Step 3

    To create the inside cover of the book, adhere second piece of 4” x 10” piece of patterned paper on top of the coasters.

  4. Step 4

    Score both pieces of 3” x 12” card stock at 3”, 6” & 9”.

    Adhere the two remaining pieces of ribbon in center of the farthest right hand panel of the 3” x 12” card stock.
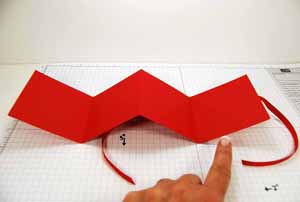
  5. Step 5

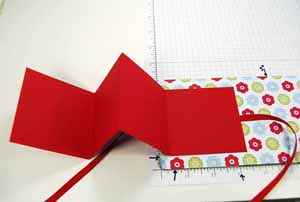
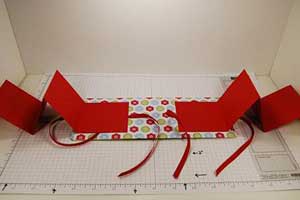
    Adhere one of the 3” x 12” pieces of card stock to each side of the inside cover to create the “pull out” sleeves of the project.

  6. Step 6

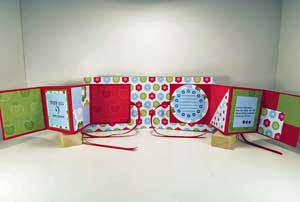
    When both pull out sleeves are taped down, it will look like this.

  7. Step 7

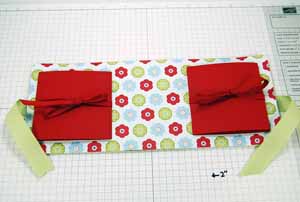
    This is what the inside of the book will look like when the ribbons have been tied.
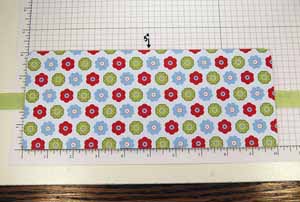
  8. Step 8

    Decorate the inside pages.

  9. Step 9

    Decorate the front of your scrapbook.

Your Turn

You've seen the tutorial, now you try it! We've got a section of the gallery set aside for Pull-Out Scrapbook. Try this technique, then upload your artwork to the gallery. Show us your creations!

***Please note - Internet Explorer/Edge is not a supported browser, and will not allow you to see the videos. Please use Chrome, Firefox or Safari to view our tutorial videos.

Questions and Comments

We'd love to get your feedback or questions. Leave your comment below.

Corinne is a very talented Stampin' Up Demonstrator. She is alwasy coming up with great cards -D projects.
I love this pull out scrapbook.
Way to go Corinne!
Dale  |  Wed Jun 18, 2008 at 9:14 AM
I love this tutorial and for sure going to make a scrapbook like this! Thanks fur the inspiration!!
Hetty  |  Wed Jun 18, 2008 at 9:17 AM
This is Awesome! Will for sure have to try this! LOVE the DSP you used too! LOVE the whole thing! TFS!
Yvonne  |  Wed Jun 18, 2008 at 9:20 AM
Awesome tutorial, Roxy! Fabulous project!
Nancy Riley  |  Wed Jun 18, 2008 at 9:32 AM
This is soooo cute, where can you get the chip board coasters?
Lisa  |  Wed Jun 18, 2008 at 9:38 AM
Hey there Corinne! Great job - been wondering how you make these great scrapbooks and look forward to doing one soon. Noticed you manage to get your beautifully manicured finger in there too! smile You rock!
Abby Lodge  |  Wed Jun 18, 2008 at 9:41 AM
A very creative album. Thanks for sharing.
Carol Markley  |  Wed Jun 18, 2008 at 9:44 AM
Hi Lisa....here is where I got my coasters:
http://www.canadacoaster.com/scrapbooking.php
I'm sure if you did an internet search you'll find lots of business that might ship smaller quantities of these too...you can always spoof a few from your favorite tavern as they're exactly the same size/shape as the coasters they put under your drinks smile

Hope that helps smile
Corinne (aka Roxy)  |  Wed Jun 18, 2008 at 9:50 AM
This is perfect for all my sons graduation pictures, great gift for grandparents!! TY
RUBIWHO  |  Wed Jun 18, 2008 at 9:52 AM
This is the perfect project for me to make for my little sister in the DSS group.
Diane  |  Wed Jun 18, 2008 at 10:01 AM
A wonderful tutorial Corrine, I love this project, thanks so much for sharing!
Jerri Kay  |  Wed Jun 18, 2008 at 10:24 AM
I have found coasters for sale on e-bay too.
mary  |  Wed Jun 18, 2008 at 10:33 AM
Dear Corrine,
What a lovely, simpe project. Where can I get the chipboard coasters?
Poli
Poli Rizco  |  Wed Jun 18, 2008 at 10:50 AM
great tutorial!! you know i have been waiting for this!! smile i had no idea it was coasters!!! can't wait to make one tonight!
susiestampalot  |  Wed Jun 18, 2008 at 10:56 AM
I'm assuming that the book is scored in the middle of the coasters and then folded to create the front. Did I miss something, or am I supposed to read between the lines?

Thanks!

j
Joan Bruyninckx  |  Wed Jun 18, 2008 at 11:23 AM
Thanks for sharing this adorable project--you rock! I can't wait to try it out! For those of you who need coasters there are many different coaster quantites available on eBay (search for "chipboard coasters").
Cecilia  |  Wed Jun 18, 2008 at 11:40 AM
I just love this! I am sending it to my demo to see if we can do it at stamp camp!
Thanks for shareing :
moore.reina  |  Wed Jun 18, 2008 at 11:40 AM
I love this tutorial!!! And, I made a variation using Bazzill library envelopes (top cut down to fit and re-rounded the corners) on the inside, instead of the accordian fold CS. I wanted pockets, so my grandkids could change out what they put in their mini scrapbooks.
Elsie  |  Wed Jun 18, 2008 at 12:06 PM
Hi Joan....you don't need to score between the coasters. When you tie the ribbon together it naturally creates the curve of what would be the spine of the book...hope that helps.
Corinne (aka Roxy)  |  Wed Jun 18, 2008 at 12:19 PM
These are instructions are so easy to follow!! Great project. Thank you!
Tammy  |  Wed Jun 18, 2008 at 12:34 PM

Page 1 of 4 pages  1 2 3 >  Last »

Commenting is not available in this weblog entry.

GET OUR NEWSLETTER


Splitcoaststampers's privacy policy