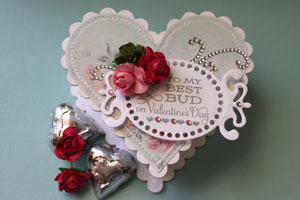
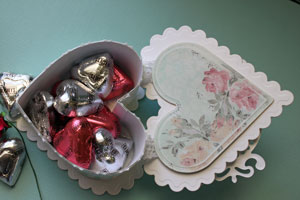
Heart Box

by Beate Johns

Create a heart shaped box out of coasters and patterned paper

Supplies
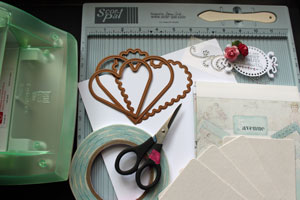
  • Classic Heart and Scalloped Heart dies
  • Thin coaster or thin cardboard
  • White cardstock
  • Patterned paper
  • Xyron or other strong adhesive
  • Scor-Tape™ or other strong adhesive
  • Scor-Pal™
  • Scissors
  • Crocheted lace, or ribbon

Step-by-Step

  1. Step 1

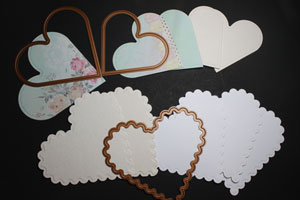
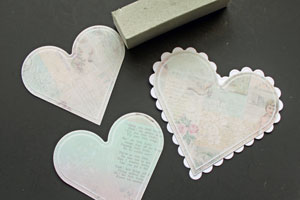
    Cut two thin coasters and three pieces of white cardstock with the largest scalloped heart die. Cut two coasters and two pieces of patterned paper with the second largest Classic heart die. Cut and emboss one piece of patterned paper with the largest classic heart die.
  2. Step 2 (Optional)

    Sand the patterned paper pieces and adhere the big patterned paper heart to one of the scalloped cardstock hearts.
  3. Step 3

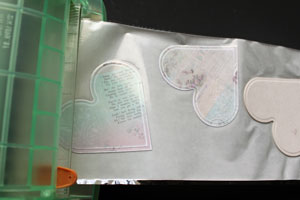
    Run all your hearts except for the scalloped coaster hearts through your Xyron machine, or use other strong adhesive.
  4. Step 4

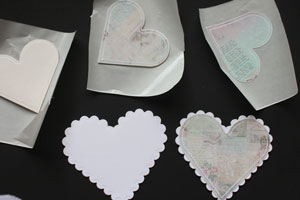
    Adhere one of the scalloped cardstock hearts to the front and back of one of the scalloped coaster hearts. This will be your box top.

    Adhere the remaining cardstock scalloped heart to the other scalloped coaster heart.
  5. Step 5

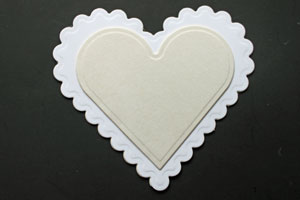
    Adhere one of the smaller coaster hearts to the center of the plain scalloped heart. This will be your box bottom.
  6. Step 6

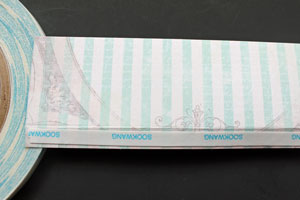
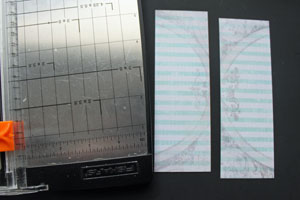
    If you are using a 6" x 6" patterned paper pad, cut two 2" wide strips.
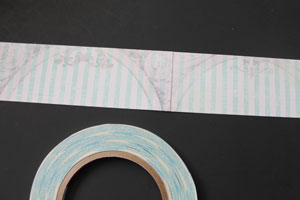
  7. Adhere the strips to one long 11 7/8" strip.
  8. Step 7

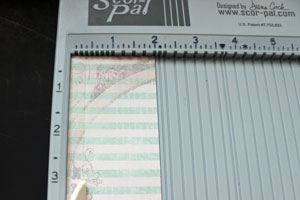
    Score the long side of the strip at 3/8".
  9. Step 8

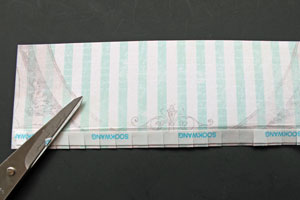
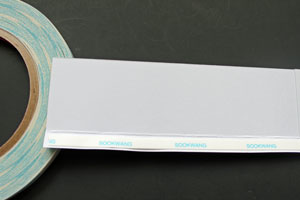
    Add adhesive to the score line on both sides.
  10. Step 9

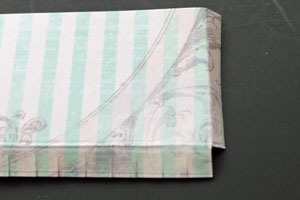
    Cut the glue tab every 1/4".

  11. Step 10

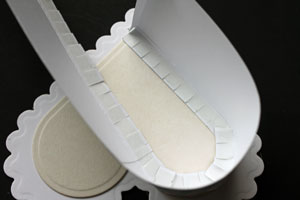
    Fold the end of the strip 1/4" over and cut the last glue tab piece off on both sides. Peel off the liner of the adhesive strips on both sides.
  12. Step 11

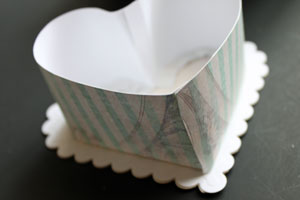
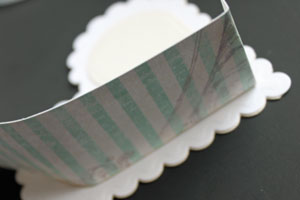
    Start at the point of the heart and tape the paper strip along the edge of the coaster heart.
  13. Step 12

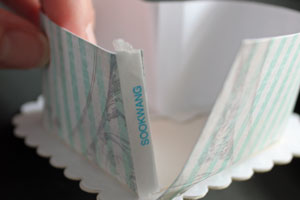
    Add adhesive to the folded over piece of cardstock and adhere heart walls together.

    Hint:
    If the paper strip is too long, cut the overhanging piece off or adhere to the wall.
  14. Step 13

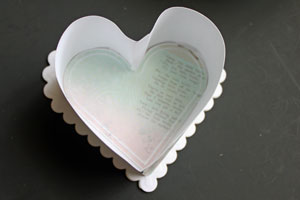
    Adhered your patterned paper heart to the inside of your box.
  15. Step 14

    Adhered two strips of crocheted lace to the back of the heart box cover.
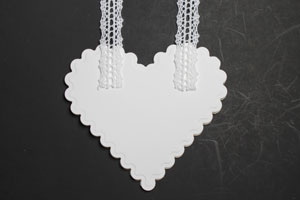
  16. Step 15

    Adhere the patterned paper covered coaster heart in the center of the back of the heart box cover. Cut the lace down and add adhesive to the end of the lace.
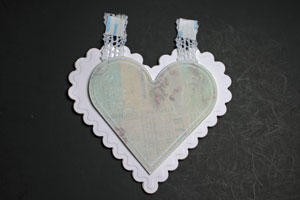
  17. Step 16

    Place the top on the box bottom and adhere the lace to the box walls.

    Hint:
    Leave a little slack so the box top will open all the way.
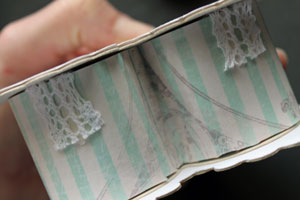
  18. Step 17

    Adhere a lace strip on top the box wall. It will hide your lace "hinges".
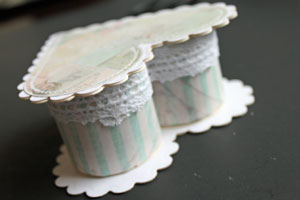
  19. Step 18

    Decorate the box top

  20. and fill your box.

Video!

Your Turn

You've seen the tutorial, now you try it! We've got a section of the gallery set aside for Heart Box. Try this technique, then upload your artwork to the gallery. Show us your creations!

***Please note - Internet Explorer/Edge is not a supported browser, and will not allow you to see the videos. Please use Chrome, Firefox or Safari to view our tutorial videos.

Questions and Comments

We'd love to get your feedback or questions. Leave your comment below.

Thats a great box! Thank you very much for the tutorial!!
Ioanna Maria  |  Sat Jan 21, 2012 at 11:22 AM
The heart box is beautiful and could be used for many occasions. Thank you for the tutorial.
Robyn Harrower  |  Wed Jan 25, 2012 at 4:14 AM
Wow, what a wonderful box! Your instructions are very clear and detailed, and your sample is just lovely--thank you!
Cyndie  |  Wed Jan 25, 2012 at 6:13 AM
Beautiful box. I have these dies, will have to try to make a box.
Barbara Wilson  |  Wed Jan 25, 2012 at 6:27 AM
Beautiful box and wonderful tutorial! You have me thinking what other shaped boxes I can make with my Nestabilities!! Thanks!
Robin Schaefer  |  Wed Jan 25, 2012 at 7:11 AM
I love your heart project video and will certainly give it a try. I have these heart Spellbinder sets already and I have to say they are sets I have used many, many times....not just for Valentine projects. As always, your project instructions are very clear and easy to follow and your results are so pretty. You always select the prettiest papers and color combos....I probably fret over that aspect of all my card making and 3D projects more than any other part....it can make or break the final result and it doesn't come easy for me....but, I'm learning...LOL
Jan D.  |  Wed Jan 25, 2012 at 7:41 AM
Gorgeous! Where do you get the "coasters" you used for the sample?
Rebecca Ruediger  |  Wed Jan 25, 2012 at 7:50 AM
Rebecca,
I bought the thin coasters at Cindy Lyles store. She is an SCS member, super nice and ships orders the same day or the next. Love her!
Beate  |  Wed Jan 25, 2012 at 7:59 AM
Thanks! I'm looking at them now. Which ones? LOL! Light, medium or heavy weight?
Rebecca Ruediger  |  Wed Jan 25, 2012 at 8:03 AM
Rebecca, definitely leight weight. Medium or Heavy are too thick for the Nestabilities dies to cut through.
Beate  |  Wed Jan 25, 2012 at 8:04 AM
P.S.: The coasters are just a smidge too small for the biggest heart. You miss about 1/3 of a scallop. That's okay though because you will line them with cardstock hearts. I just added the coaster hearts for sturdiness.
Beate  |  Wed Jan 25, 2012 at 8:05 AM
LOVE this!!!!!!!!!!! GREAT JOB!!!!!! Thanks for showing us!!!!! smile
Becky Green  |  Wed Jan 25, 2012 at 8:06 AM
Love the "best buds" stamp! What is the source? Cute box design that I'm looking forward to trying. TFS!
Bonnie H  |  Wed Jan 25, 2012 at 8:07 AM
The sentiment is from Flourishes new Heart Lines stamp set. I love that it has sentiments that you can use for Valentine gifts for your friends.
Beate  |  Wed Jan 25, 2012 at 8:09 AM
Wonderful. Thank you for sharing your talent.
Linda Lapotka  |  Wed Jan 25, 2012 at 8:40 AM
Beate, I just placed an order at Cindy Lyles store. Love that site. She had things I had been looking for and couldn't find! Thanks.
Rebecca Ruediger  |  Wed Jan 25, 2012 at 9:11 AM
I don't have these dies:(... but my expression cart has these images, so I can make these BEAUTIFUL BOXES for all 13 of my grandbabies, sons, & daughter-in-laws. TFS:):):)
dianne davis  |  Wed Jan 25, 2012 at 9:43 AM
Has anyone tried to make this box with the new Stampin' Up! Framelits Hearts dies?
Donna Bagwell  |  Wed Jan 25, 2012 at 9:46 AM
What a lovely box, thank you for sharing. Gail
Gail  |  Wed Jan 25, 2012 at 10:29 AM
Thank you for your very good directions on making this lovely box. Don't have any room for the die machines so must adapt any ideas to my cards. I love the simple things but learning to add bling to my cards.

Trina Sleper
Trina Sleper  |  Wed Jan 25, 2012 at 11:31 AM

Page 1 of 2 pages  1 2 >

You need to be logged in to comment

GET OUR NEWSLETTER


Splitcoaststampers's privacy policy