Impressabilities
Brought to you by Spellbinders
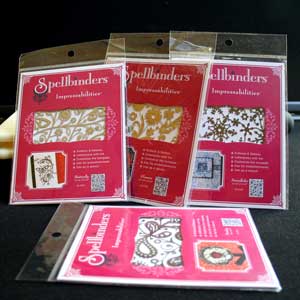
Use these thin metal templates as stencils, to emboss, deboss, or letterpress your paper and to create embellishments.
Highlights


- > Impressabilities are single layer metal templates for embossing, debossing, letterpress or stenciling.
- > Templates measure 5 3/4" x 4 1/2" to cover an A2 card front.
- > Template can be cut apart to use individual designs, then pieced back together with magnetic mat.
Product Description
Manufacturer's Description
Spellbinders Impressabilities Templates are innovative, customizable embellishment templates that offer 5-in-1 functionality. With each template you can emboss, deboss, stencil, letterpress and embellish all in one.
There are currently four Impressabilities designs that, at a suggested retail price of just $6.99, will allow the consumer to effortlessly emboss or deboss the front of an A2 (5.5” x 4.25” ) card or add embossed or debossed accents to pre-cut shapes and letters creating uniquely detailed accents.
Using micro-tip scissors, Impressabilities can also be trimmed to create custom templates for flourishes, frames, charms and more, or even used as dimensional accents for a variety of projects. And, when used with inks, Impressabilities templates can create elegant debossed letterpress effects.
Impressabilities Templates can be used with paper, vellum, smooth cardstock, foil and a variety of other media to create beautifully detailed cards, frames and embellishments for scrapbooking, gift giving and general paper craft projects.
Template Size: 5 ¾" x 4 ½" (outer edge)
4 1/8" x 5-3/8" (just inside the border)
Product Description
Impressabilities are thin metal templates that can be used to emboss, deboss and letterpress cardstock and other materials.
They can be cut apart to use only part of the template or to use as embellishments. Impressabitilies™ can be used with most die cut machines.
The templates measure 5 3/4" x 4 1/2" and will create embossed images up to 4 1/8" x 5 3/8".
Impressabilities in Action
Reviews
-
Versatile Templates
By Beate JohnsI was very excited to be able to review the new Impressabilities. I was not disappointed. The templates are very easy to use. Not only do they work great with the Wizard, but they also went through my Big Shot with no problem. With both machines the templates left wonderful deep impressions.
The main difference between the Cuttlebug Folders and the Big Shot Texture plates and the Impressabilities is that instead of plastic, these templates are made out of thin metal. Not only can you use them to make great backgrounds, you can also cut them up. You heard me! Scary, but so cool. You can cut them up and use only part of the image for your embossing, or you can use the cut up images as embellishments on your cards. You can even color those parts with your Copics™.
Another great thing is that you can use the templates as stencils. Get your air brush (or even your brayer or sponges) and create a background that way.
Impressabilites are definitely the most versatile texture plates on the market today. I LOVED playing with them and I was dazzled by their versatility. Embossing, debossing, letterpress and stenciling as well as embellishments. Five functions with one template. You can't beat that. -
Impressed with Impressabilities!
By Angel WildeI really enjoyed working with the Impressabilities plates and I quickly learned that this product offers more than one function as do most of Spellbinders products! I love the fact that the embossed design covered an entire card-sized panel!
Another cool option was being able to trim out a portion of the plate and use to emboss an accent piece. That is not something I could do with any other embossing folder or template! (If you’re thrifty, you can use the magnetic pad and put it back together to use the entire design again.) My favorite project actually used a portion of the plate as a metal embellishment on my card. The Impressabilities are inexpensive enough to justify this use!
It is very important to have your “sandwich” stacked properly or the plate can get mangled in the process. This information was not found on the packaging and was something I had to look up on the internet before I began. That was the only major drawback I found with the product. -
Make an Impression with Impressabilities
By Ashley NewellUsing Impressabilities to add texture to projects is easy with a Wizard or other embossing-capable machine like a Cuttlebug™. You can use the template as a stencil which makes it very versatile. To take it further, I really like how you can cut the lightweight metal template into parts you want to use to emboss. For example, I cut a few butterflies from one template so I can individually emboss butterflies on my projects. If you use a white-core cardstock, you can emboss, then sand your paper to make the embossing pop. This works on non-white-core cardstock as well except the paper will not turn white, it will just be lighter. You can achieve so many design options from one template. Impressabilities come in many templates, but I would like to see more simplistic designs. However, you can trim them to meet your specific style.
Inking is a great technique to use with Impressabilities. One inking technique you can use is to emboss your cardstock, then ink the cardstock lightly, making the embossed elements pop. Another inking technique is to ink the Impessabilities then emboss on the cardstock. This produces an amazing result! The last inking technique I discovered is to lay the Impressabilities on your cardstock and apply ink to achieve a stencil effect. So many options! -
Impressive Impressabilities!
By Mary BrownThis month the review team got to play with the new Impressabilities from Spellbinders. Oh what fun! At first when I heard that we were going to be reviewing these I went over to the Spellbinders site to take a look. I thought this was a 'folder' type of embossing item but it is really a very thin stainless steel plate. I decided to 'give mine a whirl' on my Big Shot.
First, the sandwich for my Big Shot. I found on my machine what worked best was the platform, tab one, acrylic plate, Impressabilities, paper, rubber pad, silicon pad. That gave a nice impression and was easy to put through the machine. If you like the DEEP embossing that you get from a folder type product, you will find you can achieve this with these if you stick with thinner paper. Personally I like the debossed (back side up) look more then the embossed look, but I feel that is just a personal preference.
I started with playing with different papers and running it through the machine just to get a feel for these. There was a suggestion for putting white pigment ink on the Impressabilities and trying that. White was nice but black...WOW!!!!...especially with the Paisley Impressabilities on red paper. (I would HIGHLY recommend though that you dry the ink on the paper before using it...no...REALLY!!!) A word of caution though, I found when using the pigment inks on the plate, you really want to make sure you are cleaning your base plate (acrylic plate), Impressabilities and rubber mat really well before going to your next project. You also want to make sure you do it right away and not wait. It did clean up easily enough. Another fun thing I found was inking the Impressabilities with VersaMark™, running it through your machine and then embossing with clear embossing powder. That really makes it POP!
One of the last things I did with this was to use some printed white core paper, use the Impressabilities and then, when finished, use a sanding block and lightly sand. This really makes the design stand out.
The Impressabilities are very intricate designs. You do want to use care when handling them, especially when cleaning off the ink afterward. They are thin but designed that way so that you can easily cut them apart and use individual pieces. If you want to do that, you will want to purchase two: one to cut apart and one to keep intact.
What I found when using these is that they give you a wonderful, more subtle texture to your paper. I liked using it with the thinner papers and the white core papers best but highly recommend you try inking Impressabilities up before putting through your machine and watch the design just pop on the paper! They are a GREAT value at $6.99 each! -
Embossing And Much More
By Rose Ann ReynoldsI was surprised at the new Impressabilities when I first opened the package. They seemed quite thin, and I didn't realize how many different options there were for them until I started playing around with different techniques.
I was immediately thrilled with the larger size, knowing that the design would completely cover my A2 card sizes, so I started with embossing in the traditional way. I ended up liking the look of the debossed side a little better, so the next time I decided to use some craft ink on the die before running in through my Wizard™. I totally LOVE this look!!
Another cool look I love uses white core designer papers, debossing, then sanding to make the image show beautifully. I also like how you may use the dies for stencil work as you choose.
The dies are so thin; after a while they started to lose their shape a bit. I ended up trimming the frames off a couple because they were getting bent and deformed anyhow. One cool advantage of the dies being thin, is that you may cut out certain areas of the die for your own custom use. I cut out a couple of butterflies from my butterfly die, inked them up, and ran them through my Wizard. Next I trimmed them out, and popped one of them on my sentiment tag for a lovely accent.
I love the different designs of the Impressabilities and I hoping for many more in the future as they are easy to work with and so versatile! -
Versatile and Fun!
By Jeni AllenI had a great time working with the Spellbinders Impressibilities™ ! The thrill of watching your plain smooth cardstock come through the Wizard%trade; with a beautiful intricate embossed image is so much fun! I was surprised at how thin and delicate the stencils were as I opened the packages. I was a bit worried that I might bend them out of shape-but that turned out to be a great thing! With such a detailed and delicate design, the Impressibilities™ can be used as a whole (yea! for covering a whole A2 cardfront) or piece by piece. I used some of my paper snips to cut out some of the designs that I wanted to emboss specifically onto my card. I love the options!
I really liked how the Impressibilities™ worked with other Spellbinders dies. I had a shape cut out with my Nestabilities, and leaving it in the metal shape die, ran it through the Wizard™ again, adding my tan embossing mat and Impressibilities™ stencil to the sandwich and out came a beautiful embossed shape!
I decided that the Impressibilities™ stencils also make great thin metal embellishments! I used my paper snips to cut a few of the perfect flourishes for a specific card! The Impressibilities™ are prefect for embellishing--they are thin and don't add a lot of bulk to a project! I used mini glue dots to adhere my flower to my card. I was really happy with the quick and simple elegance that the metal accent added to my card!
I'm sure I'll keep using the Impressibilities™, I think they are great and really enjoyed playing with them! I enjoy using products that have great possibilities and can be used in many ways and Impressibilities™ did not disappoint! I know there are several other ways to use these stencils and I'm excited to get more use out of them!
Product Gallery
See a gallery of creations made by our review team using products and materials from Spellbinders.


Questions and Comments
What do you think? Leave your comments and questions.
WILL YOU PUT ME ON YOUR E-MAIL NOTICES
i will ask you if de impressabillities that your shown can be jused in a cuttlebug
greatings from marion lammertink
Do you know if you can use Impressabilities in a Cuttlebug? I tried to dry emboss in my cuttlebug using the spellbinders tan mat with cardstock, (I used the same recipe for using spellbinders with a cuttlebug, to emboss a spellbinder die) but did not get very good results. Any information you could pass on would be greatly appreciated. Thank you.
I’d also like to know how well they work with a Big Shot.
I have found that I get a deeper embossed impression if I spritz my cardstock with a little water prior to running it through my Big Shot.
I am having trouble getting these impressabilities to emboss. I have tried cardstock and spritzing. Still nothing. I have the Big Shot. What is the correcting layering for these impressions?
Thanks,Dorothy
Dorothy,
Check the upper right edge next to the review. Click on Embossing or Letterpress with Impressabilities Tutorial. Under the tutorial you will find a sandwich for the Big Shot.
Hugs and smiles
Beate
I cannot figure out how to use my new Spellbinders Impressabilities with my Cuttle Bug. Any help would be appreciated. Thank You!
can you help with how to use spellbinders impressabilities in a cutllebug machine. thank you
Judy and mailguyer,
Check our tutorial on Embossing with Impressabilities. Under the tutorial you will find a list of Sandwich stacks for other Die Cut Machines, including the Cuttlebug.
Hugs and smiles
I used my new plate in my Cuttlebug as following and got a great result which you can see at http://www.splitcoaststampers.com/forums/cards-f107/monthly-swap-any-theme-open-come-join-fun-t488566-8.html#post18228266
#291
I used:
A plate
C plate
2-3 shims of cardstock (I started with 2 but 3 was a little harder to get through but did add a little depth, especially after the 2 were run through a few times
Cardstock
Impressabilities sheet
B plate