Embossing with Impressabilities™
by Beate Johns
Create beautiful backgrounds by running your cardstock through your die cut machine with Impressabilities templates.
Supplies
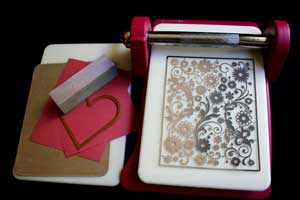
- Wizard™ or other die cutting machine
- Impressabilities™ Template (Impressabilities™ Flowers template used here.)
- Tan Embossing Mat
- Cardstock (Core'dination Cardstock used here.)
- Sanding Block (optional)
- Stamps (Gina K. Design stamps Framed Flowers used here.)
- Embellishments
Step-by-Step
-
Step 1
Create a "sandwich" by layering the Impressabilities template on top of one plate.
Add cardstock on top of the template.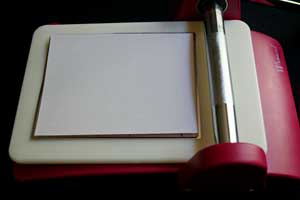
-
Step 2
Lay the tan embossing mat over the sandwich.
-
Finish the sandwich by topping the plate, template, and mat with a second plate.
Insert into the Wizard and emboss.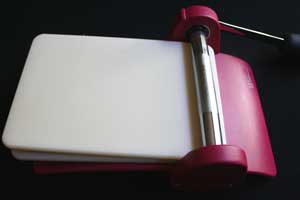
-
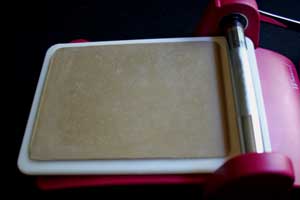
Step 3
Unstack the sandwich and remove the embossed cardstock.
Hint:
Flip cardstock over for a debossed design.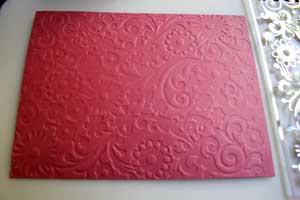
-
Step 4 (Optional)
Enhance the embossed design by sanding cardstock to reveal the paper's core.
This is especially impressive in cardstock with a different colored core.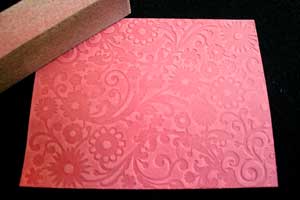
-
Step 5
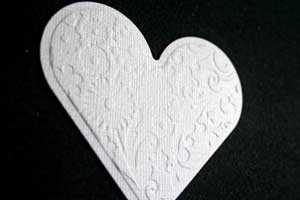
To create an embossed image with Impressabilities™ and Nestabilities™ first cut the cardstock with a Nestabilities die.
Here's a video that will show you how to Create an Embossed Cut Out.
-
Step 6
Create a sandwich by layering the Impressabilities template on a plate.
Place Nestabilities die template with the cut cardstock inside on top of the Impressabilities template, cardstock side up.
Finish your sandwich by adding the tan embossing mat and the second plate.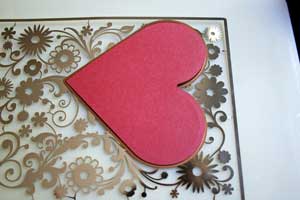
-
Step 7
Run sandwich through Wizard.
-
Step 8
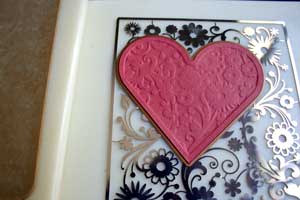
Remove shape from die.
-
Again, if you have a cardstock that has a different color core (or if you are using patterned paper) sand cardstock to highlight the embossed image even more.
Fun Fact:
The cardstock used for the 1/4 sheet in the first few steps and the cardstock for the heart are the same cardstock. One side is white, one red. It is a sheet from the White Wash collection from Core'dinations.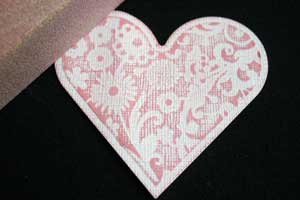
-
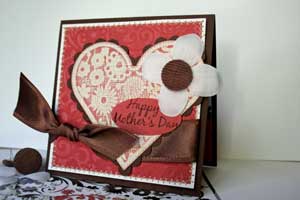
Step 9
Finish your card.
Video!
Variations
-
Embossing/Debossing only part of the image
Use metal (or other strong scissors) to clip Impressabilities template apart, then use the pieces individually.
Sandwiches for other Die Cut Machines
Impressabilities™ with Cuttlebug™
A Plate
B Plate
Tan Embossing Mat
Cardstock
Impressabilities template
Thin cardboard shim
B Plate
Impressabilities™ with Big Shot™
Multipurpose Platform Tab 1
Acrylic Plate
Impressabilities™ template
Cardstock
Silicone Rubber Mat
Impression Pad
Your Turn
You've seen the tutorial, now you try it! We've got a section of the gallery set aside for Embossing with Impressabilities™. Try this technique, then upload your artwork to the gallery. Show us your creations!
***Please note - Internet Explorer/Edge is not a supported browser, and will not allow you to see the videos. Please use Chrome, Firefox or Safari to view our tutorial videos.
 *
*
Questions and Comments
We'd love to get your feedback or questions. Leave your comment below.
Love both your cards using the impressabilities. I have just purchased two of these and was a bit lost as what to do with them.
When i have been using my tan mat, it leaves a tan color on one side of the card. Does anyone else have this problem? Would it do any harm if I wash the tan mat in luke warm soapy water? it does feel a little powdery.
Thankyou for sharing your wonderful creations!
The mat shouldn't leave a residue on your card. Yes, try washing it. That will not harm it. I had to wash mine after my letterpress tutorial sample, since it had craft ink all over it.
Thanks, Beate
Colleen H
Love the layers on this one and the richness of colour on your gorgeous blue one!! Thank you for all the creativity you share with us and the inspiration to aspire to!
Thank you for the "sandwhich specifics"
check the left hand side on top of the tutorial. There is a link there to our Product Focus on Impressabilities. Go there. On the left hand side there is a link directly to the Spellbinders site where you can buy these wonderful templates.
Or you go to your google search engine and type in Impressabilities into there. You will find lots of online stores that carry the templates.
Hugs and smiles
Rose Ann used Spellbinders Ribbon Tags Trio Shapeabilities die pack for that sentinment Label.
Page 1 of 2 pages 1 2 >