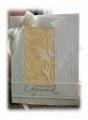
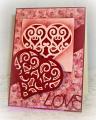
Jenn gave us a challenge to use the positive and negative space from dies. Started by cutting the rectangular shape die.....then I embossed the card front with the lace edge die. Scored lines below this embossing. Cut out the lace edge die and floral die. On the back side put the adhesive on the rectacular, and glued the two positive die cuts. Next I adhered this card front to a piece of designer paper. Added the banner with the sentiment and bow. From experience...you need to plan this card before adding any adhesive to the back. tfl
Date: Monday, February 16, 2015 GMT Views: 2584
Favorited:15
Splitcoast Dirty Dozen Alumni Favorites Team Notifier Splitcoast Challenge Hostess
Registered: October 26, 2009 Location: Oakhurst, near Yosemite Nat'l Park. Posts: 46821
Mon, Feb 16, 2015 @ 7:16 PM
Wow Linda! This is outstanding!! Love that border and how you used it!!! I have to take note of this because I'm sure I need to use your idea!!! What a lovely wedding card! Of course, I just HAVE to favorite this card!!!
------------------------------ Blessings, Robin Encourage one anotherMy Blog-InkMagination , QFTD201,Dirty Dozen Alumni.Impression Obsession DT, ECraftDesigns DT, Formerly HC DT, ODBD DT, DRS DT
Splitcoast Dirty Dozen Alumni Proud Fan Club Member
Registered: June 19, 2010 Location: SC Posts: 6005
Tue, Feb 17, 2015 @ 7:03 PM
Beautiful wedding card, Linda. I've never got the hang of how to emboss as you have done. It reminds me of letterpress. But, I never got the hang of how to punch around the page either (she laughs) - just ask Peggy (Jasonw1) and Andrea Ewen. So I leave this artistic talent to card artists such as yourself. Even the cream linen compliments the die cut floral - a lovely, lovely card!
Registered: February 9, 2010 Location: Mentone, California Posts: 7361
Fri, Feb 20, 2015 @ 11:29 PM
Such amazing design work here Linda! Love everything about this beauty...your lace and die cut in your negative cut window and your signature scoring and embossing ROCKS!