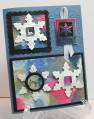
1. Take a baggie, cut it down the side and across the bottom. Open it like a book.
2. Take 2 different color ink pads in the same color family. (I used Pacific Point & temp turq)
3. On one side of the baggie, take your (Pacific Point) stamp and smoosh it against the plastic. When the plastic has ink on it stop.
4. On the other side of the baggie, take your other stamp (temp turq) and smoosh it on that side of the bag until you see color
5. close the baggie, take your bone folder and run it across the baggie in all directions anyway you want.
6. open the baggie
7. take a spray bottle filled with water and food coloring of an opposite color. Spray a few times on each side of the plastic baggie.
8. close the baggie up
9. take your bone folder and run it in all directions across the baggie. You will see water pockets on the baggie
10. Open the baggie, place 2 pieces of glossy cardstock or glossy photo paper, back to back, glossy side out, onto the baggie
11. close the baggie.
12. take your bone folder out and run it in all directions across the baggie. Make sure you do the most over where your cardstock is located
13. Open the baggie and take your paper out
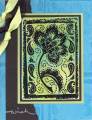
14. Wait until dry and make a wonderful, unique card with your great new image.
Date: Friday, July 18, 2008 GMT Views: 807
Favorited:6
Registered: September 12, 2007 Location: Wake Forest, NC Posts: 61357
Fri, Jul 18, 2008 @ 7:06 PM
Wow, Dara, this sure seems like a whole lot of work! Glad you have the tenancity for all these steps, and the end result is totally awesome. Beautiful card.
------------------------------
Art Neko and Prickley Pear DTs
Former DT Dolce Designs, Rubbernecker, StampItCrazy,
I Brake For Stamps
DO U KNOW?
BRAK members love to send SCSers cards on their birthdays? Come join us.
"Do not go where the path may lead; go instead where there
is no path and leave a trail." ... Ralph Waldo Emerson