I see these patchwork gems in antique stores now and they trigger very fond memories. If Mom was at home, she had on one of these aprons. I remember occasionally getting into trouble--usually for sass--and staring straight into that cherry-covered pocket because I was too ashamed to look her in the eye. However, forgiveness came quickly and I was soon happily helping her with some chore.
Happy summer and happy Fourth of July and I hope you all can recall some happy bygone times as you also celebrate in the here and now.
How to:
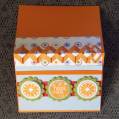
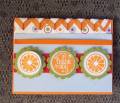
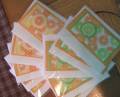
The finished card measures 4.5 inches wide at the top, 6 inches wide at the bottom. ItÂ’s 5 inches tall in the center and 4.5 inches tall on the sides.
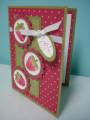
Start by cutting a piece of whisper white card stock 6 inches wide by 10 inches high. Fold the base piece so that you have a card 6 inches wide by 5 inches high. On the bottom left and right sides lightly mark up ½ inch from the bottom. Line up a dinner plate face down along the bottom edge middle and the ½-inch marks and lightly trace the curve of the plate to get the shape of the bottom edge. Hand cut along that pencil line. Line up the white-dotted red DP along this edge and trace and then cut the same curve onto it: move the DP down 1.5 inches and mark and cut the curve again. Do not attach the DP to the base yet. Mark the center (3 inches in) of the top edge. Measure 2 ¼ inches out toward top edge on each side (or 3/4 inches in from edge) and lightly pencil mark. Line up this pencil mark and the bottom corner on the paper cutter and trim. Repeat on the other side. This is what creates the angled side.
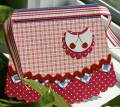
Remove the guide from the corner rounder punch and punch the scalloped edge onto the dotted red DP. Line the DP up over the base so that the scallop overhangs the white enough so that the base doesnÂ’t show. Affix. Trim the DP sides to match angled edge of base.
Shape the plaid layer bottom with the same dinner plate technique. Line it up over the red layer and affix. The blue and white patterned DP was cut into squares along the pattern and then cut diagonally through the squares to create the points. These were lined up and glued along the curve where the two DPs met. The rick-rack was then glued on.
Cut the blue DP .75 (3/4) inches by 5 inches. Glue that over the plaid DP along the top edge. Trim all the DP side edges even with the angled base piece. Cut a 15-inch piece of striped grosgrain and center it over the blue piece. Angle the ends of the ribbon. Punch a scalloped circle out of the dotted red. Ink the cherries stamp with markers and then stamp the cherries onto a separate piece of white. Punch them out with a circle punch. Punch off the top edge of the cherries piece with the circle punch. Glue it to the red scalloped piece. Then, leaving a red border, punch off the top of the red scalloped piece with the circle punch. Glue on the pocket.
Hope this helps those who wanted dimensions and instructions.
Date: Friday, June 20, 2008 GMT Views: 1939
Favorited:69
Registered: November 28, 2004 Location: the Florida wilderness Posts: 20588
Fri, Jun 20, 2008 @ 2:51 PM
This is sooooo cool!!! I love it! My mother didn't wear an apron, but my grandmother did. I don't remember her very well, but there are so many photos of her and she usually had one on if she was at home! This is a beautiful apron card...the design is wonderful!! Terrific job on this challenge!!