Registered: April 3, 2007 Location: In a state of oblivion.... Posts: 14120
Thu, Jun 05, 2008 @ 7:31 AM
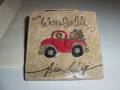
Beautiful job! Now I'm going to have to check out getting some more colours of Staz-on! This place is so hard on my wallet! Love your tiles...
------------------------------ Heather ...... My Gallery You cannot do a kindness too soon, for you never know how soon it will be too late." Ralph Waldo Emerson Founding Member of the Punchkateerz - "You don't have to be crazy to be one of us, but it sure helps."
Registered: February 23, 2007 Location: Ohio Posts: 142
Tue, Sep 16, 2008 @ 11:08 AM
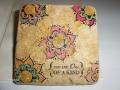
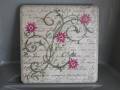
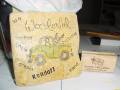
Supplies:
o 4 x 4 tumbled tiles
o Damp rag
o Felt pads
o Staz on ink pads (Black or Timber Brown)
o Stamps
o Sharpie Markers
o Embossing gun (optional)
o Rubbing alcohol
o Paper towels
Instructions:
� The best stamp choices for making tile coasters are those with fine line images.
� Use tumbled tiles from Lowes or Home Depot (shiny white tiles are too slick and difficult to stamp without smearing)
� Wipe tiles with a damp rag to remove the powdery residue. Allow them to dry before beginning the project.
� Stamp image with Stazon permanent ink. (Tap stamp firmly several times on ink pad. Place stamp gently on the tile. Apply pressure with fingers. Lift stamp straight up.)
� If you make a mistake, just rub off the image with a paper towel and rubbing alcohol before it dries.
� Allow Staz-On ink to dry overnight or heat set with an embossing gun or bake 15 minutes on 350 before coloring.
� Color images with Sharpie markers.
� Bake the tiles for15 minutes at 350 to set the image and color.
� Add felt pads (or hot glue pieces of felt) to each corner on the bottom of the tile.
� Tie sets of 4 together with a ribbon for gift giving.