Registered: July 6, 2006 Location: Keystone Heights, Florida. We have 2 Red lights now :) Posts: 604
Sun, Feb 11, 2007 @ 5:41 AM
To everyone who has e-mailed me for instructions, and of course anyone else who wants them:
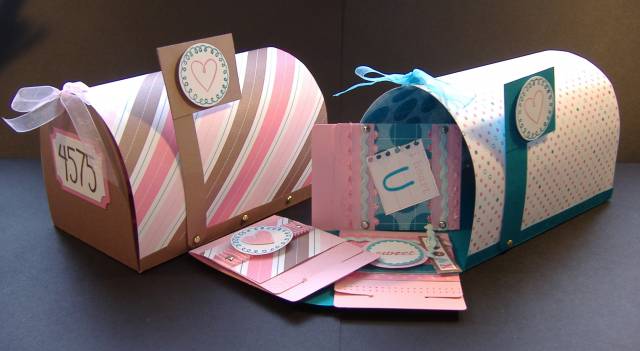
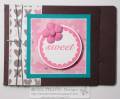
Wow, this is definitely one of those ya gotta see it things. But I will try. I made the template. It is all one piece and it is cut from 12 x 12 Card Stock, Lay it out on the diagonal. To make the template start with a 4-1/2" X 6" rectangle, centered on Paper. Draw a 1/2" line inside from each 6" side. This should form a 3-1/2" X 6" base with a 1/2 " edge on each 6" side. Score these 1/2" parts and fold up to form the sides (see picture). Use a piece of designer paper cut 9-1/4" X 6". Round Paper in your hand and hold up to the smaller part of the base. It should look like 3/4's of a tube standing on end. Might need some help. Use a pencil to trace a connecting curve same size as curved paper. This should connect to 3-1/2" edge, leaving the 1/2" edges on each side. You are going to do this on each end one is going to become the back and one the front. Score along this entire shape on the back only. Now draw another curved edge or seam 1/2" from the one you just drew. Start at the 1/2" base side. Your only going to do this on one end (the back). If you have ever sewn, it's the same concept as inserting a sleeve shoulder seam. Clip every !/2" around curve to ease seam. You need to clip the 1/2" mark where your base sides and this new seam meet. You will clip from outside curved edge to inside curved line. Scoring this line is not necessary but it helps. Fold all your new little flaps inward. Run snail on top of them. Some will overlap. Next, decide what side of designer paper is going to be outside. Run snail along one inside Long Edge. Matching this up with scored edge of back work the glue edges together until you have connected the complete curve. Works best standing on end. On the 1/2 base sides, punch for brads at 1-1/2, 3 & 4-1/2 along 6 " from either end. Run snail in between holes. Bring top down (like an alligator mouth) Kinda looks like a covered bridge, with 1/2 wings. Bring "wings" up and adhese to both sides. Reaching inside to help I used the paper piercer, to go through the brad holes and make the holes in the designer paper that is now blocking those holes. Flag Pole is 3/4" x 4", Flag is 2" x 1-1/2. It is attached with the first brad on the right. if you clip the corners of the bottom of the pole, it will move up and down. I used the 3/4' round punch in the front door and aligned it with the top made a mark and punched through the top. This is where the ribbon threads to close. Have Fun. I hope it helps. I had the pleasure of hosting our demo meeting today and these were a great hit..
Registered: September 16, 2004 Location: Clear Lake City, Houston, Texas Posts: 69
Thu, Feb 15, 2007 @ 6:55 AM
Hi there; I sent you a message regarding the template for the body. I put together one using Word and Object shapes that worked wonderfully; with you permission I will post it in my gallery so others can use it too! I made one from my MOMS Club Valentine lunch and all the moms loved it!! I have sent them the template I put together - thank you for blazing the trail! Just wanted to make sure you had no objections. Cheers!!
------------------------------ MadeByMo
"Say what you mean and be who you are because those who matter, don't mind, and those who mind, don't matter." Dr. Seuss