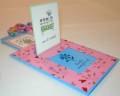
Made these at a stamp club for local demos – our make & take this month.
Folded 4 ÂĽ x 5 1/2 card
4 x 5 1/4 cardstock in another color for the “flipper”
2 1/2” x 5” cardstock for the tag
Stamped and layered image at least 2 1/2” wide - it must be wider than the flipper.
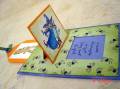
Images/greetings for the surprise opening on the front of the card
Optional - images/greetings for the tag. We did not do this at the make and take, but I thought it is more fun to have one there, too.
Paper Cutter
1/4 or 1/2 circle cutter
Ribbon or fiber
Red liner or double stick tape
Corner rounder or tag corner punch
______
Stamp a background on the a 4” x 5 1/4” piece of cardstock. This will be your flipper.
On back of this stamped piece of cardstock, draw lines with a pencil as follows
1” from each side
3/4 “ from the bottom
1 1/4” from the top - I draw a dotted line to remind me to fold, NOT cut.
Cut the RECTANGLE that is formed by these lines - sides and bottom only - do NOT cut across to the edges of the card. The cut rectangle is your flipper.
Score top line.
Apply scotch tape along the top of the score line ( the side away from the flipper section) and past the cuts to help strengthen the card
On the flipper you just made, score 5/8 from the bottom.
Then score halfway between these two scorelines.
The top and bottom are valley folds the middle is a mountain fold.
Now your need the 2 1/2 x 5 cardstock. Punch top two corners with tag corner punch or corner rounder.
On the BACK of your flipper, apply tape to the bottom 5/8” section. Attach the bottom of the tag so that it is lined up with the bottom of the flipper.
Turn the piece around and apply tape to the FRONT of the flipper between the 5/8” fold and the middle fold - keeping it away from the folds.
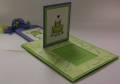
Attach the your stamped image to this section. Your flipper is done.
Apply tape to the side and bottom edges of the flipper layer, not the flipper.
Attach to the card front.
Pull the tag out. Stamp images on the front opening and tag.
Punch a half circle in the middle of the top of the card front, for a thumbhole.
Punch a small hole at the top of the tag, and add fibers or ribbon.
Date: Friday, September 15, 2006 GMT Views: 2500
Favorited:95
Accessories: Stampin' Write Markers - Real Red; Watercolor Crayons - Always Artichoke, Green Galore; non Su yarn; googlie eyes for frog in main image; White Sigmo gel pen for eyes on tag; red liner tape
Registered: August 8, 2005 Location: near the BIG pond Posts: 483
Fri, Sep 15, 2006 @ 8:55 AM
Okay...how did you do it? I have to search the resources for this one. How cute for a child's card! I LUV every part of this cutie! I have so much work to do today and now I just want to stamp for FUN! lorijane
------------------------------ Lori Jane Mittlestadt SU! demo/Sr. Supervisor [email protected]
Registered: May 1, 2006 Location: Somewhere under the raindrops. Posts: 8624
Fri, Sep 15, 2006 @ 9:47 AM
Ok, I've searched for over a 1/2 an hour now and can't find directions on SCS for the Flip Tag card! Can you please post a link to where you found your directions if you found them online? Pretty Please!!!!! Thanks!
------------------------------ * Rhonda * SCS Gallery, Crafty Blessings Blog Successful people do the things that unsuccessful people don't. ~unknown~