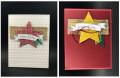
I started with the Stitched With Cheer card kit from Stampin' Up! Got it on clearance so the price was great, but I knew I wasn't going to like doing the stitching on those stars. I finished the kit version of the cards (on right in photo) and they are really cute, but I knew I was going to finish out my cards with something I liked making.
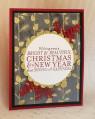
So, I copied the layout, using the leftover banners from the kit--I had 32 leftover banners already stamped and I doodled the edges of the banners. Not the fast way to do it, but I do things like that while I am talking on the phone, so it didn't take much time.
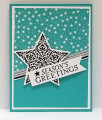
Stamping and embossing a whole sheet at a time is a quick way to get all those stars done (and a whole lot faster than stitching them!) You just have to watch where you are stamping so you leave enough room to die cut around them.
For the background/base, I looked in my retired papers file to see what needed to be used up. This was a favorite combo of mine before Riding Hood Red retired, so I loved using it.
For the burlap, I put sticky strip on it (but left the backing in place) before cutting it into the correct lengths. Great time saver.
In the kit, I hated putting the holly on and didn't love the finished look, so I went to banners and twine for embellishments instead. Much faster.
So I used up a bunch of retired supplies and made a pretty easy card.
(The metallic thread behind the star was something I put on a few of them because I had made them for another project and didn't use them. The rest of my cards didn't have that little extra touch.) Several of the cards have little variations because of supplies I was trying to use up.
Date: Sunday, December 9, 2018 GMT Views: 579
Favorited:3