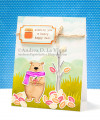
I created this fall card for Send a Smile 4 Kids. I have a few bits & pieces left from the Echo Park "The Story of Fall" ephemera pack, that I am trying to use up on cards. The greeting from "Bear Ware 2" fit perfectly on a label from that set, so I used it on this card. In fact, I designed this card around that label, and used Versafine Vintage Sepia ink to stamp the greeting.
I die cut the bear from bristol paper. The die is solid, so I tend to die cut then stamp. I lined up the stamp in the negative of the die cut, picked it up with my MISTI, laid the die cut back into the negative space, and stamped the bear with Vintage Sepia ink. Sadly, doing it this way, I have yet to stamp the bear perfectly. This time, he was offset to the left, but it was good enough for jazz, so I just went with it. I stamped the tree in Charcoal ink, and die cut it with the coordinating die. I also used Charcoal ink to stamp the scarf, and Vintage Sepia for the apple. I used Love Letter, Tangelo, & Cantaloupe dye inks to stamp a LOT of the leaf image from "Bear Ware 2." Then I die cut the leaves with the coordinating die.
I colored the bear, apple, scarf, and tree with Tombow markers, using a damp paintbrush to move the color and add shading. After the pieces had dried, I die cut the apple & scarf. I glued the scarf around the bear's neck, and then glued the apple into his hands.
For the background, I cut an A2 size piece of bristol paper. I inked most of it with Broken China Distress ink and the "Cloud" stencil. Then I decided I needed some trees in the background, so I die cut a mask from Delicate Surface Frog tape with one of the "Landscape Trio" dies. I adhered it to my panel, & inked with Bundled Sage, followed by a touch of Evergreen Bough. I moved the mask up, offsetting it from the first placement, and inked again. I repeated this one more time. Thankfully, the green inks covered the Broken China, so the clouds don't show through my tree lines!
I inked 2 scraps of mixed media paper with Crushed Olive Distress ink, and added Peeled Paint towards the bottom of each for shading. I die cut both with 2 of the "Grassy Hillside Border" dies. I adhered the taller one to the bottom of my card panel, & glued my tree in place. I then adhered the front grass, and glued down my bear. I took one leaf of each color & glued them to the tree. I arranged the rest of the leaves into piles on the ground.
I decided the label needed some added details, so I used a 1/4" hole punch to punch the corners (in the blue "mat"), to match the curved corners in the white portion. I matted it with orange cardstock so it would stand out against the sky, trimmed that to a 1/16" border, and punched the corners of that as well. I felt it needed some "grounding," so I wrapped some thin jute twine 3 times around the upper part of my panel, and taped the ends to the back. I added the label with foam tape, and tied a bow from the same twine around the wrapped twine. I added some liquid glue to the knot, so it won't come untied or slide along the twine. I mounted my card front to a white card base, and went over the bear's eyes & nose with a black glaze pen.
Date: Sunday, September 9, 2018 GMT Views: 514
Favorited:3
Accessories: My Favorite Things "Cloud" stencil; Mama Elephant "Landscape Trio" die; Essentials by Ellen "All Inside" & "Bear Ware 2" dies; Lawn Fawn "Grassy Hillside Border" dies; Tombow markers
------------------------------ Nancy Williams - Hope your day is Spirit-filled and ink-filled (in that order)!DRS Designs-DT, Punchkateerforever, Dirty Dozen Alumni
Registered: June 4, 2009 Location: Deatsville, Alabama Posts: 83667
Sun, Sep 16, 2018 @ 3:38 AM
Super cute! So many awesome details!!!
------------------------------ Nancy Williams - Hope your day is Spirit-filled and ink-filled (in that order)!DRS Designs-DT, Punchkateerforever, Dirty Dozen Alumni