I had just seen a new technique called "Pop Out Card" that I wanted to try. Since it involves a circle punched in the center of your card front, I KNEW it had to be featured in my Design Team card for this week!!!
You start by creating your card front - which was double easy since we had a great sketch to work with this week!
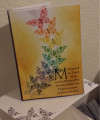
I wanted to go out on a limb and use a different color combination. I started with some lovely Recollections floral aqua print paper. It matched SU's Island Indigo perfectly. So I got out my color wheel to see which colors would form a triad with blue-green - and discovered that yellow-orange and red-violet. This was perfect since I wanted to feature a Monarch butterfly is the pop-out element.
Following the sketch this week, I cut and adhered all the layers on the card front. then selected a circle die that was just slightly smaller than the butterfly I wanted to feature. For details on how to build your pop-out see: Pop Out Card Tutorials at Splitcoaststampers
It takes a lot of repeated running the 4-layer card through the Big Shot to get the die to cut all the way through. As a matter of fact, I finally resorted to turning the card over and putting the die on the side (with the card layed flat - NOT folded!) to get the final cut. To make this easier on yourself, I recommend using paper instead of cardstock on as many layers as you can.
After the hole was die-cut, it seemed it needed just a little dash of something, so I die cut a scalloped matting and glued it around the hole.
The pop-out element is created by first stamping three images of your butterfly (heart, or any symmetric punch/die that's slightly larger than your die-cut hole). I then used my SU Elegant Butterfly punch and punched out all three. Fold each butterfly in half, then glue half of two of the butterflies to the back of the butterfly you have chosen as the "front". Fold the back butterflies flat against the front so the non-stamped side of the butterflies can have adhesive put on them. I chose Tear & Tape since it is extra strong for all the pressure that would be put on the butterfly from repeated opening of the card.
Then, close your card and slip the butterfly in through the hole, centering it so all the wing tips are outside and on top of the circle hole. Press the butterfly against the inside of the card.
Now the butterfly will hold your card closed, then when the card is opened, it will be featured as a 3D element inside your card!
This card wasn't difficult to make, but getting all those layers of cardstock to cut through with my circle die was a chore! Remember the paper advice I gave above to make it easier to die-cut. Because of this, and the careful construction of the butterfly pop-out, I am giving this card a difficulty rating of "4" out of "5". If you use paper instead of cardstock layering, the difficulty would be a "3". Have fun!
Date: Monday, February 5, 2018 GMT Views: 755
Favorited:2